
 Lessons: 13Length: 1.9 hours
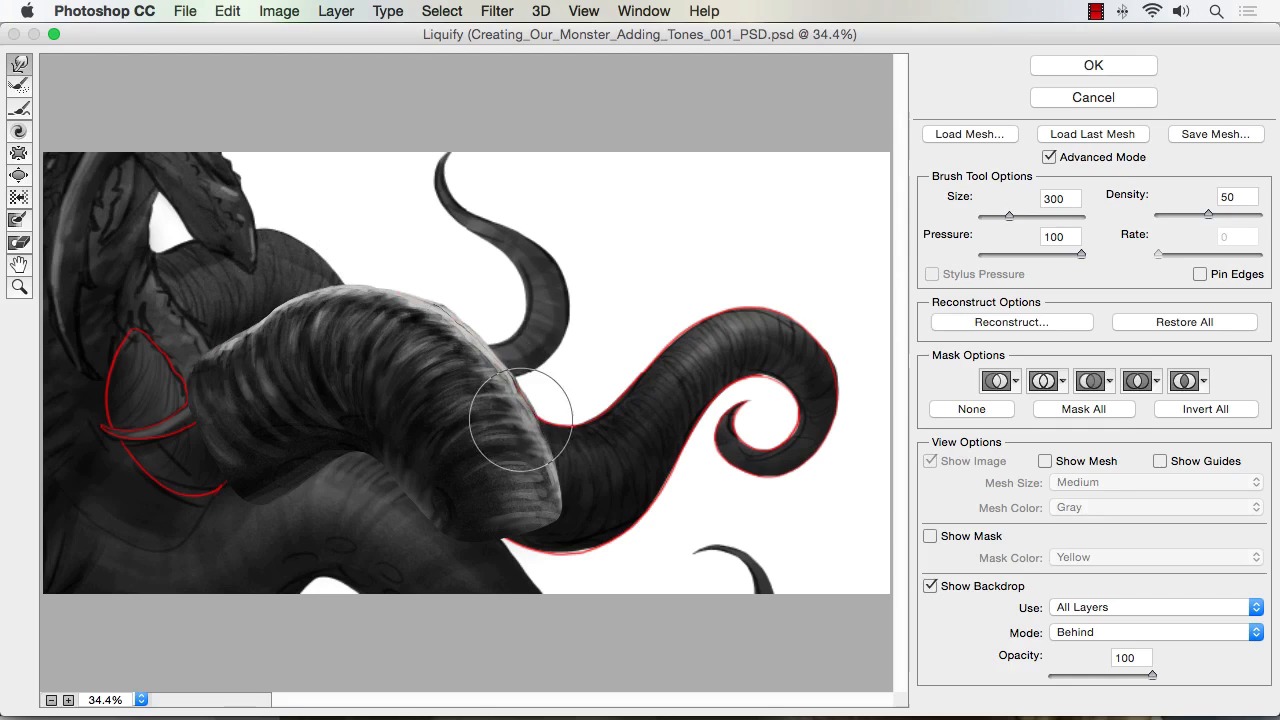
- Overview
- Transcript
3.4 Using Liquify to Quickly Modify Parts of Your Illustration
In this lesson we will be using the Liquify feature in Photoshop to quickly modify parts of our painting. We will use it to reshape parts of our illustration and also as another way to paint and create texture.
1.Introduction
1.1Introduction01:15
1.2Tools and Resources01:20
2.Understanding the Tools We Will Use to Create Our Monster
2.1Understanding Layers and Brushes18:14
2.2Working With Selections to Control Our Effects11:21
3.Designing Our Monster
3.1Studying and Sketching From Reference to Create Our Creature Design11:32
3.2Blocking in the Overall Shapes of Our Painting15:35
3.3Painting in Light and Shadow to Give Our Monster Depth and Form15:39
3.4Using Liquify to Quickly Modify Parts of Your Illustration14:45
4.Refining the Artwork
4.1Adding in Detail and Textures12:59
4.2Creating Effects With Blending Modes04:19
4.3Adding Finishing Touches With Levels and Color Balance03:20
4.4Saving Elements of Your Painting to Enhance Productivity02:08
5.Conclusion
5.1Conclusion01:12
3.4 Using Liquify to Quickly Modify Parts of Your Illustration
Welcome back to How To Create Monster Art in Adobe Photoshop brought to you by Tuts+. I'm your instructor today, Robert Marzullo. We'll now be covering lesson 3.4, using Liquefy to quickly modify parts of your illustration. Okay, so you've got your illustration going, you've got a fair amount of detail. Parts of your monster are fully painted, other parts still need some work, but one of the time savers and one of the effects that you can create as you're doing a painting like this. And a very powerful one at that is to use the liquefy feature. So first, I'll show you what it is, if we take this monster make sure live transparency is not on it has a little bit of an adverse effect to it and then go to Filter > Liquefy. Now, the settings are basically that you can move things around, so you can size the brush up. And say, for instance, with this back tentacle, I want more randomization to the edge, it's a little too smooth of an edge. It's really easy to get in there and just move things around. So I mean, you can just kind of push the color and the shape around really quickly, get a little bit more rigidness, whatever. You can zoom in further and really detail it out. There's lots of applications where just this alone can be very helpful. So if I just wanna give it a little bit more bumpiness kinda like what you see I started to pain in here. Now, the thing is, is to always separate when it's better to just paint something in, and when it's better to use some of these liquefier facts. But there's lots of areas where using the liquefy can help. Say for instance and the monster's face here, I felt that the eyes were a little bit too large. So I can easily take the brush that condenses N word right here, scale on my brush up and down with the bracket keys. And I can hold over the eye and I can size all eyes down pretty quickly. I can move them, if I say ones a little bit higher. I can move it into place. I use this a lot of times to fix my artwork really quickly and on the fly so that I can keep moving forward. Say I don't like the the nose that much of the character here, it looks maybe too humanoid. So I wanna widen out parts of the front here. And I just play around with that see what works. I can also Ctrl+Z back out of it, Ctrl+Alt+Z, or Cmd+Alt+Z to do multiple undos. And then ultimately, I can hit OK here, zoom into the changes and just toggle on and off by having Ctrl+Z. It's kind of a funny effect too but it shows you really quickly what you might like better and honestly I do like the smaller eyes. So I look at it from a distance. He's kinda making faces at us but I think the smaller eyes are a little bit better for what I was looking for and you can do this all over the artwork. You can just really play around with this feature. You can select specific areas like this, go filter liquefy and it will now keep your range. You don't have to have the whole picture in the liquify box here. You do have to be careful not to manipulate the at the very edge because that will have an adverse effect on your painting, when you go back into the other screen. But now I can just get in here and I can detail the work a little bit more, I can move elements around, change the mouth. If you wanna be more specific just size your brush down. You have to make sure that as you're doing this, you don't distort the work in a negative way or an unbelievable way. But just play around with it and see what additions you can make to your work and make it look better. And sometimes, small changes incrementally can be really good when doing stuff like this. I actually like it more the previous way in that one, so I'll leave that, Cmd+D to deselect that, zoom back out. All right, so now, I wanna show you how you can sometimes save yourself some work, there's a couple options when using liquefy to do that. Say the monster here, so you're happy and you spent a bunch of time with those front tentacle. And you really like the look of it, and instead of repainting all these other textures on this side. You wanna utilize some of that, so I'm gonna show you how to do that with Liquify. We're going to first select just very quickly, draw a selection around most of his tentacle here. Like so and Cmd+C Cmd+V to make a copy of it. Bring it over to here. Edit > Transform > Flip Horizontal. Now, for the most part, we can just kind of tilt and turn it into place. Then you're gonna get the parts where it's just not going to bend as well. I made a read guide here to kind of show what I'm talking about. Once it gets to this area, it's a little bit trickier and now, what you could probably do is copy this twice and rescale it down and tilt it and get part of this tentacle. Right there, so there's gonna be areas where you're going to have to use different effects, and the other one to keep in mind is also transform and warp. So you can push and pull this into place, this is also very helpful to use in conjunction. So some areas you're going to move around like that and keep in mind that maybe the texture is going the opposite way of what our initial sketch was. You see here, it's kind of going in this other direction. So that's where you could also try to liquify some of that into place and also just some of it you'll just paint back. And you need to discern when it's gonna be just quicker to paint this again or to use these effects. But I just wanna make you aware of what these effects can do, so I'll get rid of some of the other information in the way. I'll start with just this first tentacle, so I'll get this one out of there. And let's go, actually let's select this area and keep it confined to just this area for now. Filter > Liquify and you can see as long as show backdrop is checked all layers in behind you can start manipulating this layer. So you can see settings I'm using there. I use the push tool right there and I can start to move this and just get it right behind that line. So you can just easily push that around and sometimes the effects will be perfect, other times it'll need a little bit more manipulation after this, but it can be a time saver. Especially, when a lot of time is put into the initial texture painting and you're able to just move it around with little to no distortion. Now the part we're shifts here, that's part but I wanna show you. You can use this tool here and if you just click and hold it will start to twist it clockwise, hit Cmd+Z. If you hold Alt, it'll start to twist the other way. And you kinda have to play with this and get a good feel for it and see how well it works for a particular instance. But I just wanna show you again the effect that you can get in the region and then, maybe so save yourself some time with the amount of paint work that you have to do to finalize it. So, also about stretching those textures, I can pull it texture and try to distort it the other way. And again, giving the tentacle a little bit more randomization. This is also nice when you just don't want your stuff to look like you copied and pasted and moved it over. So this is another good way to add that little bit of change in the work to take your eye away from that. For the viewers eye, I should say. So I'll hit OK to that. Zoom back. Hit Cmd+Z to check the work and you see, it's starting to shape into that form. I don't know that it's perfect and I don't even know if I would keep that particular instance but it gets us a little bit close closer to what we're after. So now, if I start to combine these effects and let's see if I put the guide here to get rid of this tentacle and let's see if we can shape this one a bit more. Alter [SOUND] you got to be on one of the layers, filter liquify. And let's see if we can shape this one a little bit more into place. I'm sizing the brush up and down witch the bracket keys, just like I can do inside of Photoshop. So that a lot of these commands work throughout. Again, I can add little bumps into the technical to give it a little bit more realism. Hit OK, check the work. Hitting Cmd+Z and I think I like that and again, I don't know that it saved a tremendous amount of time. I'll put both in there and then I'll paint to connect them but it did at least allow me to modify the work. So another thing that you can use a liquify for, I put the background back into place is also using it for texture effects like this here. So if you see, I'm painting right on the background here and at this current part, the rock formations don't look much like rock at all. So I'll take my chalk brush here, I'll set it to dark and light and I just wanna show you that you can also use liquify as another way to paint and kind of get textures going. Cuz a very important part of doing all this paint work is getting some good variety of textures that look believable. And that sometimes requires you using different brushes but also using different methods in which you place the artwork. So it's quiet and sorts just to light [INAUDIBLE] light as I was he really strong in working out a hundred percent opacity but [INAUDIBLE] I'm just trying to get some value in there. Then I'll start to select the outer tones, if I create a new tone I'll select that as well. Sometimes paint areas down, I just kind of paint back and forth until I get the shapes that I'm looking for. And I try to move pretty quick with this process, just so I can I have some happy accidents and get things to go pretty pretty fast when I'm painting. Okay, so as you can see [LAUGH] it doesn't much like rock formations at all right there but that's probably for the best, cuz I wanna show you how this tool can help. But I've got a good amount of tone and variation of tone in there, say probably a little bit too light but we'll start with this and we'll see where we are or we can go with that. Okay, so now, I'll select this area, go Filter > Liquify. And all I'm gonna do is just try to move this around a bit, and see if I can get the right kind of shapes to form. It's not gonna do any blending, so that's how it's different than just grabbing a smudge brush. It's just simply moving the stuff around, so you can reshape it. Maybe you wanna see a hard angle and you wanna pull this tone up this tone back. So I just challenge you to look at the liquify tools not only a way to correct your work but also just another way to paint. If I feel there's too much of the dark in there, I can just pull that other tone and lighten the dark, resize the brush and try to get some other shapes in there. Okay, and hit OK, see if they did anything worth keeping. Here and actually from a distance it looks better and then I would probably soften that up a bit. And as I have to do there is take a soft brush or even a sharp brush really, I'll stay with the sharp brush, but I'll turn the opacity way down. And I'll grab one of the corresponding tones just kind of soften this of fact down. So I'm just painting back the rock texture a little bit and the darks. And just like that, I was able to get a little bit more believable rock shapes and formations in there, so the liquify feature is very versatile. All right, and that'll complete this lesson. Next, we'll head over to chapter four, refining the artwork.


