
 Lessons: 13Length: 1.9 hours
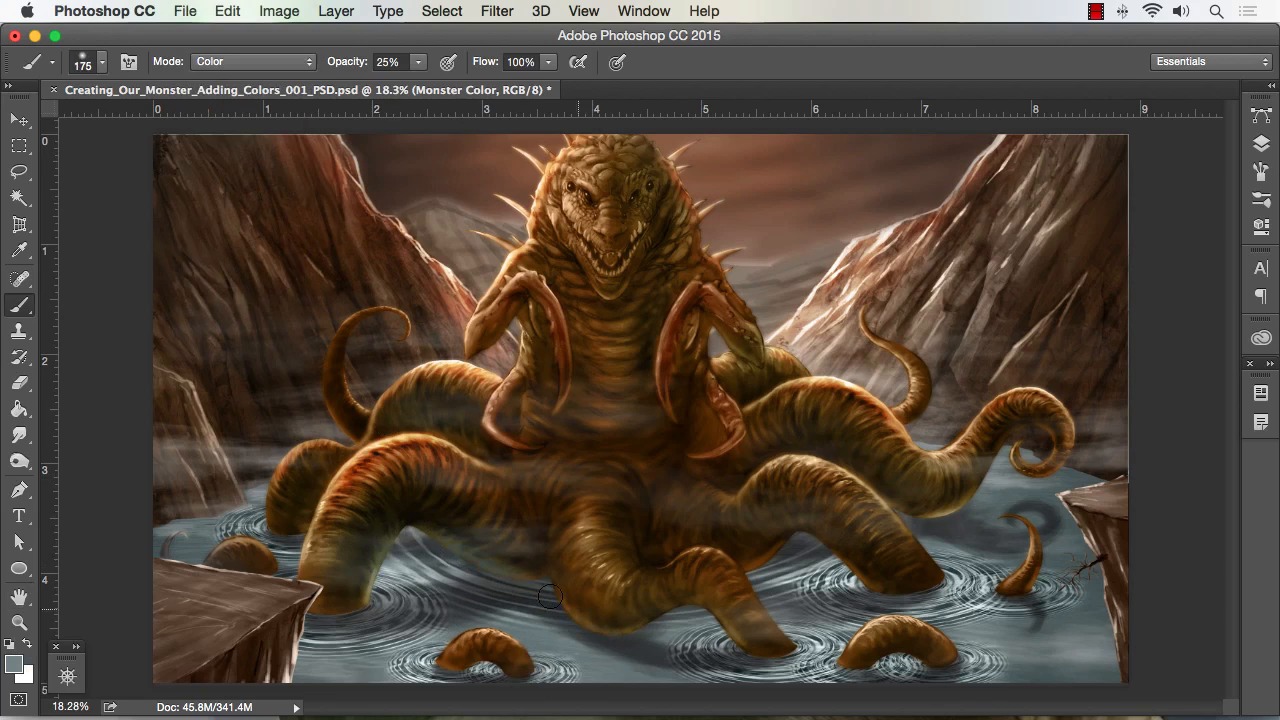
- Overview
- Transcript
4.2 Creating Effects With Blending Modes
In this lesson we will be adding color and effects with blending modes. There are a variety of blending modes in Photoshop that can be used in conjunction with the layers and the brushes to create some unique effects in your work.
1.Introduction
1.1Introduction01:15
1.2Tools and Resources01:20
2.Understanding the Tools We Will Use to Create Our Monster
2.1Understanding Layers and Brushes18:14
2.2Working With Selections to Control Our Effects11:21
3.Designing Our Monster
3.1Studying and Sketching From Reference to Create Our Creature Design11:32
3.2Blocking in the Overall Shapes of Our Painting15:35
3.3Painting in Light and Shadow to Give Our Monster Depth and Form15:39
3.4Using Liquify to Quickly Modify Parts of Your Illustration14:45
4.Refining the Artwork
4.1Adding in Detail and Textures12:59
4.2Creating Effects With Blending Modes04:19
4.3Adding Finishing Touches With Levels and Color Balance03:20
4.4Saving Elements of Your Painting to Enhance Productivity02:08
5.Conclusion
5.1Conclusion01:12
4.2 Creating Effects With Blending Modes
Welcome back to how to create monster and Adobe Photoshop brought to you by Tuts+. I'm your instructor today Robert Marzullo. We'll now be covering lesson 4.2 creating effects with blending modes. All right, so now that we've got everything separated we've got our details in place in our textures in place we can start coloring. And in using blending modes, we can apply color really quickly. So what I'm doing here is just selecting a color mode with an airbrush, and painting in right over the top of my gray-scale layer. And then I'll grab some different color ranges and paint over top of that all in the same layer of the monster. Now, if I want to punch up certain highlights, I'll switch between color to overlay and all the while still painting on the same layer so. What's really neat about this is that you can not only paint the separate layers that I've categorized here, the monster, the mountains, the water. But also, I can create selections over top of those and add new effects as well. So, it affords you a lot of opportunity to control your painting. And slowly work up your forms or your color on your forms. So basically what I'm doing here is just applying a little bit of color to each element so that I can work up and see the contrast. I want to be able to see how my highlights react to the edge of the mountains versus the back of the creature and things like that. So just with color mode, I can get a lot of that work done. And now I'm switching to overlay, I'll punch in some of those highlights on the rock edge there. And really that's all you have to do to work in this fashion, I mean we'll apply some different effects over top of the entire painting once most of this is done. But you can get 90% of your color work done this way in. And I've seen Artists actually do this the entire way through and still yield very nice results. So you can combine the Color Mode and the Overlay. Another one that you can use that can be helpful is Multiply and they all have just unique ways that they react to each other. So it's kind of good to experiment all those. So a lot of times I play with the colors quite a bit in the stage, just trying to figure out what kind of mood I'm trying to set. Here I'm adding a little bit of blue into the volume color it's actually right in front of everything just to add a little bit of atmosphere to the painting. And you notice most of my coloring I just stay on the soft brush. I would say predominantly all of it. So I just use the airbrush effect to apply color to each one. And here I'm up in the brightness and contrast, just a little bit of the water and then punching up some highlights with the Dodge tool. So the Dodge tool is a very great way to throw in some quick highlights to any areas of your painting. So really, I just keep repeating that process of adding a layer with a blending mode or painting directly over top of our Segmented areas. The fact that we've separated the elements of the painting in this way make for the coloring process to be very easy to understand and quite effective. So you just need to experiment with blending modes and see which affects yield the results that you're looking for. And combining those effects to get to the necessary end result of your painting. So dodge and burn for punching up highlights and contrast. Blending modes in conjunction with one another to create different effects. And past that it's gonna just rely on your knowledge of color and the way that light reacts off various elements in your scene. So just experiment with these techniques and you'll be coloring monster art like a pro in no time. And next, I'll show you how you can take color balance and levels and really adjust these existing colors and make a variety of new effects. So that'll complete this lesson. Next we'll head over to lesson 4.3, adding finishing touches with levels and color balance.


