
 Lessons: 13Length: 1.9 hours
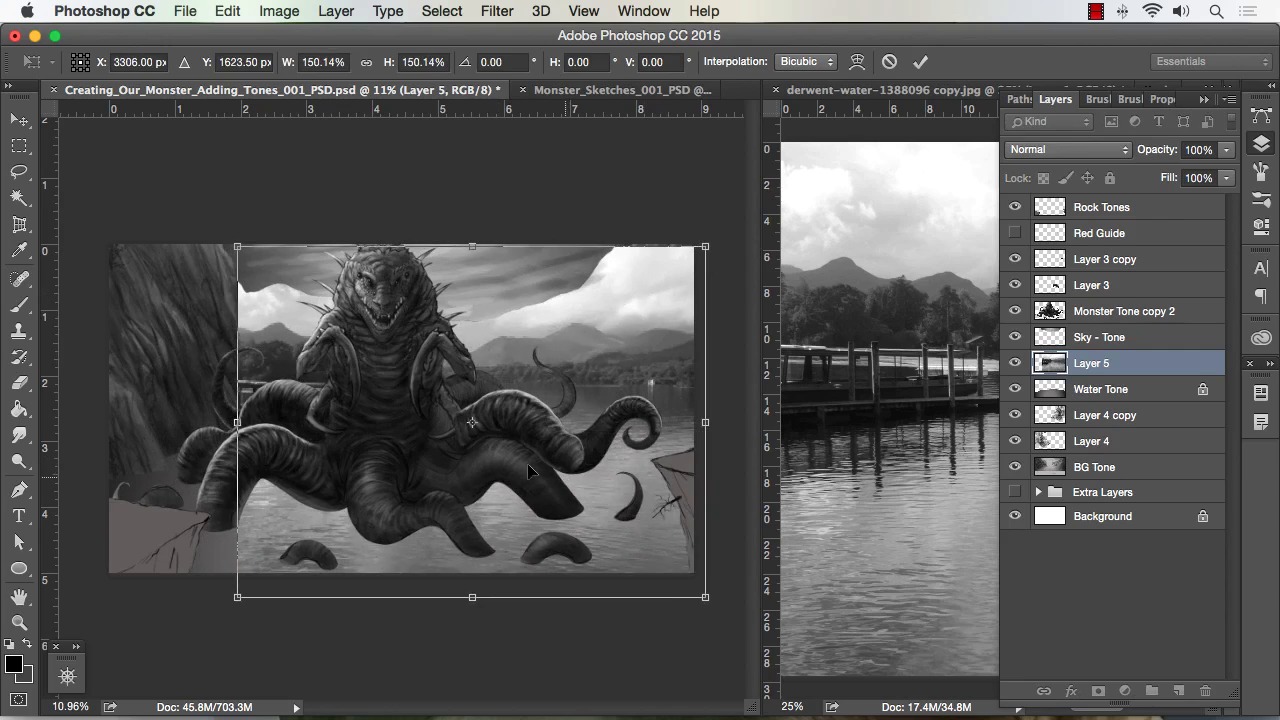
- Overview
- Transcript
4.1 Adding in Detail and Textures
In this lesson we will go over how to use more of our reference photos to add texture and depth to our painting. This method can speed up the process of a digital painting and also add a good amount of realism in that process. By using blending modes and soft erase, we can make the textures look very natural.
1.Introduction
1.1Introduction01:15
1.2Tools and Resources01:20
2.Understanding the Tools We Will Use to Create Our Monster
2.1Understanding Layers and Brushes18:14
2.2Working With Selections to Control Our Effects11:21
3.Designing Our Monster
3.1Studying and Sketching From Reference to Create Our Creature Design11:32
3.2Blocking in the Overall Shapes of Our Painting15:35
3.3Painting in Light and Shadow to Give Our Monster Depth and Form15:39
3.4Using Liquify to Quickly Modify Parts of Your Illustration14:45
4.Refining the Artwork
4.1Adding in Detail and Textures12:59
4.2Creating Effects With Blending Modes04:19
4.3Adding Finishing Touches With Levels and Color Balance03:20
4.4Saving Elements of Your Painting to Enhance Productivity02:08
5.Conclusion
5.1Conclusion01:12
4.1 Adding in Detail and Textures
Welcome back to how to create "Monster" in Adobe Photoshop, brought to you by Tuts Plus. I am your instructor today, Robert Marzullo. What I'll be covering, Lesson 4.1 adding in detail and textures. Okay, so now something that we can do to speed up our painting quite a bit is grab some textures from some various sources. So If you notice here, I've got some water texture ready to go. I've got some ripples that I want to make come off the water from where the monsters entering, the water. And I've also got some rock textures. So, I'll go ahead and start with the rocks textures and show you how you can incorporate these in your painting. Start off by hitting command j, which will duplicate the layer and then you can hit command shift u, and it will desaturate. And you can get to that by going Image Adjustments Desaturate. So now what happens is, when you bring that photo over, [INAUDIBLE] side these back and forth, keep in mind too, you can create side by side windows, by dragging these into place, and highlighting, so I can keep all my animals over here. My scenery shots right there. It's a nicer way to keep everything organized, and then you just slide it over to condense it. Okay, so now, we've got our texture here and this just really gives you a nice way to add some added texture and value to your existing painting. Again, you don't have to do it this way. You can just pick your own, but it does speed up the process and you don't have to use entirely all of it and I'll show you what I mean they are. Actually, going to size this down, so I want the right texture to be pretty condensed. Okay, so now if I go to my layer blending modes and I can put this to either Multiply, which makes it really dark but we can also control the Opacity here or Overlay. And I think, I like Overlay better in this particular instance. So I will do Overlay kind of rotate and play around with that we can also take it and go Edit Transform Warp. Give it a little bit more curvature to go with our existing rock formation. And then, all you have to do is basically soft erase the edge. Edge of c don't want that square pattern in there. I usually randomly do this throughout the the work anyways, just so, I only want portions of the the image. I don't want it entirely in there then hold Alt and drag with the Move tool and then create an instance of that, Command t to rotate and resize, if I need to. And just really repeat that process. Erase your edges. Again, you can soft erase some of the areas that you think maybe are helping the rock formation look that you want. And if you get to an area where you like the two effects combined, you wanna save time, you can hit Command e and then hold Alt and move again and kind of speed up the process for copy and I'm moving it. You sometimes just have to be creative with the placement of the textures. So you might have to resize or rotate, just whatever gets you the look that you're after. You continued a softer race. Actually, turn that up a little bit. You see, I'm just getting that artifact line from that first layer so softer a set out of the way, kind of blend them together. You just repeat that process. And if you notice here, I've got this line right there that I don't like, so I'll find which layer that's on. So, I'll have to erase that back. And that's really all there is to it. Cmd+E to bring those down. And the last thing, I would do is play with the Opacity and see, how dramatic I want that effect. But you can definitely see that there's a lot better realism to that side of the rock formation is in this side over here. And that wouldn't be the very end result because, you'd go back and just add some of your own digital paint over top and pull from areas that you like and bring that out even further. And actually, this last part over here, is part of the background, so I would even take a selection, across here and delete that cuz I want those rock formations in the very back to be a lot more faint and less detail. And then once you get that effect down. You can really speed up the process, I could take command J, Edit, Transform, Flip Horizontal. I can overlay those to this rock formation over here. Rotate it and try to manipulate it a little bit more so it doesn't look identical. And you see, it actually looks a little bit different regardless because of the underlying paint that I've already applied. So now, will go ahead and do the water. So, I've got the water tone separated as it's own element. I repeat the process that I showed you with the water effects, so, we'll hit Command j to duplicate the layer. Command shift u to desaturate the layer. And then, we'll drag a copy of that over here. We're going to hit Command t to scale that up. And remember, I just want that water pattern again just to save myself a little bit of time, and painting all that texture, and I wanted to just effect the water tone, so we'll say that we have it in the place where we want it, I'll select water tone and go Select, Load Selection. Water tone transparency had okay. And that's another beauty of separating our elements like this it also gives you a way to create your selections really, quickly. So now, go back to our reference layer Command shift high to invert the selection and Delete. And you see, just that quickly were able to drop that water pattern inside that area. And to give it a little bit more effect, we could probably go to Overlay, yep, and it blends it even more. So, it's taken some of that underlying gradient that we initially applied, and put it into place. And then, we can get back in there, we could do one of two things, I could actually copy these two by selecting both and hitting Command j Command e to merge. I'll take the eye off the previous two and I just gotta remember that I merge these down. And I can now, take the Dodge tool and I can just take a soft brush and punch up some of the highlights. Just to get a little bit more specularity and randomness to the water. I don't wanna go too crazy with this yet because I still have to apply the shadow from a creature against the water and some of the reflectivity, so I'll wait to do anymore of that, but I just want to show you how you could punch up your highlights really quickly with the water effect. Okay, to add another level of realism to this effect that we got going, I want to take the ripples here. Repeat the process again. command j, command shift u. Drag it over to here. And now, what we need is the ripples themselves look pretty cool, but they don't look like they're matching the perspective that we're working within. So, I'll show you how to fix that. Let's go edit. Transform Distort. Just like that we can distort these and make them look a little bit more into perspective of what I'm trying to envision here with the creature going in the water. So, I put those ripples right around the entry point. Will go and pull this out and I can see the entire image here. Real quick. Actually, we'll bring that forward. And we'll take a soft erase. Again, I just wanna get rid of that squared off edge. We don't need every bit of those ripples for the effect to Be convincing, but this edge will give us an artifact that we don't want in our painting. My soft brush is glancing across those edges till they're gone. Something like that should work. Put it back into place. Put it behind the monster. But in front of the water layer and something like that. Now, we could probably set that to overlay as well and what it will do is it will take a little bit of that underlying effect of the other water and incorporate that as well. That's fine. Now, we can hold all, and actually I think I'll tone down the opacity, it looks a little too vivid. In there's more, now hold all, drag it over, Command t to resize, and just repeat this process for its core every want to see the effect but I'm kind of envisioning that it's occurring everywhere of the waters. They're creatures going in and out of the water. So I move around a little bit try to randomize it, I try to not only copy anything but always give it just a little bit, at least in size or stretch or something just so it's not an exact copy. And the other thing that you can do in doing this is once you had a mall in place, you could soft erase some of the elements of each one so that they have a little bit more of a difference from one another. And obviously, I'm resizing them to kind of match the size of the portion of the creature. So, just something like this. You're kinda holding all each time. Now, I'm getting a little bit layer crazy over on the side there. But I'll merge these together once I get to a level where I feel that they're convincing. Okay, so it's starting to get there. The only other thing that I think I should do one larger one. It looks like to me that maybe there would be some larger ripples coming off the creature kind of touching down right there. So, I'll create one larger one like that. And I'll make it a little bit less vivid cuz I picture that you know his shadow is going to block most of that anyways. So, just all those things to try to add some different effects in there. So I can grab all those, I usually check it by grabbing the furthest one away and making sure it's a ripple. And that's obviously the sky there so hold Shift, grab all of them at once and Command E. Set it back to overlay and there's my effect. So, now I've got a few of our textures laid in and you can see it starting to give the piece a little bit more realism. If we were to take these all off, it's a definite a lot more boring without the textures that we've incorporated in the rocks, the water, and the ripples. Hopefully, that gives you a better understanding of how you can use textures with some of the blending modes to really boost up your effects. All right, that'll complete this lesson. Next, will head over to lesson 4.2 creating effects with blending modes.


