
 Lessons: 15Length: 1.7 hours
- Overview
- Transcript
3.3 Creating a Sketchbook
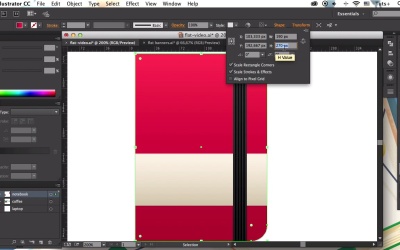
In this lesson we’ll be rendering a front view of a pocket notebook, using basic shapes and Blending Modes.
1.Introduction
1.1Introduction01:40
2.Advertisement Concept Idea
2.1Making a List of Elements03:30
3.Creating a Set of Workspace Elements
3.1Making a Laptop13:40
3.2Drawing a Cup of Coffee06:58
3.3Creating a Sketchbook05:53
3.4Rendering Glasses07:55
3.5Making Headphones06:37
3.6Creating a Smartphone04:59
3.7Creating a Tablet04:10
3.8Drawing a Camera08:32
3.9Designing a Wallet and Credit Cards11:50
3.10Making Stationery08:15
4.Making an Advertisement Template
4.1Creating a Wooden Background06:15
4.2Building a Composition08:26
5.Conclusion
5.1Conclusion02:13
3.3 Creating a Sketchbook
Hello everyone and welcome back to Creating Flat Workspace Elements for Advertisements course with Yulia Sokolova at TutsPlus. In this lesson we'll be rendering a front view of a pocket notebook using basic shapes and blending molds. Let's get started. Let's start by making a 190 by 270 pixels rectangle for the base of our notepad. Take the Direct Selection tool and select upper and lower right anchor points. And use the Live Corners feature to make these corners slightly rounded. Make another rectangle of 190 by 75 pixel size, for the paper stripe across the notebook. Align both objects, and use the up arrow key on your keyboard to move the stripe up a bit. Use the rectangle tool again to make a narrow strap of 20 by 280 pixel size. Put the elastic band across the notepad, which holds the cover and the sheets together. Let's apply the colors and add more details. Select the base of the notebook and apply a bright red linear gradient, making the shape darker in the bottom. Move to the papers trap, applying darker and lighter beige colors. And finally, fill the elastic band through the very dark grey linear gradient. Select all the elements and switch off the stroke color in the color panel. Copy the band and paste it in front. Make the copy smaller, and switch the blending mode to multiply in the transparency panel, to make it darker. Place the copy closer to the left side of the band, and then select it and drag to the right while holding down Alt+Shift, or Option+Shift to create a copy. Press Ctrl+D, or Cmd+D several times to make some more copies. Let's add a gentle shadow at the bend of the cover. Take the rectangle tool and create a 5 by 270 pixels narrow strap. Place it on the left part of the notepad and align it with the base of the notepad. Switch the multiplier blending mode, making the shape darker. Adjust the colors if needed. Place the shape beneath the paper stripe in the layers panel. And now, select the shape with the Selection tool and press Enter key to open the Move Options window. Set the horizontal move value to 5 pixels, which equals to the width of our strap. Click the copy button to form another strap next to the first one. Switch it to Screen Blending mode. Make the fill color much darker and squash the shapes a bit to make them thinner. Now, let's make notebook more dimensional by adding a gentle shadow. Copy the basic shape and paste it in front. Move the upper copy up and to the left a bit with the help of the arrow keys. Paste the basic shape in front again Select the two shapes, and use the Minus Frame function of Pathfinder to cut off the unneeded parts of the upper shape. Switch to Blending mode to multiply. Let's add another shadow beneath the elastic band. Copy it and Paste in Back. Make the copy a bit wider, and pick the color from the shadow on the notebook. Use the Shape Builder tool, and hold down the Alt or Option key to cut off the unwanted pieces. Make some minor adjustments if needed, editing the colors or the sizes or the shapes. And our pocket notebook is finished. Great job. Our paper notepad is ready, and we can move on to the next item on the list. Now our next lesson will be creating stylish hipster glasses, using the Pen tool and Transparency Features to give them a realistic look. Stay tuned.


