
 Lessons: 17Length: 1.5 hours
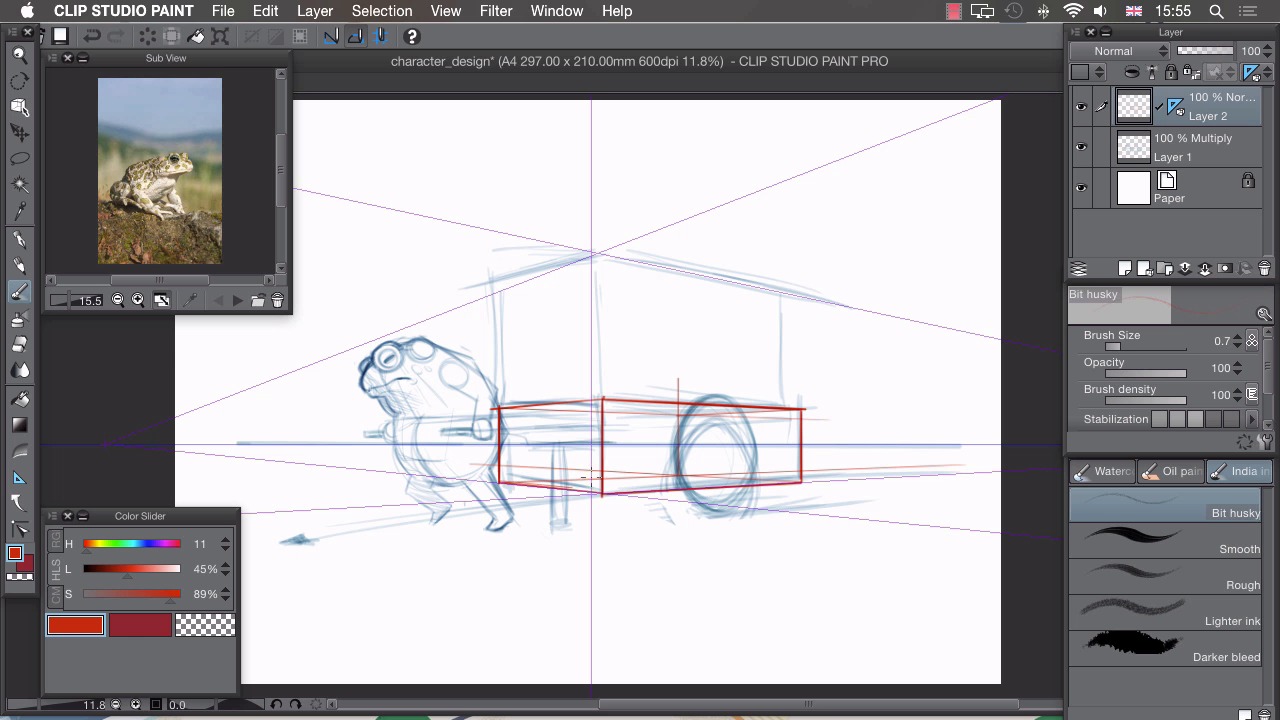
- Overview
- Transcript
2.3 Working Out the Perspective
The perspective in our drawing needs to be fairly accurate to give our drawing some solidity. In this lesson I’ll show you how to use Manga Studio’s perspective rulers to build a solid foundation for our drawing.
1.Introduction
1.1Introduction01:01
2.Sketching Our Idea
2.1Reference03:53
2.2Blocking In09:22
2.3Working Out the Perspective11:46
2.4Background09:57
2.5Character09:50
3.Inking
3.1Pen Setup05:44
3.2Inking Over Our Drawing09:18
4.Colour
4.1Flatting04:54
4.2Palette05:10
4.3Colouring03:17
4.4Shading04:41
4.5Line Colour03:28
5.Finishing Touches
5.1Colour Tweaks02:44
5.2Texture02:29
5.3Exporting02:24
6.Conclusion
6.1Conclusion00:41
2.3 Working Out the Perspective
Hi. Welcome back. In this lesson I'm gonna show you how to work out the perspective on the rough drawing we completed last time. So now that we have a rough idea of what we actually want to achieve with our drawing It's time to start making things a bit more solid, by figuring out the correct perspective on this. Cuz at the moment we just have sort of a bit of guess work. We've not done any any working out there. It's just an idea of what we want to achieve. So we have a few good tools here. The first thing I want to do is create a new layer. So if I create a new layer by clicking on this icon here, I then go to layer, ruler frame, and Create Perspective Ruler. And that brings up this dialog box here. So you can see we have two vanishing points. One going that way. One going that way. So we want 2-Point Perspective. Click on OK and that creates this ruler here. If we press O on the keyboard, we can now manipulate this. So I'll just select that. You can drag the whole thing around by dragging this green square. So this blue line here is our horizon line. So, if I just drag that down on to the horizon line that we've drawn previously. We can then, start to manipulate our vanishing points and try and get a ruler set up that actually follows what we're trying to do here. So, I think I'll figure out this vanishing point first. So if you grab one of these guides by clicking on the circle and dragging that. And I'm going to place that on the corner of this cube here. So right on the very corner that will be my turning point there. I can then rotate this because you can see, this ruler doesn't actually follow the line we want it to. I can rotate that by clicking on one of these plus signs here, and dragging and you can see if I scroll along. That's actually created a vanishing point over here and that lines up. So if you grab the other ruler, which also corresponds to the same vanishing point, and if you drag that to another corner, you'll see that we've done quite a good job of guessing a vanishing point there. If I just figure out the other side as well, see if we'll be quite as lucky on this side. Again, click on the circle for this one. Drag to the exact same point, because we're trying to create almost this cube here, but with our ruler. And by clicking on the plus and dragging, you can see we're moving our vanishing point I'll just move it to something like that, which adheres to our drawing. And again, grab the other side of the ruler, see what we've got, and it's not quite such a good guess this time. So, possibly, we've not put enough on the top here. So if we just rotate that, so that, cuz I like this line here at the bottom. I'm not too fast about this one here. If we just move that to about there, we don't want too extreme a perspective, so I'm now not looking at the rough sketch, I"m looking at the box that's created by my ruler. So I think I quite like the angel we've got here. Let's see what we can do with that. So back to our pencil, we have blue selected which is what we were drawing our very rough sketch on. At this point I want to be able to differentiate between different layers of drawings, so I want to be able to see what my corrected perspective is, and what my rough sketch is. So I'm gonna change the color to something a bit more obvious like a red. And again, using my favorite pencil tool I can now start to figure out perspective on this. So, the first thing I want to do, I think, is figure out the cart. So if I start on a corner and drag upwards, My line automatically snaps to the rulers that are set up for our perspective now. So, I have a snap set on vertical and if I go from here and drag toward this vanishing point that will snap all the way to that vanishing point. And again, draw another vertical, like this, and just finish that edge off like that. Now to try out this vanishing point here, see what that does for us. Drag towards that one and again from that corner. And then create a vertical and stop where they meet. So, I'm vaguely happy with that. I think I'll carry on working everything else out. That's looking like it might work to me. So, I don't just draw the two planes that are visible on this. I like to draw the whole 3D object just so that I have an idea of where the center of my object is. So, from this corner we will drag towards the other vanishing point again, and from this corner we'll drag to the opposite vanishing point, and where they cross. Will be the far corner of our box there. And we'll do the same for the top drag toward this vanishing point, and then drag toward that vanishing point, and again you can see that meets up. So there we have the beginnings of a 3-D cube. At this point, I'd like to figure out a center point, as well, so I know exactly where center on my object is. So if I just go to the brush tool, I've selected an ink brush. And I've made it really really small, so that it doesn't create quite such a line as my drawing here. Cuz I want just a very faint suggestion for this bit. So if I click on one corner. Hold down shift on my keyboard to draw a straight line and then click on the other corner. You can see a very, very, very faint line has appeared there. Now do it again in that corner, hold down shift, and there. And where these two cross is our center point. So back to our pencil. And we can draw upwards of our center point. And that would be the center of our object. And if we drag where the center crosses on this bottom line here, towards this vanishing point. We can drag the center all the way through to the other end and then up, and that's our back center point there. Now, just to figure out the size of these jars, so again, I'm gonna start a bit further this time, draw upwards so our cart is this big. Obviously, its contents are gonna be a bit smaller, so I've started a little bit further in here, so I've left this little edge. Drag to our corner, drag in vertical, drag away. Leave a small edge again and there we have a rough bounding box for the shape of our jaws. And then we can turn that into a 3-D object by just dragging out and extending these vanishing points. And you can see where those would go. It's important to note that at this point we're not actually trying to draw every single object in 3D here. What we're doing is roughly drawing a bounding box for all of the different shapes that we're going to be drawing. And that helps us have a more solid view of what we're drawing. So this is gonna be not a cube at all once I'm finished. It's gonna be different jars. But this just gives us some volume to work with, and I can sort of think in 3D at that point and then fill in with different jars later on. So I'm not gonna draw every single object. I'm just gonna do a little bit of planning, and from there I can just take it and freehand it. So If we figure out the center for this site here. So, I want to figure out where dead center for this plane, on this right hand side is. So I know where to put this wheel. So, back to my paintbrush there. Click on a corner, hold shift, click on the other corner. Click on a corner, hold shift. Click on the other corner. And then they cross about here, and that is the center of that edge there. So if you draw that all the way down, that will give us a center point for this wheel here, and if I drag from where our character's feet are towards this fashion point here, that will tell us where his feet are lining up in the cart, so I'll do that one as well. And I know that I want the wheel to be a bit further out, so if I just do that and I see that the wheel probably hits the ground around about there. So just draw a very rough square in perspective there. And then add some volume to it by pulling these out. And now that we have that 3-D shape there we should be able to figure out our ellipse by putting it into this box shape here. If we want to show the wheels on the other side, we can drag to the other vanishing point, like that. I can actually see that we won't be able to see our wheels on the other side. So probably about there, just to imply something. It's not technically correct, but it should read a bit more accurately if you just have a little bit of wheel peaking through there. Another thing I want to figure out Is the handle. So we've got two handles for this pushcart here. And if we just start on that edge there. Do a vertical. And then drag that there. You'll see that's sort of the rough idea for our handles. Drag to find the other one. We can just do that. And that gives us a very, very rough idea of what our handles will look like. So now that we've got most of the 3-D guides placed in there what we can do is hide our very base sketch here just to show what we've drawn in this lesson. and you can see we have some cubes here which really help us when we're trying to draw the finished thing. We have some guides for the wheels, we have some guides for our handles there. One last thing I think I"ll do find the center point for this cube, which represents our jaw. So that should help us a little a bit. Again, go to the paint brush tool, click in the corner, shift, click in that corner. Click in the corner, shift, click in that corner, and you'll see where the cross is our center. Which we can then drag through 3D space like that. So there I've got a rough idea of the center point at all times in this cube that represents our jar. So I should be able to, if I wanted to, I could divide this into two jars. That are sitting next to each other because I know where the center point is. I'll just turn on the rough sketch again. We can actually start on cleaning up the sketch. In the next lesson, I'll show you how to use a rough sketch and your perspective guides to draw the background of our illustration.


