
 Lessons: 17Length: 1.5 hours
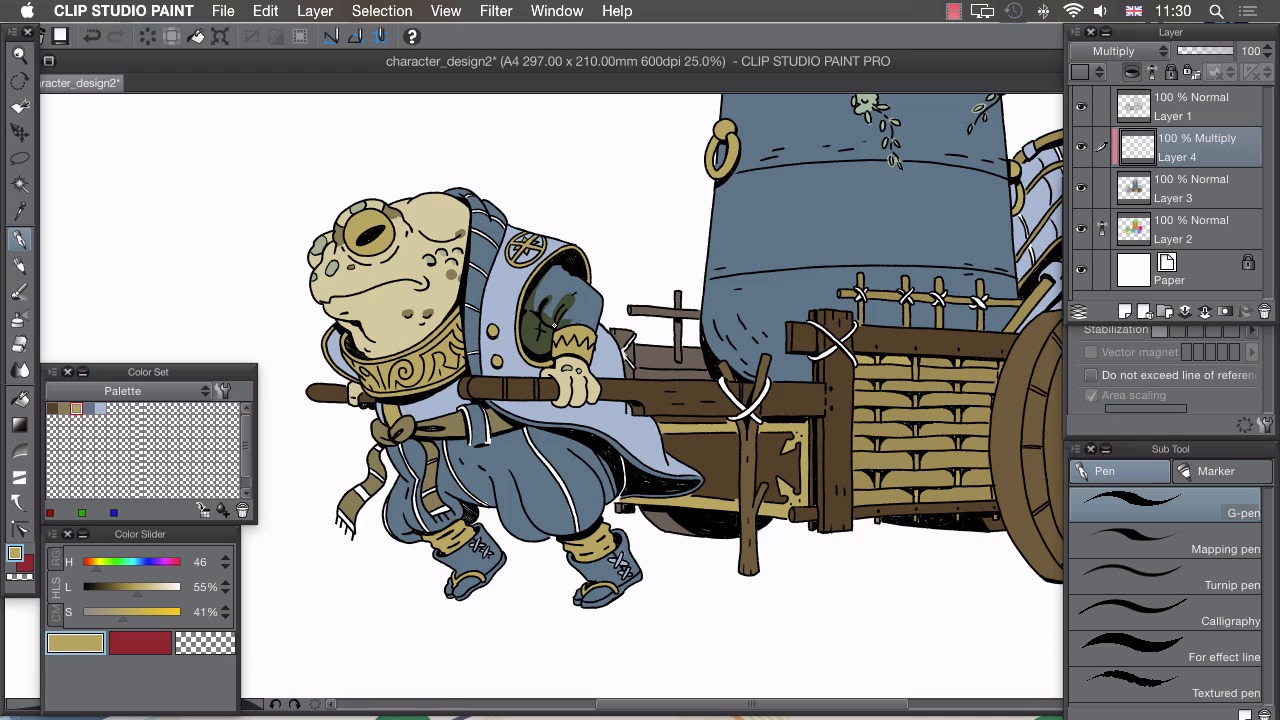
- Overview
- Transcript
4.4 Shading
In this lesson we’ll be adding some shadows to our flat colours to give our drawing some volume.
1.Introduction
1.1Introduction01:01
2.Sketching Our Idea
2.1Reference03:53
2.2Blocking In09:22
2.3Working Out the Perspective11:46
2.4Background09:57
2.5Character09:50
3.Inking
3.1Pen Setup05:44
3.2Inking Over Our Drawing09:18
4.Colour
4.1Flatting04:54
4.2Palette05:10
4.3Colouring03:17
4.4Shading04:41
4.5Line Colour03:28
5.Finishing Touches
5.1Colour Tweaks02:44
5.2Texture02:29
5.3Exporting02:24
6.Conclusion
6.1Conclusion00:41
4.4 Shading
Hi, welcome back. In this lesson, I'm gonna show you how to add some shadows and highlights to your image. So far, all we've done is add some really basic colors to this, and that's resulted in quite a flat looking picture. To give it a more 3D appearance and to help clarify some of these details here, we're gonna add some shadows and some highlights. So the first thing we're gonna do is create a multiply layer and to do that, I'm gonna create a layer on top of my flat colors and change the layer mode to multiply. And what that does is actually multiplies the color that I draw over the top of this onto this base color, creating a sort of shadowed look, like this. You may notice that at the moment, I can actually draw outside of these lines and we have a few ways of actually controlling our shadows. So if I just undo that, I can click on this icon here at the top beneath multiply mode and that creates a clipping mask. So this layer will now be dictated by the opacity of the layer underneath it. So you'll see if I draw in this layer now, I can only draw where there's paint in the layer beneath. Another really useful tool is the magic wand tool. So if I go to the magic wand tool and go to our tool properties, you'll see that we also have this multiple referencing option in the magic wand tool. So if I turn that on, I change it to our Reference layer. We still have this flat layer here which is set to reference layer. So now when I try and make a selection this will only select from this reference layer and you'll see that I can actually select big parts here which I can isolate and add shadows to. So, I'll select this sleeve here, and I think I'm gonna add all my shadows in this yellow color but you can add whatever color shadows you like. Go to the pencil, and I'm just going to help bring out some of these details, so what I'm doing here is adding a shadow completely to this underside of the arm, which should bring the arm out and move it away from the body so it will make the body part actually recede and i'm actually going to accentuate the details. So if we've got some folds in the cloth here I can accentuate the folds by adding shadow. If I just deselect that, I can go in free hand and you'll see that we've actually added quite a lot more depth to that and it's clarified what's going on with the sleeve here. Now I want this image to look quite simple. I want to keep this nice simplicity I've got going so I'm going to apply this technique to the whole image. So with that shadow applied to our whole image, we actually have something that looks so much more 3D. I've kept this really simple. I've not gone too crazy with the rendering of the shadow and it already adds so much depth. The last thing. Thing I want to do is add a new highlight on top. I'm not going to go too crazy with the highlights, I'm just going to add a few different lines on the top here, a few highlight lines on the top, just to clarify some of this design. I'll create new layer, clip it to this layer again by clicking on the clip icon, but this time I want to change my mode to screen and using this same color that I've used for my shadows, I can then go in and then bring certain elements out. So I'm gonna add a line on top there and this eye is gonna be quite shiny as well so I'm gonna add a shine on top there, slight hint on the sleeve and I think possibly the handle of this pushcart is getting little bit lost in all the detail so I'm gonna add a slither on the top which should help clarify the design a little bit more. Like that, just zoom out for a second, a tiny bit on top of this wheel, and I think possibly this highlight's looking a little bit too strong at the moment, so if I just turn the opacity down, add a couple more highlights, I'm not gonna go too crazy with this highlight, because if you highlight everything, it adds even more noise to this, it doesn't really clarify anything, it just keeps adding more and more detail, and everything can tend to look a little bit too shiny as well so just the odd sort of hint of light here and there will go a long way. Just a touch on here, I can then select all of these layers, all of my color layers, right click them and then say combine selected layers, which will give us our finished colors. In the next lesson I'm gonna show you how to change the color of your lines.


