
 Lessons: 17Length: 1.5 hours
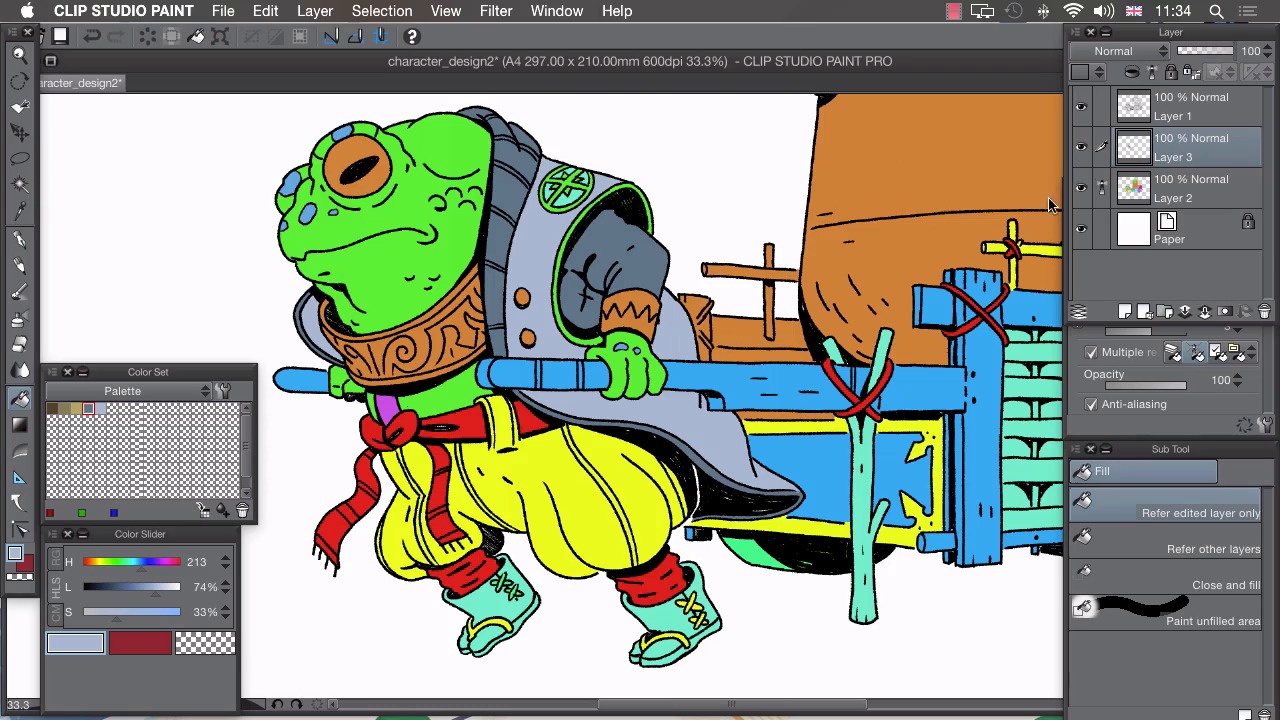
- Overview
- Transcript
4.3 Colouring
In this lesson I’ll show you how to use the flats from the previous lesson to quickly add the colours from our newly created palette.
1.Introduction
1.1Introduction01:01
2.Sketching Our Idea
2.1Reference03:53
2.2Blocking In09:22
2.3Working Out the Perspective11:46
2.4Background09:57
2.5Character09:50
3.Inking
3.1Pen Setup05:44
3.2Inking Over Our Drawing09:18
4.Colour
4.1Flatting04:54
4.2Palette05:10
4.3Colouring03:17
4.4Shading04:41
4.5Line Colour03:28
5.Finishing Touches
5.1Colour Tweaks02:44
5.2Texture02:29
5.3Exporting02:24
6.Conclusion
6.1Conclusion00:41
4.3 Colouring
Hi, welcome back. In this lesson, I'll be showing you how to add color to an illustration. With our flats in place and our palettes selected, we can now really easily add our colors to our illustration. I'm gonna just create a new layer here above my flats and this is the layer that my colors will go into. Next I want to choose the paint bucket tool. And I need to make a few changes in the layers here so that we can easily color this in. But first thing to do is go to our inks layer, and turn off the referencing mode. So we don't need to use that as a reference anymore. But we do need to use our flats as a reference, so if we select that layer and click on the small icon at the top to turn that into a reference layer. We can now use these flat colors to dictate the behavior of our paint bucket. So back to our color layer and go to our Tool properties. And what we need to do is have Multiple Referencing ticked on for our paint bucket tool but we need changed that to Reference layer. So that means that these inks won't affect our paint bucket filling but our reference layer only will. So if I choose one of these colors, for example the light blue. Because I have this reference layer. Our flats is our reference layer. I can then fill any color like that with one of my selected colors really, really easily. So I can just go ahead and do that in all sections like this. And you'll see how quick this is. And as easily as that I have the majority of his jacket filled in. I can also use different kinds of layer so if I keep a layer on top of that and for example fill in his skin. So the behavior of our paint bucket tool is still the same, like that fill all of this in. Like this. And in a new layer, I can choose the blue. And at this point I'm gonna change it to darken and choose my pen tool. I can then use the same colors and get a different hue. By choosing a different blend mode. So because I'm in darken I've got this sort of slightly greenish color being created by combining this blue on top of that. I'm gonna apply this technique to the whole image, and once I'm finished it should look something like this. Now because we took the effort to create these flats I've managed to color this in really simply and really quickly. And only using four different layers. So I have two normal layers like this. I have a normal layer with it's opacity set down which changes certain hues here. You can see if I turn that off and on how the hues change. And I have a darken layer. So, I've put a blue color over the top of one of these yellows or greens, and it creates this slightly greener look. So if I turn that off and on You can see that changes the warts on our toad there. The last thing to do would be to merge all of these layers so that we have just the one color layer. So if I select them all by holding Shift, right click on one of them, and we choose Combine Selected Layers. That merges down into the one layer, and we can move onto the next stage, which is adding shadow. In the next lesson, I'll show you how to shade your illustration.


