
 Lessons: 17Length: 1.5 hours
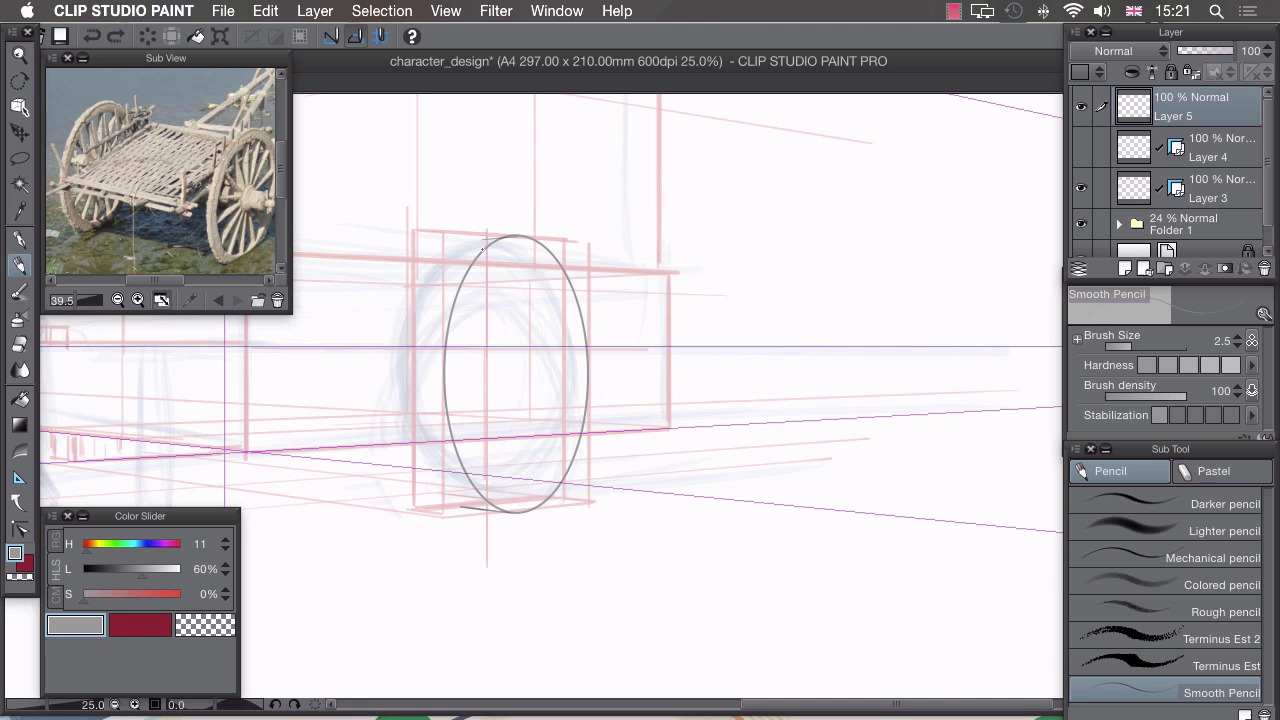
- Overview
- Transcript
2.4 Background
In this lesson I’ll be sketching the background for our character to interact with.
1.Introduction
1.1Introduction01:01
2.Sketching Our Idea
2.1Reference03:53
2.2Blocking In09:22
2.3Working Out the Perspective11:46
2.4Background09:57
2.5Character09:50
3.Inking
3.1Pen Setup05:44
3.2Inking Over Our Drawing09:18
4.Colour
4.1Flatting04:54
4.2Palette05:10
4.3Colouring03:17
4.4Shading04:41
4.5Line Colour03:28
5.Finishing Touches
5.1Colour Tweaks02:44
5.2Texture02:29
5.3Exporting02:24
6.Conclusion
6.1Conclusion00:41
2.4 Background
Hi. Welcome back. In this lesson, I'm gonna show you how to use our very rough sketch layers to create the background element of our illustration. Now that we have our rough idea of what we want to draw. And we have our prospective guides in place here. It's time to start drawing things properly. And I'm gonna start by drawing this push cart at the back here. By drawing something that's 3D, it becomes a lot easier later on to create volume with this character, and to place him correctly so that he's grounded at the floor. Its also a lot easier to start from the background and work your way forward to the foreground. The first thing I want to do, is change my reference image. So if scroll along by clicking on this button here to the picture of the push cart. And I'm going to zoom in on that, so I can see a few of those details. And center it like that. I also need to change our layers. I need to change this, so that we can still use this perspective grid here, and not always see this perspective drawing that we've done, cuz it might interfere with what we're drawing and we might just want to use the ruler on it's own. So if I create a new layer and drag that to the very top like this, we can actually split this ruler away from our drawing by clicking on it and dragging it to this new layer. I also need to create a new folder for our rough sketches. So if you click the third icon at the bottom here, that creates a new folder. We can just drag these new layers in, like that, and collapse it, so that it's nice and neat. By doing that, we can also change the opacity of both letters at the same time. So these are a bit too dark at the moment and would interfere with the new sketch we're gonna draw. So if you just drag the opacity at the top down to around 20% we can still see all of our base sketching but it won't interfere so much with the drawing we're about to do. Now, moving on to this layer at the top which now contains our prospective ruler. I'm not actually going to draw in this layer, because I'm gonna use this as a container for our ruler that we can turn off and on. So if I create another layer on top of that, you can see, I've also changed my ruler by clicking on the side of the top here to show in all layers. By default, the layers are set to show only when editing the target. So if I go to this top layer, I've changed it to its default. Go to the top layer and our ruler disappears. We need to change that to, Show in all layers, and we can then use this ruler in every single layer that we have. The first thing I want to tackle on this push cart, I think, is this wheel at the bottom here, and that's gonna need another ruler. So you can see why we've set up multiple layers here, so we can turn off and on multiple rulers, because to turn off snapping on a ruler, we would have to click on this icon at the top here, but that turns of snapping to all rollers. So if we just turn off each layer. So I'll just show you. At the moment, we have snapping set to perspective, but if I turn off the visibility of that perspective layer, I can then draw in freehand all to another ruler which I have contained inside another layer. So getting back to this wheel here, we're gonna need to draw an ellipse. So if we click on our ruler icon here, we want a special ruler, and we want concentric circle. I'm gonna drag out a circle onto the canvas like that, and that creates a circular ruler. Choosing the operation tool or by pressing o on your keyboard you can manipulate this. So I'll rotate that to make sure that these verticals line up like that. And I'm gonna try and move it so that it's in the center of this front face of my rough wheel shape. You can then. Change the shape of this ellipse by dragging these cubes. And I want this ellipse to only just touch the very edges of this outer face, and work on the vertical as well, needs to move down a little. So about there. So you can see, I've managed to manipulate the ellipse so that it only touches on the very edges of our box. We need to change this ruler so that it works on every layer as well. So again click on the icon at the top, showing all layers, and create new layer. Go to our pencil. And we can draw an ellipse like that. I'll show you now how this multiple ruler setup works. So at the moment, we're snapping to this ellipse here. If we were to operate our ruler by turning it off and on with this button here, that would turn off all rulers. But what we can do is turn off our ellipse and turn our perspective back on. And then, you'll see that instantly we have snapping in perspective, and that will help us figure out the other ellipse, like that. So we can turn off perspective again, turn on our ellipse, go back to our operation tool, and we can move that so it lines up, with this backface here. Back to our pencil, back to our top layer. And we can draw in this line like that. So if I turn off all the rulers, you can see that we've actually got quite a nice wheel shape drawn in. I'll zoom out there so you can see it in context. And I"m basically going to use these two rules turning off and on visibility like this to build up a design for this push cart. I don't have any design at the moment, I just have a big box, which I can then manipulate and draw different parts on and use it as a basis to design it. I've got this as a good reference. I'm not gonna copy it piece by piece. It's not gonna look exactly the same. I'm just gonna copy the sort of very rough ideas that are in this reference image. So, for example, I like the way that, if I zoom in here, I like the way these pieces of wood are interlocking. So I might use this sort of binding mechanism here on the corners of this design. And I might use this sort of woven effect at some point in my design. But this design ultimately won't look anything like this, it will just have sort of elements of realism taken from this and applied to my design. So I'm gonna be drawing in the one [INAUDIBLE] like this. I can draw freehand by turning off all rulers. So you can see, I can potentially add a rounded edge here. But if I feel I need another straight line, I can then turn on the perspective and that snaps again. So I've gone again from freehand on to a ruler, and then I can turn that off and go back to freehand and do another rounded edge, like that. This is also really good if you want to add any different design elements, so if you've drawn a little bit and you've decided you want an extra panel for example, you may have to just try and sort of eyeball the perspective. But because we've got this ruler that we can turn off and on, we could turn back that on and we can very easily and quickly add, Panels to this design like car.I gonna apply these ideas to the all of this, I gonna speed up my drawing progress.You can watch it all the way through and I'll see you at the end.Right. So I'm starting something that will be obscured later on. I've started with the handle of the cart, and I'm just using that as a reference. I'm building up details and spreading out as I go. I'm using the perspective ruler to draw all these hard lines here like the paneling on the side here and I'm going back to free hand to add all the little details like the shading at the bottom. Using the ellipse ruler, I can build up this wheel really easily by modifying that ruler. Dragging along and a bit of freehand to build up detail, I can then completely freehand this roof part here using our perspective as just a rough guide and again, a little bit of detail for the. I'll mirror across my wheel using the ellipse and then mirror across these details that I've drawn in the foreground into the background part. And add a few more details using this perspective ruler. And again using perspective, mirror that across there. Now I'm just going to completely freehand this supporting stick here, so that our character can rest the cart, and using the perspective ruler, I've drawn a new box here as a guide for this big pot which I'm now drawing in with Ellipses and mirroring each side along the center axes for a nice and symmetrical shape. I found the center there and I've deleted some of these details that upscale by this pop and using the ellipse, I'm just adding a few horizontal line patterns there And back to Freehand, I can add in all this patterning and these handles for our pot. Adding the plant which is growing out of top there and spilling down the sides. And the final few details on the very front of our cart, And there we go. I hope you were able to follow along and see that I was basically using the same two rulers, but just manipulating them, changing the size and changing the rotation, as well as using a little bit of freehand guesswork, and just building up, piece by piece, the finished cart. In the next lesson I'll show you how to take the rough sketches, and draw a character.


