
 Lessons: 15Length: 2.1 hours
- Overview
- Transcript
4.3 Transform Your Pattern Into a Seamless Pattern for Different Devices
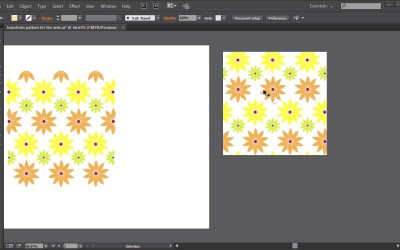
In this lesson we will transform the patterns we just created into tiles that we can use for the web as repeating patterns and for Photoshop to use as a repeating pattern as well.
1.Introduction
1.1Introduction01:12
2.A Quick Overview of Patterns
2.1What Are Patterns?06:31
2.2Patterns in Adobe Illustrator08:30
3.Create Patterns From Scratch
3.1Create a Repeating Geometric Pattern13:03
3.2Customize the Geometric Pattern10:25
3.3Use Your Geometric Pattern10:33
4.Create a Seamless Pattern
4.1Create a Seamless Floral Pattern09:01
4.2Customize Your Floral Pattern12:27
4.3Transform Your Pattern Into a Seamless Pattern for Different Devices10:20
5.Create Pattern Brushes
5.1Create a Basic Pattern Brush12:03
5.2Add a Corner Design to Your Pattern Brush07:57
5.3Create a Pixel-Based Pattern Brush06:49
6.Create a Complex Pattern
6.1Create a Vintage Pattern08:54
6.2Assemble Your Complex Pattern09:26
7.Conclusion
7.1Conclusion01:20
4.3 Transform Your Pattern Into a Seamless Pattern for Different Devices
Hi everybody. I'm Simona, and welcome back to the course, Mastering Patterns in Adobe Illustrator here on Tuts+. And this is lesson, transform your pattern into a seamless pattern for different devices. In this lesson, we will use your just created patterns and we will transform into tiles that we can use for the web, as repeating patterns, and also for Photoshop. So, let's get started. Let's open up Adobe Illustrator. At the same time, go to your source file folder and open up the file called transform pattern for the. Then we have a look here at the swatches panel you can find a swatch that is called flower power. Now we played around with the pattern options tool and we know now how to make a test and tweaks to save a new pattern from our original one. But what if we wanted to have a small pattern tile as a jpeg, a png or even as a tiff file? Of course we could fill a rectangle or square with the pattern and we could export it as such a file, but will it be seamless. We want of course our file, for that to be as small as possible. There's no need to create a gigantic background image for your website when we can tile it and have it repeated seamlessly. And how can we create an exact tile of our pattern that we'll see mostly repeat. Let me show you how we can achieve this. Remember we can just drag out an instance of our pattern onto the art board. So if I drag out the flower power onto the art board here, you can see that we have the tile. Now when we select a tile we can see which elements have to be on the outside of the binding box, and then get added to the next. Let me show you what I mean. If I copy it here to the other side you can see now we have seamless repeating tile, and this is what we need to create as a jpg or jif or png. So in order to create a small tile that will be seamless, all we have to do is find out the exact size of our bounding box. As you can see here, we have the bounding box. And in order to select it, you can either use direct selection tool, if you go to the outline mode We can easily select it. And then in the menu bar on top of here, we will get the width and the height. In this case, it's 450pts in width and 450 pts in height. If you don't have the menu bar up here, you can also go to the transform tool and find the same values for the width and height there. Let me switch back to the preview mode. And then select the selection tool. And instead of using the direct selection tool and going to outline mode, we can just double-click on the tile, and then we are inside the group. And then with the selection tool, we can grab our bounding box, and then we will get the same values, of course. So let me leave the group here. Now what we need to do is, we need to create an artboard of that exact same size. So 450 pts in width and 450 pts in height. The reason why we need to create an artboard, and not just create a rectangle of that size and then fill it with the pattern and then export it via illustrator as a jpeg or gif or png. Is that if we wouldn't use an artboard, we would get gaps in between, white lines, and it wouldn't be seamless. Now, let's create an artboard. Let me zoom out here, and move everything a little bit to the left. And then we go to the artboard tool here in the Menu Bar, and then we drag a rectangle. And it doesn't have to be exact for now. Just approximately. Because we can always set the values on the top menu here. So, as you remember, we need 450 for the width, and the same value, 450, for the height. And now we have an art board of the exact same size as the tile. If you select the artboard tool again, we can see now, we have artboard #2. And this is important that we remember that this is artboard #2 when we export our file. So let me exit here. Now what we have to do is we have to create a rectangle the same size. So we select the rectangle tool, Click once on the artboard, and set 450 for the width, and 450 for the height. And then click okay. Now, we'll move it into place with the artboard, and so that we are exact on it, we can use Align to artboard, and then set it vertically and horizontally centered to the artboard. After that, we're going to open our panel with the swatches here. And we're going to fill the rectangle with our Flower Power pattern. We have to export this particular art board with our rectangle filled with the pattern as a jpeg, for example. Now just to show you that it really repeats seamlessly, let me just make a copy of the rectangle here and move it to the right, and you can see that it repeats. So now what we can do is we can go to File > Export, and in the pop-up menu, we're going to save the file, and then in File name, we'll give it a name. We can just keep the name for now, that we’ve used for the file. The file type we’re going to save jpeg from the drop-down menu, and we're going to check Use Artboards. Once we check Use Artboards, we will get the option to check All Artboards or a Range. And in our case the range will be not #1, but #2 of the artboard. And let's move it up here so you can see everything. And after that all we have to do is click export. After that you're going to get the pop-up menu for the jpeg options. For the image color mode, we want to select RGB, of course. Baseline compression method, we use baselines. Resolution, we want to make sure it's set to 72 PPI. Anti-aliasing we'll leave as is. And the quality we'll set to 10 for maximum. And then we click Ok. Now this will export our tile as a jpeg. And this jpeg you can use for the web and have it repeated as a background or we can export it as another file if you wanted to have it as a transparent background, we would save it as a png transparent, or if you wanted a gif, you can export as a gif as well. Now i would like to show you how we can use this jpeg that we just exported from illustrator as a pattern tile in Photoshop, and how we can use this to create a pattern in Photoshop. So let me open up Photoshop for you... I already opened up the jpeg that we've exported, the transform pattern for the web. You can find the same jpeg in the source files folder, just in case you wanna follow along. Now, let's create New Document. For example, let's set the width to 1200. And the height to 600. And the resolution to 72, and the background let's leave as transparent. Now when we go back to our tile all we have to do is we have to go to edit, define pattern, and then in the pop-up menu we'll have to name transform pattern for the web jpeg. Of course, we can call it Flower Power and this is really up to you how you want to call your pattern. And then we click Ok. Now, when we switch back to the new file that we've created, now we want to actually fill the background with this pattern. So, easy way, we go to Edit again Select fill, or, the shortcut is shift F5, and in the pop-up, we'll get the contents for pattern, which of course we can choose either foreground, background, color, pattern, and in the options under custom pattern, we can find now all the way at the end, the tile that we've just added. So we select it. We'll click okay, and now the background has been filled with this particular tile. And as you can see, it is of course, seemless. Now I would like to show you one more thing though. Let me hide this layer. Let's create a new layer, and let's fill it with white. Now of course since we just created a pattern out of this particular tile and it's quite large, what if we wanted to have a smaller pattern. Of course we could size it down, define it as a pattern again and then fill the background again. But there is also another way we can actually set a pattern for our background. We can use layer styles. So if we go and double click our layer and in the pop-up window, in the layer style here, we can set pattern overlay. Now in the pattern overlay you can choose of course the pattern again. Now depending on how many patterns you have defined or default are opened, the pattern we've just created might just be on the bottom. So if we select this one here, the flower power pattern that we've added as a pattern into Photoshop. We can actually use the scale to make it smaller. And as you can see, now I'm scaling down the pattern, flower background. And now we have the pattern much smaller than the original one. Let me show you the original one. It's pretty big. And here is the smaller one. And of course, you can double click it again. And change the option and you can make it bigger, you can make it into 70 or 100% again. And this is it for this lesson. Now, we've created patterns. We started simple, and then we created more complex patterns, we adjusted patterns, and we created new patterns out of original existing patterns that we've created here in Adobe Illustrator. Now let's move on to the next lesson, and let's learn how we can create our own pattern brush in Illustrator as well.


