
 Lessons: 15Length: 2.1 hours
- Overview
- Transcript
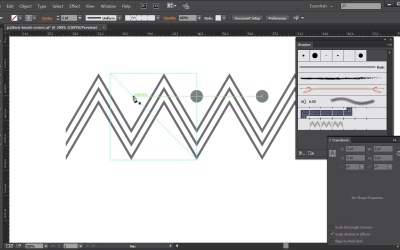
5.2 Add a Corner Design to Your Pattern Brush
In this lesson we will add a corner to our newly created pattern brush.
1.Introduction
1.1Introduction01:12
2.A Quick Overview of Patterns
2.1What Are Patterns?06:31
2.2Patterns in Adobe Illustrator08:30
3.Create Patterns From Scratch
3.1Create a Repeating Geometric Pattern13:03
3.2Customize the Geometric Pattern10:25
3.3Use Your Geometric Pattern10:33
4.Create a Seamless Pattern
4.1Create a Seamless Floral Pattern09:01
4.2Customize Your Floral Pattern12:27
4.3Transform Your Pattern Into a Seamless Pattern for Different Devices10:20
5.Create Pattern Brushes
5.1Create a Basic Pattern Brush12:03
5.2Add a Corner Design to Your Pattern Brush07:57
5.3Create a Pixel-Based Pattern Brush06:49
6.Create a Complex Pattern
6.1Create a Vintage Pattern08:54
6.2Assemble Your Complex Pattern09:26
7.Conclusion
7.1Conclusion01:20
5.2 Add a Corner Design to Your Pattern Brush
Hi everybody. I'm Simona, and welcome back to the course Mastering Patterns in Adobe Illustrator, here on Tuts+. And this is lesson, Add a Corner Design to Your Pattern Brush. In this lesson, we will add a corner to our newly created pattern brush. So let's get started right away. Let's open up Adobe Illustrator, and at the same time, you can open the file called Pattern Brush Corner in your source file folder. Here we have the art board with a blank canvas, and, when we open up the Brushes Palette, we can see here the brush called Zig-Zag that we've created in the previous lesson. Now to remember, if you Double-click the brush here, the first would be the outer corner tile, then the side tile that we have already created. Then the Inner Corner Tile, the Start Tile if we needed one, and an End Tile if we needed one. Now in this lesson, what I would like to do is create a corner tile with you for our Zig-Zag brush. First thing we want to do is, we want to drag an instant of our brush onto the Artboard. Now when we select all of the shapes here, you can see that we have our invisible bounding box. As you remember, our corner has to be the same height as our side tile here. And since it's a square, the height and the width is the same, but we have to find out the height of our bounding box for our side tile. Now again, this is fairly easy. So, let's select the Direct Selection tool, grab the bounding box, and on top here or in the transform panel, we can see the width and the height. Now, we are just paying attention to the height, and we have the value here of 124.579 points. So all we have to do is select it, make a copy, and then we want to create a square, so we select the Rectangle tool. Click once on the Artboard, paste the values for both the height and the width, and press OK. Now we want to directly align it to our side tile that we've dragged out onto the artboard. The best way is to actually switch to outline. So here, we can select our square that we've created, and place it next to our side tile. And because we have smart guides, it snaps it into place. So let me zoom in here. Now since we do not want to alter this square, the best method here, in my opinion, is to create a guide out of it. So all we have to do is select it, go to View > Guides, and select Make Guides. After that, we want to switch back to the Preview Mode. Now as you can see here, this tile we need to fill for our corner. Now since we know we have these three lines here, we can just make a copy of them. So if we select them, and I make a copy I press alt or the option key on the Mac, and drag a copy down here to the bottom. And I know I don't need the bounding box, so I can select it with the direct selection tool and delete it. And I don't need the circles, I can delete those as well. After that, I want to ungroup this three lines. You might have to ungroup them several times. And now we can select them singly. We can select all of these three lines and move them right next to our side tile, into our corner tile. And since we have our Smart Guides on, it snaps it into place. As you can see now, what I actually need to do, we need to create a diagonal line in our guide. So we can, with the help of our Pen tool, and we set it to the stroke. Click in the anchor here in the other corner, and then with the stroke selected, we turn this as well into a guide again under View > Guides, and Make Guides. Now, we know that we have to cut our lines right here in the middle. Because this part, we need to cut and then reflect for our corner. And the easiest and best way is to just create another line with the Pen tool. And then select the three lines with the line just created for our cut, and then we go to the pathfinder panel and we select divide. Now with the Direct Selection tool, we can just select the lines here on the left side and delete them. As you can see we're getting a better idea now of what our corner tile will look like. Since the circle here is part of the side tile, we don't have to worry about it. Then we just select the lines and then we reflect it. We select the Reflect Tool, shortcut is O, or we can find it here in the menu. Click on one of the anchor points here and then we hold the Shift key and the Option or Alt key to make a copy, and now we've copied our lines into the bottom corner for our corner tile. As you can see now this would be the corner. Now I think maybe we still need a circle so we can copy one and we can copy it into our corner tile. And we can put it into place. And if we wanted to, we can make it even a little bit bigger. Maybe just like this. Now, we are almost finished with our corner tile creation. There's only one step left to do, for us to add the corner tile. Either, we could select it and we could go back to Object > Pattern, and Make a Pattern and the swatch will be added to our swatches panel. And then we can double click our brush and add it via the drop down for the corner tile. Or we can simply select the lines and the circle, press the Alt or Option key, and drag it into the brush. And as you can see, the first is the corner tile, and it gets highlighted, and I see a plus sign. Now if I let go, the Pattern Brush Options will appear and you can see the corner has been added into the outer corner tile. And it looks kind of funky here on the preview, but don't worry about it. Our sizes are correct and it will add it in the proper proportions. So all we have to do is click OK. And then when I zoom out, and let's move here to the side, and I create a rectangle, I set the fill to none. And then I set the stroke to our pattern brush. You can see that it added now our pattern brush to it. Now if I select the stroke to be smaller than one point and I zoom in to show you, you can see now the corner here is exactly what we've created and it will add it into each corner. And this is a way how you can create your custom corner. Now, of course, I would like to show you the automated corners that Illustrator has to offer for Pattern Brushes. Now, what we can do here is, we can just make a copy of our brush and then we'll Double-click it, and in the Pattern Brush Option panel we can change the corner tile. Instead of the original that we've added and created, we can choose automated ones and here we have quite a few to select from. The first one is Auto-Centered, Auto-Between, Auto-Sliced, Auto-Overlap and if I choose Auto-Centered, you can see what it adds. If I choose Auto-Between, it adds other ones, or Auto-Sliced, or even Auto-Overlap, it is totally up to you. Instead of creating your own corner, you could actually let Illustrator do the work for you. So if I select for the outer corner tile, Auto-Sliced for example, and I press OK. And then I select a new rectangle, and apply the Pattern Brush, change the stroke to a small one. You can see now, we have still the same size for the Pattern Brush but a different corner. And this is it for this lesson. This is an easy way to create your corners, or you can have it even easier and let Illustrator choose the automated corners for you. And of course, you could create a start and an end tile as well, and then add it to your brush. But let's head over to the next lesson and let's create a pattern brush out of an image.


