
 Lessons: 15Length: 2.1 hours
- Overview
- Transcript
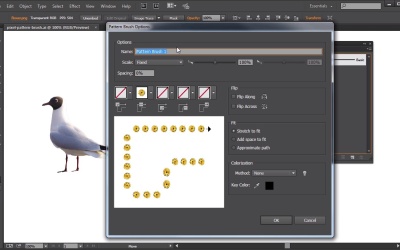
5.3 Create a Pixel-Based Pattern Brush
In this lesson we will create a pattern brush out of a pixel-based image.
1.Introduction
1.1Introduction01:12
2.A Quick Overview of Patterns
2.1What Are Patterns?06:31
2.2Patterns in Adobe Illustrator08:30
3.Create Patterns From Scratch
3.1Create a Repeating Geometric Pattern13:03
3.2Customize the Geometric Pattern10:25
3.3Use Your Geometric Pattern10:33
4.Create a Seamless Pattern
4.1Create a Seamless Floral Pattern09:01
4.2Customize Your Floral Pattern12:27
4.3Transform Your Pattern Into a Seamless Pattern for Different Devices10:20
5.Create Pattern Brushes
5.1Create a Basic Pattern Brush12:03
5.2Add a Corner Design to Your Pattern Brush07:57
5.3Create a Pixel-Based Pattern Brush06:49
6.Create a Complex Pattern
6.1Create a Vintage Pattern08:54
6.2Assemble Your Complex Pattern09:26
7.Conclusion
7.1Conclusion01:20
5.3 Create a Pixel-Based Pattern Brush
Hi everybody. I am Simona and welcome back to the course Mastering Patterns in Adobe Illustrator here on Tuts+. And this is lesson Create a Pixel Based Pattern Brush. In previous versions of Adobe Illustrator, you were not able to create a brush out of a pixel or raster based image. You could only use vector images or vector shapes to create brushes. But now with Adobe Illustrator CC, you can use a raster image or pixel-based image to create your brushes. So let me show you how we can create a pattern brush out of an image. Let's open up Adobe Illustrator. At the same time, go to your source file folder and open up the file called pixel pattern brush. Here we have two images, one is a yellow flower and the other one is a bird. I already prepared those files. It's important to pay attention to the file size when using a raster file for pattern brush. If it's too big, it can really affect the performance of Adobe Illustrator on your computer. And also, to create a pattern brush or brush out of a raster image, the image has to be embedded. As you can see here if I select the file, it gives me the name flower.png and that it's a transparent RGB file and that it's embedded. Since Adobe Illustrator CC also lets you now unembed files, you could easily unembed it. But in order to create a pattern brush it needs to be embedded. Now the first thing we want to do is have a look actually at the Brushes panel. So if I drag out the Brushes panel, right now we don't have any other brushes here and we want to create a new brush out of this. So let's see what options we have. First, we want to select our brush and let's see what size it is here in the Transform panel. And I think the size of the flower is okay, if it was bigger, I would suggest to scale it down a little bit. Now the next thing we want to do is actually drag this selected flower into the Brushes panel. So all we have to do is grab it and drag it over. You can see the plus sign and at the same time the blue line on the top right here. And then we just let go. After that, we are getting the New Brush options panel. In here, you can select what kind of brush you want to create out of this image. We cannot create Calligraphy Brushes and we cannot create Bristle Brushes. The only three brushes we can create is a Scatter Brush, an Art Brush and a Pattern Brush. And since we are all about patterns in this course, of course we want to create a Pattern Brush. So let's select the pattern Brush and then let's click OK. We get a little warning here from Adobe Illustrator saying that the use of a high resolution image in art and pattern brushes adversely affects performance. So all we have to do is click OK to optimize the image to create a brush. Of course, you can hide this little pop up by checking Don't show again. So OK, and then again, we get the Pattern Brush Options panel. Since you are already familiar with this panel now and know that the first one is the Outer Corner Tile and the Side Tile and so forth. And on top here we can give it a name, so let's call it right away yellow flower and then let's explore what we can do for our corner. As you remember from the previous lesson, we can create our own corner or we can actually let illustrator choose to create automatic corners for us. Since we are creating an image pattern brush here, I think the best is actually to let Illustrator choose for us. So when we click the Outer Corner Tile, it might take a while to generate what we can choose from. We get four options here. We can choose Auto-Centered or Auto-Between, Auto-Sliced and Auto-Overlap. Now I think it will just be neat to have all the slides and if we select this option you can see that now for our corners, we will have the same flower. And if we wanted to have a different one for the Inner Corner Tile, we could say Auto-Between. And this will add Auto-Between and as you can see for the Inner Corner Tile, it will sort of squeeze the flower a little bit for the inner corner. But this is really up to you, you can always choose something else for the Outer Corner Tile. And then it gets updated and it sometimes takes a little bit. Or you can choose again, Auto-Sliced for the outer corner and the same thing for the inner corner. Again, it is up to you. After that, we leave everything else as is and then we're going to click OK. And as you can see, we have a new brush now, it's called yellow flower. Now if I go and create a rectangle, and set the stroke to the pattern brush and scale it down, you can see now. In Illustrator, we have an Image Pattern Brush that we can add as a border to our rectangle, now let me delete this. Of course, the flower is fairly simple, but what if we have an odd-shaped image. For example, this seagull here, now of course, we want to do the same thing. We select the image which is imbedded and then we drag it into the Brushes panel. We let go and in the New Brushes Panel options, we choose Pattern Brush again. Click OK, click OK again and again for the corner, I just let Illustrator show me the options. So this time, maybe I want to have Auto-Overlap and I get this funky corner of the seagull overlapping. Or I want to have Auto-Between and this will squeeze our seagull into the corner and this will look like that. And since I wanna have the same thing for my inner, I choose Auto-Between as well. And now I say okay, this looks good, I call this bird and click OK. And again, if I create a rectange and I apply my brush, I'm going to get a bird brush. And here we have a rectangle with the Pattern Brush applied to the stroke of the bird. And this was not possible in older versions of Adobe Illustrator. You could not add a raster image as a Pattern Brush, Scatter Brush or Art Brush. And this is it for this lesson. Of course, you can create images, you can alter them in Adobe Photoshop, you can prepare them. And then open them up or import them into Illustrator, embed them and create your image Pattern, Art or Scatter Brushes. Now let's go on to the next lesson and let's put everything into use that we've just learned and create a really complex pattern in Adobe Illustrator.


