
 Lessons: 15Length: 2.1 hours
- Overview
- Transcript
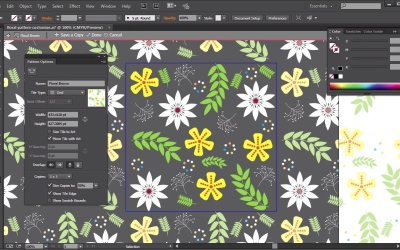
4.2 Customize Your Floral Pattern
In this lesson we will alter and customize the pattern that we just created so that we can create several new patterns from it.
1.Introduction
1.1Introduction01:12
2.A Quick Overview of Patterns
2.1What Are Patterns?06:31
2.2Patterns in Adobe Illustrator08:30
3.Create Patterns From Scratch
3.1Create a Repeating Geometric Pattern13:03
3.2Customize the Geometric Pattern10:25
3.3Use Your Geometric Pattern10:33
4.Create a Seamless Pattern
4.1Create a Seamless Floral Pattern09:01
4.2Customize Your Floral Pattern12:27
4.3Transform Your Pattern Into a Seamless Pattern for Different Devices10:20
5.Create Pattern Brushes
5.1Create a Basic Pattern Brush12:03
5.2Add a Corner Design to Your Pattern Brush07:57
5.3Create a Pixel-Based Pattern Brush06:49
6.Create a Complex Pattern
6.1Create a Vintage Pattern08:54
6.2Assemble Your Complex Pattern09:26
7.Conclusion
7.1Conclusion01:20
4.2 Customize Your Floral Pattern
Hi everybody. I'm Simona and welcome back to the course Mastering Patterns in Adobe Illustrator here on tuts+. And this is lesson customize your floral pattern. In this lesson we will alter and customize our pattern that we just created in the previous lesson. So we will be able to create several new patterns from it. So let's get started by opening up Adobe Illustrator. In order to follow along if you wish so, you can go to your source file folder and open the file called Floral Pattern Customize. Here we see a white art board. There's nothing on it. But when we go to the swatches panel here and we hover over this little tile, it says floral. This is the pattern that we've created in the previous lesson. Now let me quickly draw a rectangle, and then let's fill it with the pattern. As you can see, this is the pattern we've created. And right now, since we have a white art board, and our pattern doesn't have a background color, and some of our elements have a white fill, we can't really see all of the pattern shapes in this pattern here. So let me just drag everything to the left here, move the art board and then drag the rectangle to the left so we are on the grey. Now we can see everything what's happening. We have the white flowers, the white little floral elements, and sometimes when you create a pattern, you might realize that you have to actually make some changes to it. As you can see here, the leaves are a little bit too close to our yellow flower. The yellow flower is repeating on top of each other almost. Maybe we have a little bit too much space. Maybe this is a little bit too tight. Now in the past, before CS6, in Adobe Illustrator, we would have to drag out the whole tile onto the art board. Make changes in there, and then drag it back in. Give it a new name. So we have an updated pattern. But since CS6, we have the pattern options tool. And this makes the life much easier for pattern creation. Now let me delete the rectangle here. And then we're going to double click on this watch tile here in this watches panel. And then we have the pattern options tool popping up. And we can see our pattern here. And you can see that here the flower we have it in the top left corner and the bottom left corner. And of course this will repeat on top of each other. We can also see where the leaf is going too tight to the yellow flower over here. Now with the pattern options tool making changes to our pattern is really easy now. So, for instance, with the selection tool, we can just select this yellow flower here. And move it inward a little bit. And this will update things. But as you can see, the bounding box just changed as well. And this is because we have checked here, size tile to art. Now if you do not want the size palette to change, let me show you again, if I move the flower out, it would be going over the bounding box. Since this is ticked, the bounding box will follow along to the edges of the flower here. Now since we want to have a little bit more space, and let the bounding box following the artwork, we just untick Size Tile to Art here. And now when we move the flower, we can see that we have now a little bit more space here on this side. And of course we can move the elements around in our tile. And everything will be updated live, so we can really see how it gets tiled. For example, let's move this little green leaf here into the inside as well. And as you can see, we are creating more distance between the two when it get's tiled. Now since we don't want to have two yellow flowers on top of each other, all we have to do is really, select the flower, let's move it over to where the white flower is, and once that is updated, select the white flower and move it into the left, bottom corner. And then we just have to adjust a few more things here. Move some shapes around, so nothing is overlapping. If we wanted to we can select the rotation tool. And, then, we can rotate it as well, and everything will be updated. And, once we are happy with our tile, and the adjustments we made to it, all we have to do, up here, is click done. And, now, when we draw a rectangle again, and now we can see that the changes have been updated automatically. Our title is still called floral, but we made tweaks to it. And if you wanted to, you could double click it again and make more changes. Well let me cancel for now, now let me show you how we can create a new floral pattern from the existing one. So let me delete this rectangle here. We don't need it anymore. And now let's double click our floral pattern again, so the pattern options tool opens up and then as you can see here, in the menu on top, it says Save and Copy. Now, when you click this, we'll get a new pop-up that says New Pattern, and the Pattern Name. So let's give it a new name. I'm going to call it Floral Brown. And then I click okay. Again, we will get a pop-up, which will advise us that the new pattern has been saved now to the swatches panel. So we click okay, and then we double click the escape key, and the pattern closes. Now in our swatches panel, we have a new floral pattern, which is called floral brown. But of course, it's identical to the floral one here. But now what we want to do, we want to double click the second floral brown that we've just created, and in here we want to make changes to it. Now I would like to have the same pattern, but I would like to have a background color with the pattern, so I can see my white shapes, my white flowers, all the time. Now how could we achieve this? Now let me show you how simple it is to actually achieve this. First we have to make sure that we do not have the pattern as a fill and then that the stroke isn't on as well, and then for the fill we're going to choose, let's say a brown, from the swatches panel here, and then we are going to select the rectangle tool, and then we are going to draw a rectangle or a square, same size as the bounding box, and of course as you can see now it covers all of our patterns. And an easy trick here to send it to the back with a shortcut is Shift, Command, and the open bracket, or Shift, Control, open bracket on the PC, so let me do this. And now you can see that the shape has been placed into the back. Now one thing we have to pay attention to, as you can see now, our rectangle is not the exact size as our bounding box, and we can see this here by the gaps that we have in between for the tiling. Now this is not just a rendering issue, this is actually a gap between the tiles. An easy way to fix this without having any overlap, if we look in here the size for the width and the height of the bounding box, but when we select our rectangle here, and we go to the transform palate, we see that the width and the height are slightly different. Now an easy way to fix this is literally going and copying the values for the bounding box and with the rectangle still selected you go over into the transform panel and paste the value in for the width. Now the same thing will do for the height. We just copy the value for the height in the bounding box in the pattern options tool. And then we're going over to the transform panel and select the height and we paste the value in there. And now you can see the rectangle has been changed and our gaps disappear. So if I zoom out now you can see we have no overlap, no gaps, no white lines, no dark lines. And now we can actually save this new pattern. That we already gave a name called floral brown. Now either we can click on the little menu icon up here, that's called done or we could use a shortcut and press twice the escape key on the keyboard. And now our pattern options tool has been closed, but if we go back to the panels we can see our swatch here. And just to show you, if I draw a rectangle with the fill selected, it gives me the new pattern with a brown background but the floral shapes and elements inside are the same as our first floral pattern here. Now I would like to show you quickly how we can create another pattern out of our patterns that we have already created. So let me delete the rectangle here, then we're just going to drag out the original pattern here and if we go to outline so I can see things better and zoom in. I just would like to copy this part of the flower here. So I will ungroup all the elements, I will select the flower, I copy it and then I select all. With the shortcut command or control A and delete everything. And them I'm just going to paste back my flower. Now since I know that the flower is white, I could just select the petals and let me go back to the preview mode again. I select one of the petals then I'm going to go to select, same, same fill color. And then I'm going to set the fill, let's say, into an orange. And now I can see my flower. Now out of this flower I would like to create a new pattern. And as you remember, all we have to do is select the shapes. Go to Object, Pattern, Make. And in the Pattern Options Tool I can see that now I will have a new pattern. The pattern already has been copied. To my swatches panel here. It's called new pattern. So we can easily call this now a flower, and we can choose from different tile types. Now here we have the grid tile, below we have brick by row or brick by column then we have hex by column and we have hex by row. Now I want you to choose hex by row for this particular example. And I would like to change the bounding box, I would like to make it bigger. So I can just select the options here in the pattern tile tool and then I can increase the bounding box like this. And as you can see now I have more gaps in between. Now this is really neat. And if we go to size tile to art, it will snap it back to the original flower size. And if we uncheck it, we can change it again. At the same time, I would like to even take it a step further. What if I wanted the same flower but in a different color. So all I have to do is select the flower, make a copy of it, drag it on top here, go back and change the bounding box so it includes my second flower here. For example, just like this. And then I could go and select each petal, and then give it a new color. So let me do this quickly here. So I'm going to change the orange, let's say into a yellow, and now we have a yellow. And if I don't like the yellow, let's say I wanna have maybe just a little lighter orange, I can select this one here, or I can even go and select a green. Now, I think the green looks really good, and then I've created a new pattern, and with the pattern tile tool, I can easily change the bounding box and adjust it to my liking. If I wanted to, I can also select a green flower and scale it down and have it smaller in between. Or I could even create another one and drag it to the right. In this way, I can create patterns over patterns over patterns. Let me undo this now. Let me just change the bounding box back to a little bit smaller. Let's say to about here and then drag the small, green flower closer to the orange. And I think this is pretty good actually. And since I already gave it a new name, called Flower, I just have to press the Escape key or I click the Done key here, and our new flower pattern has been saved. Of course our original shape, we still have, that hasn't been altered. And if I drag out a rectangle and fill it with our new flower pattern, we can see we have it here and of course we can make changes again to it. And we could repeat this of course, over and over again and we could create new patterns out of our original flower pattern. And this is it for this lesson and now let's go to the next lesson and let me show you how we can create a seamless pattern or tile for different devices. For example, for the web or for Photoshop.


