
 Lessons: 15Length: 2.1 hours
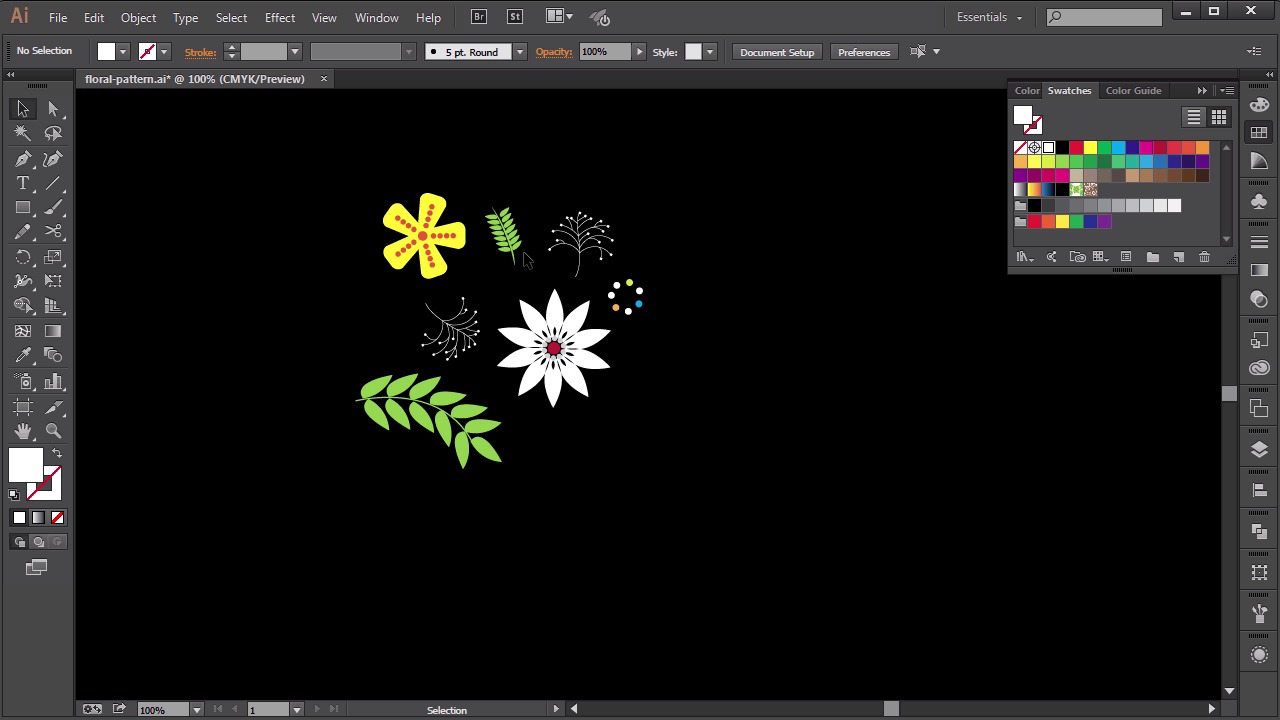
- Overview
- Transcript
4.1 Create a Seamless Floral Pattern
In this lesson we will explore how to create a seamless floral pattern and how to use the Pattern Options tool in Illustrator.
1.Introduction
1.1Introduction01:12
2.A Quick Overview of Patterns
2.1What Are Patterns?06:31
2.2Patterns in Adobe Illustrator08:30
3.Create Patterns From Scratch
3.1Create a Repeating Geometric Pattern13:03
3.2Customize the Geometric Pattern10:25
3.3Use Your Geometric Pattern10:33
4.Create a Seamless Pattern
4.1Create a Seamless Floral Pattern09:01
4.2Customize Your Floral Pattern12:27
4.3Transform Your Pattern Into a Seamless Pattern for Different Devices10:20
5.Create Pattern Brushes
5.1Create a Basic Pattern Brush12:03
5.2Add a Corner Design to Your Pattern Brush07:57
5.3Create a Pixel-Based Pattern Brush06:49
6.Create a Complex Pattern
6.1Create a Vintage Pattern08:54
6.2Assemble Your Complex Pattern09:26
7.Conclusion
7.1Conclusion01:20
4.1 Create a Seamless Floral Pattern
Hi everybody. I'm Simona, and welcome back to the course, Mastering Patterns in Adobe Illustrator here on tuts+. And this is lesson Create a Seamless Floral Pattern. In this lesson, we will explore how to Create a Seamless Floral Pattern and how to use the pattern options tool in Adobe Illustrator. So let's get started. Let's open up Adobe Illustrator. At the same time, please go and open up the source file in your source file folder, called floral pattern. As you can see, we have some elements here. It doesn't look like much, because some of the elements are in white, have a white fill, or a white stroke. So if I go and turn on the outline mode by going to view, outline. You can see that these are actually the shapes we have on our art board. As you can tell this is a flower here with white petals, and if I go and put the preview back on you can see that it's disappearing, but it's there. Now I would like to create with you the seamless floor pattern that has no background but shapes and elements so you can place it on any kind of background you'd like. So so to speak, this pattern will have a transparent background. But when you work in Illustrator with white and you have a white artboard, it's tricky to see. Of course we could put a black rectangle into the background, lock it, and then you would see everything. And let me show you quickly. You just draw a rectangle, place it into the back, and then you can see all the elements. But when we're going to work with the pattern options tool, this background won't be included for the pattern and then it won't show it, and we'll just show how it would look like on a white art board. And then we can't really see what we're doing. Now of course there are some tricks in Illustrator that we can use. One, for example, is to turn on the transparency grid. We can find it under View and then we go down to Show transparency grid. It will turn on transparency grid, and now we will be able to see the white much better. But since this is a checkered background now, it gets quite busy, and we still can't see properly what's going to happen. Well, let me tell you, here is another trick in Illustrator. You can change the colors of the transparency grid. All we have to do is go to File > Document Setup, and when we look in this part here, were it says Transparency and Overprint Options, you can change the color of the transparency grid. So the first color is white. Now we could change this into black, and press OK. And now we will have a black and grey checkered transparency grid. And then of course we can change the grey color into black as well and then we press OK. All of a sudden our transparency grid turns into black and we can see all of the elements on our art board. Now, this will be really helpful when we are going to us the pattern options tool. To align our elements and create our pattern, so it will look really good on a dark background. I created these elements with simple tools here in Adobe Illustrator. I won't go over how to recreate it, I'm pretty sure you know how to create those shapes. But I want to show you how we can use those elements, group them together and create a really neat floral background. So let me show you how we can do this. The first thing we want to look at it how we want to align our shapes of flowers and leaves, we have a yellow here, and the white flower, the green leafy elements, some circles, white element with little circles at the end. Sometimes to create a floral pattern, or any kind of pattern with different elements, it's all about placing them together and seeing how they would work together. And then with the pattern options tool that we're going to use, you can easily see how it will repeat. So the first thing we want to do, we want to place the objects around a little bit. I'm just going by what I think is best. Of course you can create a pattern to your liking how you want. Maybe the white flower needs to be closer to the yellow flower. Create some space here in-between. The circle elements here might look really good on the other side here then here we have the big green leaf maybe even want to place it in this corner. It really is just about how you would like the elements to be placed in an approximate bounding box. Your imaginative rectangle or square. This is really up to you. Now I've already placed all of the shapes of the flowers and leaves and elements in an approximately square bounding box. It's imaginary for now since I didn't want to have anything overlapping at the moment. So of course you can place your elements how you want to. Maybe they want to be a little bit closer. Maybe they want to be a little bit more further apart. It is really up to you how visually pleasing it will look to you. But since now we have a good tile that we're going to use. But this time, we will not just put it into our swatches panel, we will use the pattern options tool. The first thing we do is we have to select all of the elements, so with the selection tool, we select all of the elements, and then we will go to Object > Pattern, and then we will select Make. Now, we will have the pattern options tool in a pop-up window from Adobe Illustrator saying that the new pattern has been added to the swatches panel. And you can see it right here it has been added and as you can tell we do not have a background color. The black that we're seeing is from the transparency grid. And any changes made while in pattern editing mode will be applied to this swatch upon exit. Basically if we add this now to our swatches as a tile, as a pattern tile, and we double click it and make changes, it will update it in here. If you do not want to see this pop up again just simply click don't show again, and then press okay, and now you can see we are in the pattern options mode. On top of here we have a menu saying new pattern, save a copy, done and cancel, and here in the panel we have several elements that we can use. The first thing here is the name. So right away let's give it a name and let's call it Floral. After that we see the tile type. The standard tile type is a grid and as you can see if i zoom out it tiles it in a Grid. One tile next to each other. Of course, we can choose from several options here. We can have it Grid by Row, Grid by Column, Hex by Column, and Hex by Row. Let me just quickly go through and show you what these will all look like. The brick will, of course, offset it, just like a brick wall. The brick by row does the same thing, just vertically. Then, we have the hex, which will create a hexagon shape as the bounding box. And, you can see, now, shapes will start overlapping. And, then we have hex by row. Same thing, and overlapping again. We will leave grid, for now. If we wanted to, we can change the width and height for our bounding box and we can make it proportionate or unproportionate by simply unclicking the width and height proportion link here. If we change it, for example, and replace it to 500 points, it will create a much bigger bounding box around our shapes that we've selected and as you can see, it will add no space in between the tiles. Now if you say, oh, I don't like this. I don't wanna have a pattern that looks like this. We can simply reset it by clicking, Size Tile to Art, in the Pattern Options tool here. And then it will put it back to the original. In the same way, we could add H-Spacing and V-Spacing, we can change the overlap if we had any. And to copies show around we also can change. We can change it to one copy only five, seven, as many copies as you'd like to see. And of course, you can toggle off and on, dimming the copies that are placed around. Right now, I uncheck the Dim Copies to 50%. And we would see what the pattern will look like. I will leave the default for now and dim it. And now if we click done, we simply created a pattern. Of course we could have just dragged all of our elements into the swatches panel as well. But I wanted to show you first the Patterns Options tool. Now if I delete all of the shapes here, and I'm going to draw a rectangle, and then I'm going to fill it with the pattern we've just created. You can see it here, it's called Floral, it will put our pattern into the fill of our rectangle. And this is it for this lesson. Now we've created a Floral Pattern that is seamlessly repeating, with really simple steps. So let's move on to the next lesson, and see how we can alter it, fine tune it, and make new patterns out of this just created pattern.


