
 Lessons: 12Length: 1.7 hours
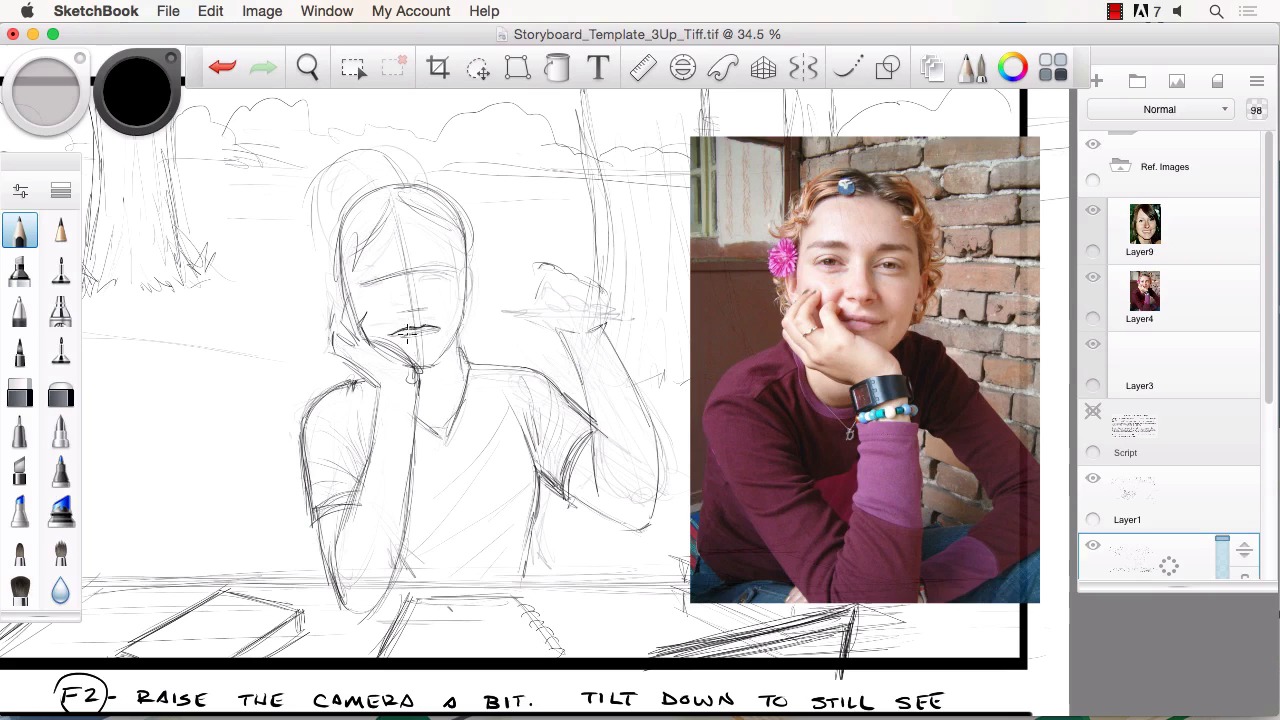

- Overview
- Transcript
4.1 Understanding When and How to Use References
In this lesson we will go over some of the methods I use to utilize references in my storyboards. We will go over the proper way to use references and techniques that I recommend for recreating new characters from the reference materials.
1.Introduction
1.1Introduction01:11
1.2Tools and Resources02:05
2.Creating a Frame Template in Sketchbook Pro
2.1Understanding Scale and File Size When Creating Storyboards05:27
2.2Creating a Template for Our Storyboard Frames07:34
3.Taking the Script to Rough Pencils
3.1Briefing Over the Script07:12
3.2Laying Out the Rough Pencils15:00
3.3Revisions to the Rough Pencils and Camera Angles11:25
4.Refining the Artwork
4.1Understanding When and How to Use References14:46
4.2Creating the Refined Artwork17:16
4.3Looking at the Finished Work Objectively04:53
4.4How to Save Files for the Client10:57
5.Conclusion
5.1Course Conclusion and Main Points02:42
4.1 Understanding When and How to Use References
Welcome back to Storyboarding and Sketch Book Pro. I am Robert Marzulo. I will now cover Chapter 4.1, Understanding How and When to Use Reference. Okay, so now we've got approval on our sketch lines and we're ready to move forward. One of the things that comes into play quite often when doing this type of work is the question of when and how to use reference. Now reference can always make your job a lot easier in this type of work. But you also don't want to use it too much as a crutch. You still want to define your ability to draw and keep your ability to create, you know, on the fly. But there's going to be times when reference is needed and it solidifies the art process and gives you a better foundation to work upon. Now the first thing to do. I've already got some reference images here I'll go through with ya. And obviously for the shot right here, let's open up this folder, I've created a group in a folder inside SketchBook here and placed the images within. So this one here, obviously, is a perfect example of the pose there. So this is a great reference and I can scale that down interactively, kind of place it there and use that for a guideline to better create a more accurate depiction of the way that the body would be posed in this shot. Now as far as getting your reference, keep in mind you've got a lot of great sites out there where you can pay for certain creative rights to be able to use that work, and you're going to be recreating the work regardless, so there's a lot of flexibility in there. But you want to make sure that you get your images the proper way. Whether you purchase them, or what I like to do is actually take as many images as I can myself. One of the techniques that I'll use quite often is take pictures of my own family members, myself and then recreate an entirely different character off that pose. And I'll kind of show this year. Even though this is a stock photo. I'll show you how it could take this and recreate it over here and make it look like an entirely new individual. So that's one way to utilize it. And this image here, let's get this in placement. We're gonna use more of her face structure, we're going to use the pose off this photo and then we're going use the face structure and more of the hair style from this one. So that's another that you do a lot in story board is kind of use elements of each picture. You know, and obviously this is going to be more of a close-up. So we'll zoom this up. I'll move this around and then we'll just go ahead and crop away some of the information we don't need just by selecting around the picture and deleting. We can probably do away with almost all of this. Something like that. And the top frame, I could use a park scene. Obviously something like that would be nice to just go to your local park or if you've got something that matches. And you gotta remember, it doesn't have to be identical. You could take a couple photos of trees around the neighborhood. You could take some shots of your local park or a big grassy area. You know you can composite it all together. And a lot of times that's what you have to do to get the shots that you need. And there's kind of a certain element that teaches you a lot when you do that with this type of work to where pretty soon you don't need as much reference because you start to visualize the frames better because you've done that so many times. Okay, so I am going to start with frame two here and I am going to show you how I typically use the reference to help me get a better rendition over here. So let's move this over just a little bit more and scale it down a bit. Just wanna make sure I can see the element that I wanna work on, which is the girl character right here. And I'll leave that at full opacity I guess. Okay, so there's my lines right there. Now one of the ways I like to do it is soft erase the initial sketch down, enough to where I I can look at the picture to the right, pull from the data form that picture and incorporate it over here. Now, again, like I said, I'm gonna use more of the face picture from the other shot. So right now I just want a better rendition of the pose. So, her hand comes in front of her face here. Keep in mind. If your drawing skills aren't as you know attuned and you need a little bit more help, you can trace basic outlines. It's not unheard of and really steep deadlines. They'll actually, sometimes, encourage it. So, I like to do as much free hand as possible because it trains me to be able to produce stuff without needing reference. Because there will be times when you're not gonna be able to find reference for the exact shot that you needed. And you'll just have to produce something. So, the more that you can practice that and train yourself, the better. And you could see like even right here, this isn't gonna be an exact depiction of that pose because there's something different going on here. Now I could easily take a picture of my own arm holding something up and then bring that in and use that for reference. Or one of my favorites, keep a mirror beside your art table, or art desk and just look inside the mirror and do the various poses. And it seems tricky at first, but you'll be amazed, you'll eventually get it. Practice heals all things when it comes to this type of work. And I'll take notes from little things too like the clothing. Maybe the way I drew the clothing looks too stiff like on the arm here. But I look over at the arm here and there's a lot of these little fold and wrinkles going back and forth like that. So I'm not just looking at the pose. I'm looking at elements of the texture or the clothing or whatever. So you can pull from all areas of that. And I think I'm going to use more of the smile of this shot because we want to add more attention to the last shot being a bigger, brighter smile, like the script said. So I'm going to go ahead and just utilize more of the shape of her smile, where it's a closed mouth. Kind of smirk or light smile. The other thing to keep in mind when creating these is that it doesn't have to be exactly like these photos that I'm using for reference. The thing that's going to be more concerning is that the continuity matches from frame to frame. So they're obviously not going to see the reference shots most of the time. Sometimes they will actually provide you with reference shots but you know, the thing they're gonna be most concerned with, is the fact that they look like the same character throughout the storyline. And I'll keep refining this hand pose. As I progress through the artwork. And that's something else where if I keep reworking it and it still doesn't look right then I'll obviously go to reference and by that I'll just take a picture of my own hand holding a pen and look at the picture. So that's the other thing that you'll have to practice is you've got to be able to change, you know, a man's arm to a woman's arm and a woman's arm to a child's arm or whatever. You know, there's the same information is there, but you have to be able to see the subtle differences or sometimes not so subtle, and make the change and still, you know, utilize the pose. Okay, let me grab the other picture to make sure I'm not making it look to much like this model. So, let's swap these around. Scale this one down. And then basically the thing that you start to get better at is noticing the little details and what makes somebody's face look a certain way, and you start to pick that apart. The roundness of her eyes, the distance from the smile in conjunction to the eyes. You know, how rounded her cheeks are, stuff like that. And here I get to show you how to fix a mistake. I've actually accidently drawn on top of the photo. One of the things to be careful of when moving things around. Let's select the area that I was working on. Cmd+X, Cmd+V, move that back into place, and luckily this was done on the rough sketch. And move that back to the artwork layer. And command E will merge that back into that layer. Then we're gonna go ahead and tilt the pen just a little bit. It's a little bit too straight across. Okay. So there's a little bit more refined, still very rough but we just keep working this. And I'll go ahead and address this more into the next lessons. But that gets us a little bit closer and that's how we basically use reference to improve the artwork. Now the other thing to keep in mind is that as we progress through this, say these are full color frames, or shaded frames and then color from there. You can still use this photo for all that reference so, if it's obviously, a color shot. Then, you could use the tones of her face. You could even take this and bring it down to a de-saturated picture. Under hue saturation, bring that all the way down. Hit apply and that gives you, your tones for your tonal values. And this is really important because a lot of times when people create toned pictures, they seem to oftentimes have the values really skewed and not appropriate. So this is a good way to train yourself to get these right. Take some trees, turn the values down or turn the saturation down, and study the amount of tone that's really in these pictures and then incorporate that into your art and you'll be pleasantly surprised. >> All right, so that'll wrap up this chapter. Now we'll be heading over to Chapter 4.2 Creating the Refined Artwork.


