
 Lessons: 12Length: 1.7 hours
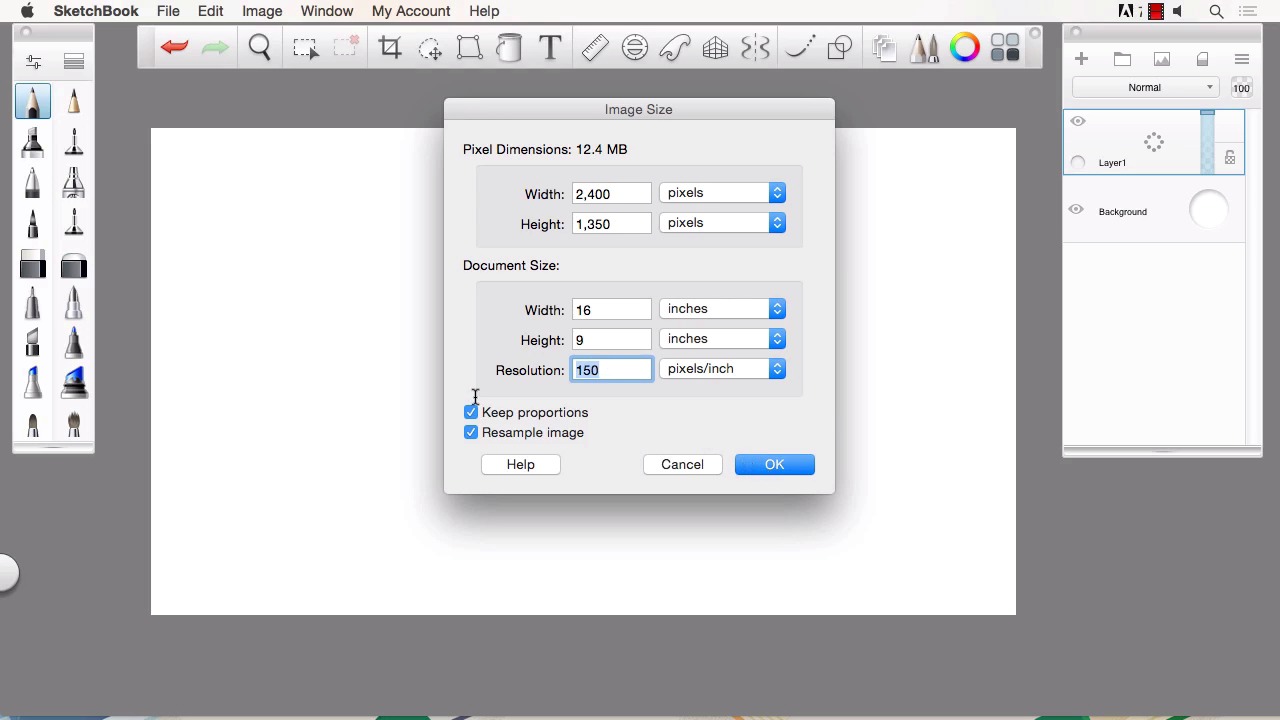
- Overview
- Transcript
2.1 Understanding Scale and File Size When Creating Storyboards
In this lesson we will cover the proportions and resolutions that a typical client may require for their storyboards.
1.Introduction
1.1Introduction01:11
1.2Tools and Resources02:05
2.Creating a Frame Template in Sketchbook Pro
2.1Understanding Scale and File Size When Creating Storyboards05:27
2.2Creating a Template for Our Storyboard Frames07:34
3.Taking the Script to Rough Pencils
3.1Briefing Over the Script07:12
3.2Laying Out the Rough Pencils15:00
3.3Revisions to the Rough Pencils and Camera Angles11:25
4.Refining the Artwork
4.1Understanding When and How to Use References14:46
4.2Creating the Refined Artwork17:16
4.3Looking at the Finished Work Objectively04:53
4.4How to Save Files for the Client10:57
5.Conclusion
5.1Course Conclusion and Main Points02:42
2.1 Understanding Scale and File Size When Creating Storyboards
Hello. My name is Robert Marzullo, and I'll be your instructor in this course, Storyboarding in SketchBook Pro. We'll now be going over Chapter 2.1, Understanding Scale and File Size When Creating Storyboards. So let's get started. Okay, so one of the first things you're gonna want to determine is what size your frames need to be. Now if you're working with a director then that's a question you're gonna wanna ask them. So one of the two popular sizes that I use are five by seven. And I'll show you how you change it inside Sketchbook here. You uncheck keep proportions. And put 5 by 7, and we'll leave it at 300 DPI. That gives us a 12 meg file. Hold the space bar, and you can pan out and move your frame around your canvas. And you can see it's pretty much like a photo. Same scale. So that's a real popular size. The one I prefer, if it's not specific to the project, and I have the ability to choose, and most of the time a lot of directors or art producers will want to go with this size anyways, is 9 by 16. So uncheck keep proportions again, and this is basically a 16 by 9 aspect ratio. So it gives you a wide screen format which is really nice because most shots are going to lend themselves to this type of framing. So once you've determined that and you see how easy it is to adjust the size in there. The only other real choice is your resolution, now you'll notice if I wanted a really high def resolution I could do something like 600, which is a bit of an overkill. It creates a really large file. And if you don't have a system that can handle that, it's gonna tax the system and slow it down, something you definitely don't want to deal with in storyboarding. Just so you know, storyboarding is a speed game. It's the ability to produce stuff really quick, understand things on the fly, and make adjustments on the fly and get it back to your art coordinator or producer or whoever you are working with. So, you have to be able to move quickly. So, if something like this is to slow your system down, there's no need. You take that down to 300, and you're still going to have a nice clarity. If you're just doing black and white line work, you can really push this down all the way down to 150. Now you're down to a 12.4 meg file, so it's gonna be pretty quick on almost any system. Now, if you're like me and you like to see all of your frames together, then you might want to start initially with a larger resolution. And then I'll go ahead and show you how to create the frame and lay that out in our next lesson. Creating a template for our story board frames. Now the other thing to keep in mind is that your file size is whatever the director coordinator determines to you and you'll want to ask him that in the brief. You know questions like how many frames, what frames are important? You'll go through all those things and then you say what resolution? What scale? So that's all stuff that you want to ask the person that's gonna be using these frames to make their, their pitch or their presentation. So once you understand that, then you can get to creating. Now what I'll end up doing is creating a larger file size, like I've shown you here, of 49 megs, 9 by 16. I'll use that to create the initial frame and then I'm just going to rough this out really fast to show you what I'm talking about, and we'll refine this in the next lesson, and I'll take this and once I've created the nicer version, I'll copy it down I'll scale it and copy it on the same canvas. Hold the icon here, pull over to duplicate layer. Click here. Use this icon to move that over by grabbing the side. And then just repeat that process. Now you can merge these two layers together by hitting command e or control e on a PC. Click and hold again, duplicate layer. Grab the move. Grab the outer ring here. Move those down. And there's my really rough layout of what we're going to create in the next lesson. But with this I can now start to figure out what my frames are gonna look like and keep in mind that you can create these in a higher resolution and then save them down at the end of your process to give to your director. And put it at whatever resolution you like. But you always want to start higher and step down. Don't try to design, especially full color, at say 100 resolution 9 x 16 and then try to save it at 300 or 600. That's just not gonna work. So you always want to start higher if your system can handle it and then save that down. All right, so that will conclude this lesson. Next, we'll head over to lesson 2.2, creating a template for our story board frames


