
 Lessons: 12Length: 1.7 hours
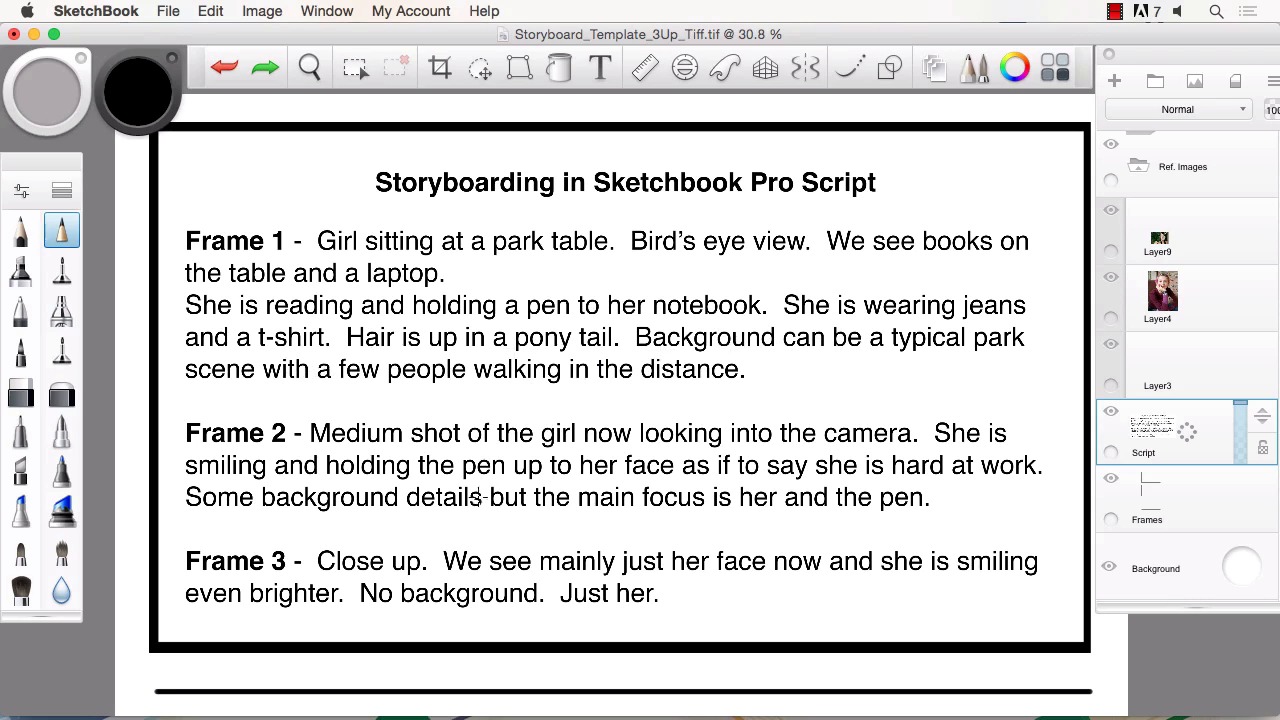
- Overview
- Transcript
3.1 Briefing Over the Script
In this lesson we will go over a script that I have prepared. In storyboarding you have to brief the script and make sure to fully understand what the client is trying to visualize. We will go over camera angles and where to acknowledge areas that may require more explanation from the creative director.
1.Introduction
1.1Introduction01:11
1.2Tools and Resources02:05
2.Creating a Frame Template in Sketchbook Pro
2.1Understanding Scale and File Size When Creating Storyboards05:27
2.2Creating a Template for Our Storyboard Frames07:34
3.Taking the Script to Rough Pencils
3.1Briefing Over the Script07:12
3.2Laying Out the Rough Pencils15:00
3.3Revisions to the Rough Pencils and Camera Angles11:25
4.Refining the Artwork
4.1Understanding When and How to Use References14:46
4.2Creating the Refined Artwork17:16
4.3Looking at the Finished Work Objectively04:53
4.4How to Save Files for the Client10:57
5.Conclusion
5.1Course Conclusion and Main Points02:42
3.1 Briefing Over the Script
Hello everyone, welcome back to Story Boarding and Sketchbook Pro. My name is Robert Marzulo. We'll now be covering chapter 3.1, briefing over the script. So now first things first. Before starting any type of Storyboard job, you're going to have to go over a script. Now, for the sake of this course, we're going to keep the script relatively basic. I've definitely dealt with scripts that were a lot more complex than this, and some that, on occasion, were even more basic than this. But this is a basic understanding of what a particular script might look like. So, you've got your frame, obviously. Your description, the shot, whether it be a bird's eye view, a medium shot, a close up. You're gonna have lots of variety of different types of shots. Extreme close up, angles, all these different things, work placement of the cameras. Then you're going to have details, like in this particular shot, we see books on the table and a laptop, little descriptions like that. This is your opportunity, when you go over a script like this with your editor or your agent or director, whoever you're dealing with. Oftentimes when you work with a script like this, you'll actually start by getting on some sort of conference call and maybe dealing with as many as four or five people at once. Sometimes you're lucky and it's just one person which is always nice. So, when that occurs, that is your opportunity to ask any questions and really start to paint a mental picture of what they mean by their wording. Sometimes, the wording will be more vague. Other times, there's excessive amounts of detail, but you need to always make sure that you understand exactly what they're trying to depict to you. And that's the trick of storyboarding, that's where the talent comes in and the foresight to be able to see into the problems that might occur when trying to illustrate this type of stuff. So we'll start with this, frame 1, girl is sitting at a park table. Bird's eye view, so the camera is up in the area looking down at the hero, which is commonly referred to the hero character in the storyboards. We see books on the table and a laptop, okay, pretty easy to understand there. She is reading and holding a pen to her notebook. Obviously pretty easy to understand there. And just to give you an example, even here, you could ask something like, as simple as this may sound, is she left handed or right handed? Is she hunched over her notebook, or just casually leaned back? Those are just examples. Obviously, that's not really that big of a deal in this type of story line. But, that's the way I want you to look at the script, and foresee any issues. And try to work the images out in your mind. She's wearing jeans and a t-shirt. Obviously pretty easy there. Hair's up in a pony tail. If these are going to color, you start asking things like, what color's her hair? What is the setting in the background? Obviously it's a park, but what time of day is it? Because the time of day will affect the coloring of those boards. If they're just line art, then all that goes out the window, obviously. Background can be a typical park scene, with a few people walking in the distance. Now, there you could say, how large is this scene? How small is she in respect to the entire scene? That will tell you how much of the park you need to draw in the background, and how many people you might want to fill up that space. Or is it a busy park or is it a very secluded type park? So questions like that are all going to factor into that type of story telling. Now Frame 2, medium shot of the girl now looking into the camera. She's smiling and holding the pen up to her face as if to say she is hard at work. Some background details, but the main focus is on her and the pen. Okay, so a shot like this, she's now really tight into the shot, a medium close-up. Now, keep in mind, a medium close-up, or medium shot, can be depicted a few ways. I've seen people say a medium shot, and it was waist-up. I've seen people say medium shot, and it was shoulders-up. So, this is a little bit loose to interpretation. And that's where you also need to ask questions and define that. And that's also where thumbnailing and rough sketches save the day in this type of work. Instead of assuming that you understand exactly what the director or coordinator means, it's better to thumbnail and do the roughs, and send them back and forth, and totally understand all of these, you know? Even the angle of the face. This is obviously forward into the camera. She's smiling and holding the pen up to her face, as if to say she is hard at work. You can ask small questions like, is the pen angled to the face? But again, something to keep in mind. If they don't specify, then there's a chance that they want you to just creatively come up with that look, and design that. So always keep that in mind too. Frame 3, close up. We see mainly just her face now and she is smiling even brighter. No background. Just her. So now, the background's entirely omitted. The focus is just on the hero character. She's smiling even more which means, brighter, more teeth, more accentuated on the smile. And close up, again, could be loose to interpretation. It could be close up, or extreme close up, and that would rectify in the thumbnails. And sometimes it's better to start with a wider shot, because you can always tighten into the shot, by just increasing the size of your artwork. So, if you're up in the air about what it might mean, always start a bit wider. It's easier to tighten in. Versus the opposite, where you would actually have to draw more artwork around your initial sketch. So okay. So now we have a pretty good understanding of what they're expecting for each frame. Now keep in mind, other good questions to always have handy when doing this type of work is, what type of character do we have? What ethniticity? What body type, size, weight, things like that? It's always good to have all those questions in mind. So that you can paint a really nice strong mental picture of what they're expecting. And for the most part, they're gonna generally give you that information, but if they don't, it's always good to be ready to ask those questions yourself. Okay, so that completes chapter 3.1, briefing over the script. Now we'll head over to chapter 3.2, laying out the rough pentels.


