
 Lessons: 12Length: 1.7 hours
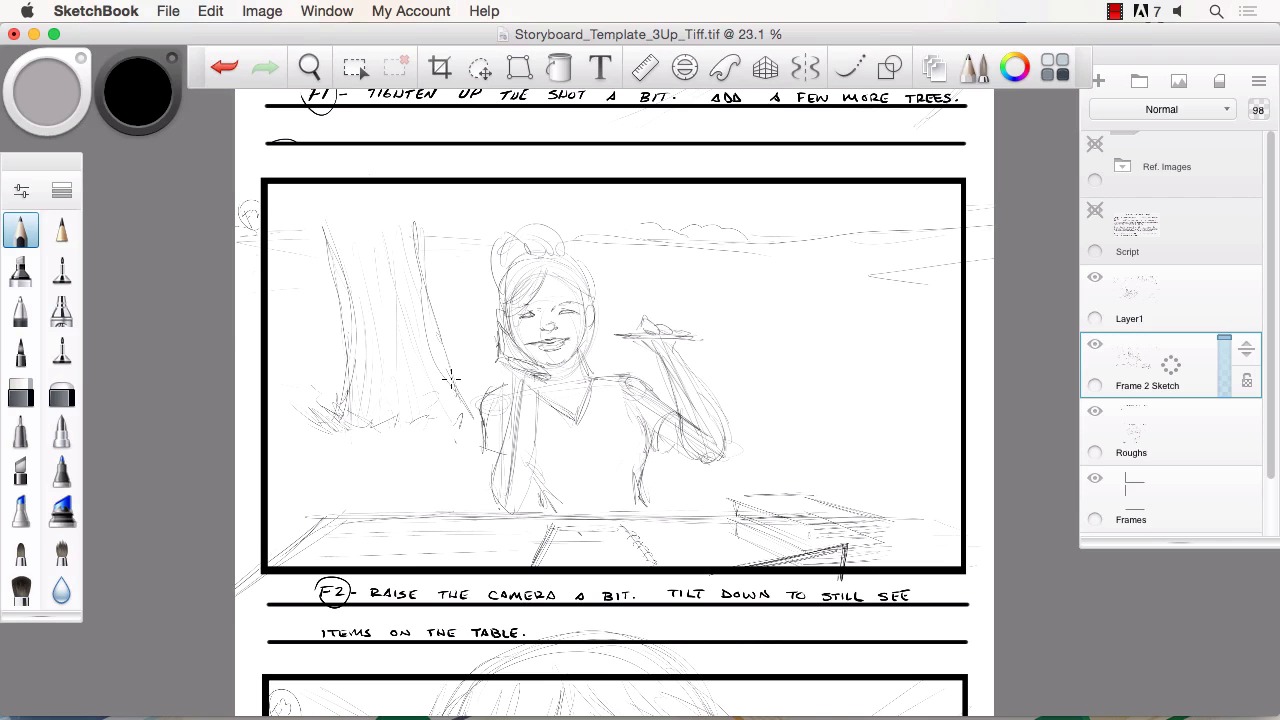
- Overview
- Transcript
3.3 Revisions to the Rough Pencils and Camera Angles
In this lesson we will go over some of the changes you may expect when dealing with a director after they have seen your rough pencils. We will cover how to make those changes and resubmit your art for approval.
1.Introduction
1.1Introduction01:11
1.2Tools and Resources02:05
2.Creating a Frame Template in Sketchbook Pro
2.1Understanding Scale and File Size When Creating Storyboards05:27
2.2Creating a Template for Our Storyboard Frames07:34
3.Taking the Script to Rough Pencils
3.1Briefing Over the Script07:12
3.2Laying Out the Rough Pencils15:00
3.3Revisions to the Rough Pencils and Camera Angles11:25
4.Refining the Artwork
4.1Understanding When and How to Use References14:46
4.2Creating the Refined Artwork17:16
4.3Looking at the Finished Work Objectively04:53
4.4How to Save Files for the Client10:57
5.Conclusion
5.1Course Conclusion and Main Points02:42
3.3 Revisions to the Rough Pencils and Camera Angles
Welcome back to Storyboarding in Sketchbook Pro, this is Robert Marzullo. We'll now be going over chapter 3.3, revisions to the rough pencils and camera angles. Okay, so now we've got our notes back from the director, and we're ready to start reworking the pencils and figuring out what's gotta be changed here to make everybody happy. So in frame one, we've got the note tighten up the shot a bit, add a few more trees. Now, sometimes you're gonna get revisions that are gonna be tougher than others. Other times you're gonna get lucky and they're gonna love your first shot. Different things are gonna happen there. So one of the things to remember is that that's why you kept everything loose and scratchy like we did here, so that you can make these adjustments and they're not too time-intensive. So tighten up the shot a bit more, we're gonna use the selection tool here in Sketchbook Pro. Select this area. And at this stage, I like to do things like, command X, command V. Control if you're on a PC. And it gives me a new layer of this particular frame. So, now I can edit this without worrying about the other layers below. And to tighten up this shot I can just increase the size of the frame, move the sketch down a little bit cuz based on what it's saying, it doesn't sound like it wants to omit any of the details, so sometimes you've got to look at the information and think, what it's not saying also. So it didn't say get rid of the horizon or get rid of the tree line in the back, so I'll just tighten up the shot a bit, add a few more trees. So, to me that means, obviously here's our center of attention, the girl at the table. So we'll pull in tighter and add a few more trees. So we'll just kinda randomly place those. [SOUND] Just to help sell the idea that it's in a park. [SOUND] You could even try something like a branch real close into the foreground like this, with a view added leaves coming off the bottom of there. That's kind of a neat effect to really pull in tighter and show some depth. And leaves could actually even come down and kinda border the frame a bit. So, it's simple as that. Say that we've got some added trees and keep in mind a lot of times when you're doing something like this, even though you make such a small addition, if there's not an extreme rush on the job, it's always smart to maybe resubmit. And, always getting the feedback. Okay, is this what you're looking for, is this what you're looking for? And you keep making those adjustments. And it saves you from putting all the hard work into the finals, and then it not being approved or, not being what they need for the project. So that would be as simple as we need for the changes on that frame. Let's move down to frame two. Okay on this one, raise the camera bit. Tilt down to see the items on the table. So again, I'll go to the rough right here. I'll grab the selection tool here. I'll draw a box shape around the sketch on that part of the layer, command X, command V. Adds a new layer for us and I could be renaming these but. And just so you know how, you simply click, hold, pull over to the letter there, rename, Frame 2 sketch. Something like that. Okay. So, to raise a camera and still get the items, on the table, obviously that's why the tilt is there. So you could raise a camera just by pulling the sketch down, but see how you lose the items on the table. So one way to kind of mimic that, is you could use the transform tool here. And you could pull these inward like you're changing the perspective of the frame. Pull those down, you may widen this out a bit. And this is just kind of a visual guide. You're still gonna wanna redraw to make it correct, which you would have to anyways because it's still very rough. But it will give you an idea of how you could raise the camera and still get the perception that you look, you're looking down on the table. So, this transform tool can be really handy for things like that. You notice you can grab the side bars and the end points. So you just kind of play around with that and get some kind of perspective. If it's something that's not working out properly in your mind's eye and the way you're trying to perceive it, then that's when you're gonna pull from reference and we'll also address that later on in the course here. So that would give me enough of an idea of changing the framework. It allows me a little bit more space to do more of the tree line in the background and I would simply either soft erase this down or tone down the layer all together and draw a new layer over top. But for the sake of this being a bit speedy I'm just gonna go ahead and draw the new information onto the existing rough. I can move items like the laptop. I can bring that up a bit more so we don't loose that. Remember to always go back and forth from your other frames, make sure that there's no elements that you're missing. Like here she's got a book off to her right and there's not one here, so obviously we've gotta add that. It's got to tilt, make sure to add the tilt. Just little details that don't seem very important until you get all your work side by side and then the sequential storytelling will either look good or bad based on those little details. And then let's check to see if our trees that we added would be in that. If you notice this tree off to her back, we'll say of her left shoulder. And actually that tells me that this tree is in the wrong place. And then the other tree would be back behind that even further off to her left shoulder. So we can fix that real quick. Select that. Actually it's gotta be this tool. Select that. Move over. And rotate a little bit. And so basically, this area over here isn't in the first shot. It's way off camera. So we could actually add another tree because we know now from the notes that the director wants more trees in the scene. So we'll go ahead and just add that. Making an educated choice there. And this other one would actually be off to her left, our right, even further. So I imagine we'd see that right about here. Something like that. A little bit of the grass line around the trees. And again just very rough, very quick to kind of get the idea down. Maybe some of the hilly shifts in the ground like that. So there. We've added a little bit more information to the back. We're still getting the items on the table. That's probably close enough to that type of change that's requested there. Okay so F three and frame three, pull in even closer or move motion lines, only the girls face is needed. So this is one of those scenarios where your pride gets kicked a little bit. You thought these maybe these cool motion lines would really help sell the scene, but somebody on the other end of the spectrum looks at it and goes, it's really not what we're looking for. Maybe to them it makes it looks like the character is in motion and she is really just sitting at the table. So there's times when you're gonna offer ideas and they're gonna get shot back at you, and this isn't a big deal or anything but it's an example. And that's what I wanna make known to you is that a lot of times in this type of work you really have to just be really open to criticism and changes of the idea, and not get offended by it. That makes you a good storyboard artist, to be able to take those adjustments in stride and keep working in making something outstanding, regardless of the feedback that you get. And oftentimes their feedback is gonna help the end product anyways. Okay, so now we increase the size of it like we did the other frames, pulling in even tighter, which will allow for more detail, and should add a little bit more drama to the scene. And we can make sure that we fill in. You're gonna see part of her pony tail, like that. All right. So, something like that and that gets us our changes. And there's gonna be times when the changes are a lot more dramatic than something like this. There's gonna be times when entire frames are just taken out of the mix, and then there'll be times other frames are needed or added. Another thing to keep in mind when doing this type of work is if the script is more detailed, obviously, than what we have here and you feel the need to add a frame, because you just can't seem to tell the story with the amount of frames that are there. That's another thing that's kind of up to you as the creative person and the storyboard artist. For you to say look, three frames sells this short little synopsis, but it would sell it a lot better or it would work a lot better if we added a fourth frame, or a fifth. So always keep that in mind too, that that's also something that you might need to speak up and offer to the creation of this project. All right, so that'll conclude this chapter. Next, we'll head over to chapter 4, Refining the Art Work.


