
 Lessons: 17Length: 1.3 hours
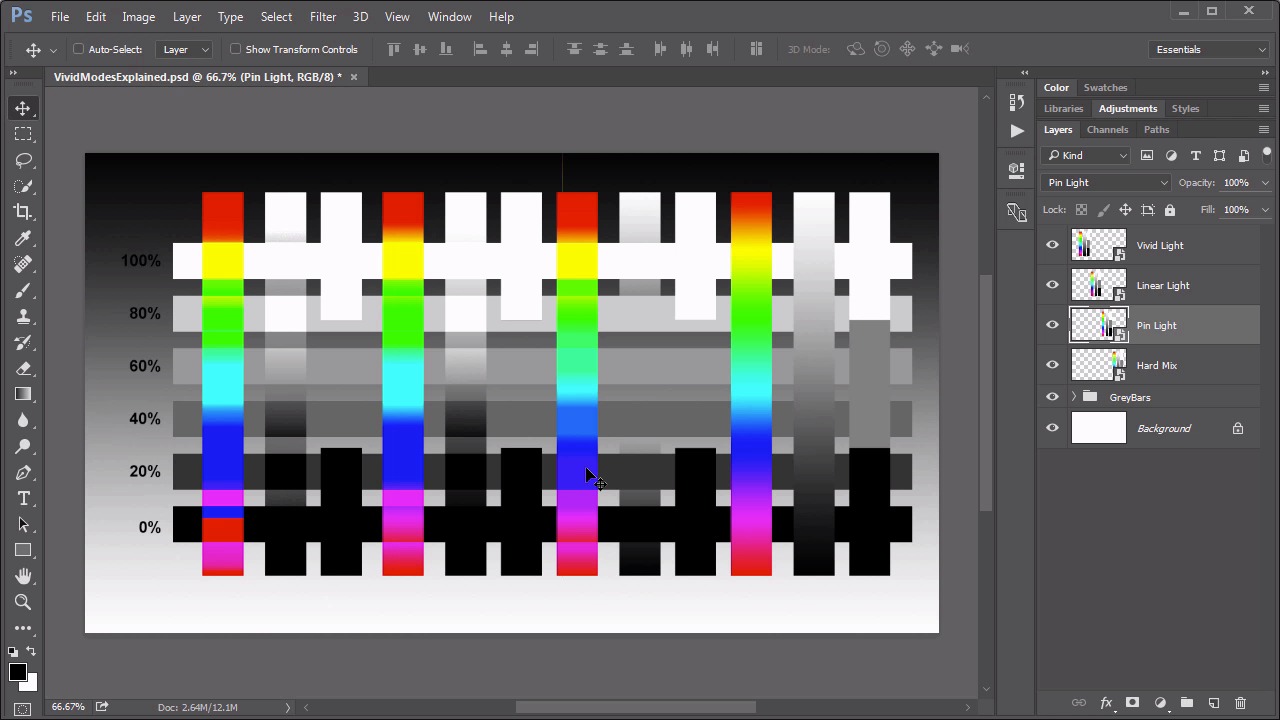
- Overview
- Transcript
5.2 Vivid Light, Linear Light, Pin Light, Hard Mix
These are some of the more obscure “creative” blending modes. They naturally fall into the Overlay set as they deal primarily with blending midtones. In this lesson, we look at what each one does and how it does it.
1.Introduction
1.1Introduction01:34
2.Normal Set
2.1Normal and Dissolve02:37
2.2Practical Uses for the Dissolve Mode06:27
3.Multiply Set
3.1Darken and Multiply06:15
3.2Color Burn, Linear Burn, Darker Color05:25
3.3Adding a Digital Tattoo06:01
4.Screen Set
4.1Lighten and Screen03:36
4.2Color Dodge, Linear Dodge, Lighter Color04:36
4.3Coffee Ghost07:25
5.Overlay Set
5.1Overlay, Soft Light, and Hard Light04:39
5.2Vivid Light, Linear Light, Pin Light, Hard Mix06:20
5.3Nondestructive Dodge and Burn06:03
6.Inversion Set
6.1Difference, Exclusion, Subtract, Divide05:52
6.2Inversion Modes: Drawing Effects03:53
7.Component Set
7.1Hue, Saturation, Color, Luminosity05:58
7.2Luminosity Mode: Soft Focus02:45
8.Conclusion
8.1Conclusion00:47
5.2 Vivid Light, Linear Light, Pin Light, Hard Mix
Hello everybody. Welcome back to Mastering Blending Modes in Adobe Photoshop. This is lesson 5.2 where we look at the last four different modes in the overlay blending mode set. If you remember in our last video we went over the first three modes in the overlay set. That's the overlay, soft light, and hard light. Frankly speaking, those three are more useful than these last four are all combined. But these are here. And it's worthwhile to go through and understand exactly what they do. And for lack of a better term I'm going to call these the vivid set. And we'll start with the first one that's the vivid light. The set of color bars over here on the left I've now set to vivid light and the rest of them will still remain at normal. You'll notice that this mode still renders that 50% grey as completely invisible. But what's different about this mode is that it considers the blending color, that's the pixels that are on the layer, and if those pixels are lighter than 50% grey, so that's the white and the lighter gray areas, then the image is lightened by decreasing contrast. Then on the other side, if the blend pixel is darker than this 50% percent grey, so that's the black or the darker greys, then the resulting color is darkened by increasing the contrast. Which really doesn't seem like it might be all that useful. But it does lead to some really interesting results with the color bars as you see here. Let's move on to the linear light. That's this next one in the set. So linear light does a very similar thing to vivid light. But instead of increasing or decreasing contrast, it's actually going to adjust the brightness of the resulting pixel. Once again the 50% gray is completely gone, but this time we see a little bit more blending happening with the lighter greys and with the darker greys. That's because it's actually adjusting the brightness of the resulting pixel as opposed to trying to adjust the contrast. Now while the differences may be rather imperceptible with the grey areas, we can see a difference in the color bars. This is creating a decidedly different effect when it's overlaying these colors over those grey stripes. Next up is the pin light. And the pin light is one of the ones that may be the most difficult to understand. Because what it's doing is using that pixel replacement idea that we talked about previously. Instead of actually blending, it's replacing pixels. So it's using the blend color, that's the color that's within the blending layer. And if that color is lighter than 50% grey, sets these light greys over here. Then any pixels that are darker than that are replaced with the blend color. Then on the other side if the blend pixels are darker than 50% grey that's these darker ones over here. Then the pixels that are lighter than that are replaced with the blend pixels. Again, the 50% greys are completely removed. The whites are white and the blacks are black. What significant about the pin light is that it does tend to have a higher tolerance for removing these grey values. As you can see in the middle of the gradient here. Even though they're not exactly 50% grey, we are getting a lot of disappearing grey values. Because of the way the math works with that. Also notice that we get a lot more striping in the color bar here. It's doing that pixel replacement idea all according to the luminous values of these colors. And so from there it will go to the hard mix, which is one of the easiest to explain, but one of the hardest to find good uses for. Really the best way to understand this is that it is forcing the composite colors to be fully saturated or fully luminous. There's no grey values left and it's all either 100% white, 100% black or 100% of one of these colors. In fact if we use the color picker and watch the RGB values you'll see what I mean. Clearly the white is the full 255 on all three of the RGB's and black is at zero. That's what we would expect. But look what happens when we sample some of these other colors from the color bar. We get a full 255 in the red and zero and zero in the green and blue. And then various combinations of that. There is no in between with the hard mix, it is full extreme values all the way. In just various combinations of those extreme values. Let's take a look at what these blending modes do when they're over an image then. First, let's start with this vivid light. That's the one all the way over here on the left. Now as we discussed, vivid light is adjusting the contrast of the background image according to the brightness values of the blend pixels. Again, the 50% grey is completely gone But we can see some increased contrast in these blended areas here. Which does lead to some very bright bright and some very dark darks and some extreme colorization too. The moving over to the linear light it's doing a similar thing but it's doing it by adjusting the brightness of the background area. Which even though it does lead to some very bright brights and dark darks. We don't have that same extreme contrast in effect. Which can lead to some posterization within the background image. We do see some of that still with the colors, but when we are using the gray scale values It tends to work a little bit better. Moving on then to the pin light, remember this is the one that's doing that color replacement. Again it's a lot more forgiving when it comes to removing those grey values. But notice how the lighter in the darker values don't really blend very much because they're being strictly replaced. And we also get a strange colorization effect through the color gradient too, where the pixels are just flatly replaced and not really blended. And then the clown prince of them all is the hard mix. This one leads to some very strange and psychedelic effects, especially when using the colors. It is forcing those extreme colors into a very posterized effect. So even with the blending of the black and white in the mid tone greys, and even the grey gradient, we're not getting a good blend from these. We're ending up with some really rather strange looking colorized effects. Overall, these are not really the most useful blending modes, in my experience. Sometimes, I will find that the vivid light or linear light can make some colors pop. And add some effects that i'm looking for perhaps when the overlay mode just isn't quite strong enough. But to be honest, I've rarely ever used these modes. It's interesting to know that they're there, and what they do. Maybe you can find a creative use for them. Next lesson, lesson 5.3, we'll look at some practical applications for the overlay in the soft light blending modes. Particularly, we'll use them to create some nondestructive, dodge and burn effects.


