
 Lessons: 17Length: 1.3 hours
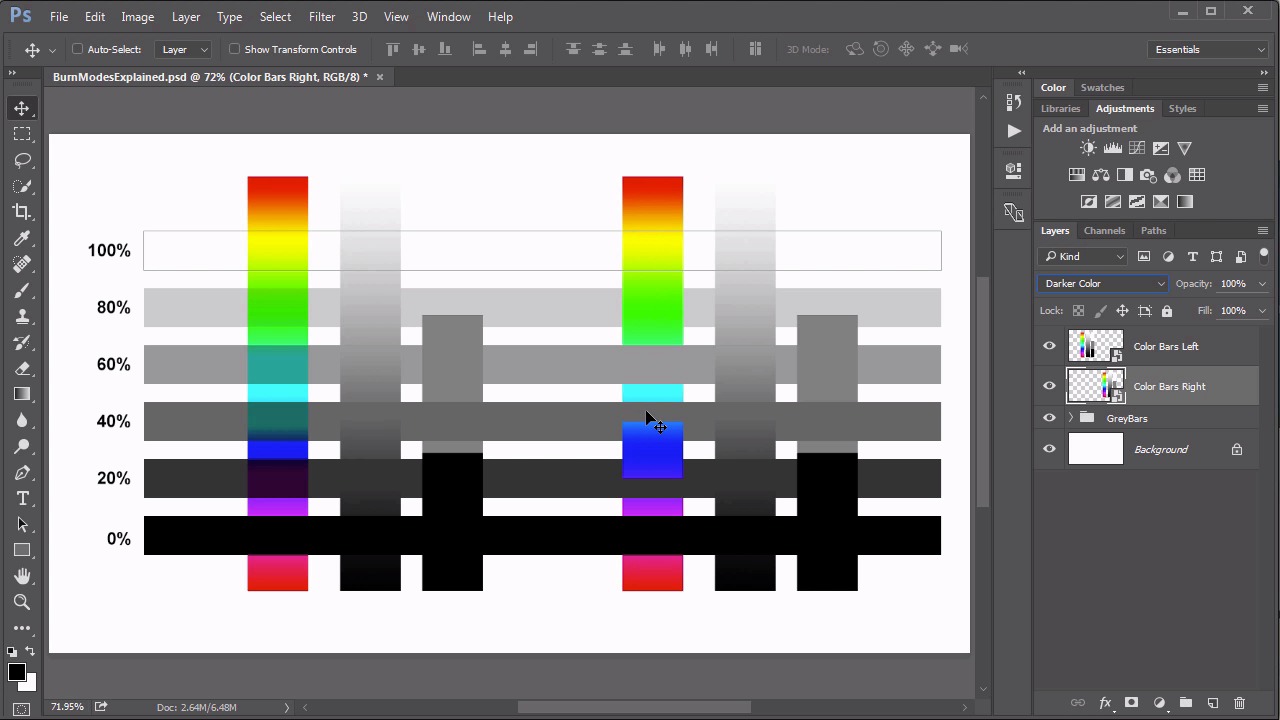
- Overview
- Transcript
3.2 Color Burn, Linear Burn, Darker Color
While these tend to be seen as the “lesser modes” of the Multiply set, they do have their purposes. In this lesson we review what the Color Burn, Linear Burn and Darker Color modes actually do.
1.Introduction
1.1Introduction01:34
2.Normal Set
2.1Normal and Dissolve02:37
2.2Practical Uses for the Dissolve Mode06:27
3.Multiply Set
3.1Darken and Multiply06:15
3.2Color Burn, Linear Burn, Darker Color05:25
3.3Adding a Digital Tattoo06:01
4.Screen Set
4.1Lighten and Screen03:36
4.2Color Dodge, Linear Dodge, Lighter Color04:36
4.3Coffee Ghost07:25
5.Overlay Set
5.1Overlay, Soft Light, and Hard Light04:39
5.2Vivid Light, Linear Light, Pin Light, Hard Mix06:20
5.3Nondestructive Dodge and Burn06:03
6.Inversion Set
6.1Difference, Exclusion, Subtract, Divide05:52
6.2Inversion Modes: Drawing Effects03:53
7.Component Set
7.1Hue, Saturation, Color, Luminosity05:58
7.2Luminosity Mode: Soft Focus02:45
8.Conclusion
8.1Conclusion00:47
3.2 Color Burn, Linear Burn, Darker Color
Hello everybody, welcome back to Mastering Blending Modes in Adobe Photoshop. This is lesson 3.2, where we look at the other blending modes within the multiply set. That's the Color Burn, linear burn and Darker Color. To help illustrate how these blending modes work, I'm going to use this series of gray bars that is escalating in brightness values. The bar all the way at the bottom has a brightness value of 0%, all the way up to 20%, 40, 60, 80, and the top one is fully white at 100% brightness. Then over these bars I've got my color bar graphics. So the one on the right I'm going to set to the next blending mode in our series, that's the color burn. The one on the left I'm gonna set to the one after that, which is linear burn. Let's talk about what's going on with these. First let's look at the one that we have set to Color Burn. Now what the Color Burn blending mode does is, Photoshop evaluates the two colors, the base color and the blend color, and then it increases the contrast between those two to darken that base color. So it further reflects the blend color. Notice that this blend mode also renders the white color completely invisible. White has no effect on the background pixels when set to Color Burn. The Linear Burn is a similar, but distinctively different, approach in that it handles white quite differently. The white pixels that are in the blend layer are still removed, those aren't seen it all. White pixels in the base are now darkened according to the color that's in the blend layer. That's because what the Linear Burn does, is it detects the differences between the blend in the base and it darkens the base to better reflect what the blend color is. So it's actually darkening the pixels that are behind this layer to better reflect this. Also notice that with both of these blend modes anytime there are black pixels on either the base or the blend layer the combination of those generates fully black pixels. There's still one more blending mode in this group that we need to address, and that's the Darker Color blending mode. Now this blending mode is very similar to the first one that we talked about, which is the Darken blending mode, but it does things a little bit differently. Some even consider the Darker Color a better implementation of the same idea of theDdarken mode. If you remember in our lesson when we talked about what the Darken mode does, it looks at the pixels in both the blend and the base layer, and it displays the one that is darkest. This works really well with grey scale, but when you get over to the colors, it tends to act a little bit differently. It's a little more of a blended mode then and not necessarily a replacement mode, which is what it was intended to be. Arguably, that's actually more useful to have it blending, than to have it replacing. But the Darker Color is just an implementation of that same idea, where even with the color bars, the pixels are replaced with the background pixels if they are indeed a darker color. So it evaluates the two pixels and it calculates the luminous values of that, and whichever one of those two colors, the blend, or the background, has the lowest luminous value, that's what's being displayed on that pixel. So to put it simply, the Darker Color mode picks whichever color is actually darker of the two pixels and displays that one, regardless if it's grayscale or color. Whereas, the original Darken mode doesn't seem to do that with the colored pixels. Let's talk about how these different modes work on our colorful boat image here. We'll take the color bars that are on the left, and we'll set these to Color Burn. Take the ones on the right, and set these to Linear Burn, and look at what the difference is between them. At first glance, it may seem that there's no difference between the two. First of all, let's talk about the similarities. Both of them totally remove the white pixels, both of them create complete black when using the black pixels in those color bars. That's also a reliable consistency between the two. But where things get different is both with the color pixels and with the gray scale pixels. The Color Burn mode is intended to increase contrast. So if you see where this grey scale is over that background image, that adds more contrast to that background image. So the blacks get darker an the whites don't change as nearly as much, just so that we can see more contrast there. Likewise, it does a similar thing with the colored pixels. The problem we run into using the Color Burn, a lot of times you get a very strange pixellated effect if the colors are too different between the blend in the background colors. Whereas, with the Linear Burn mode, it's a lot smoother of a transition. So using the colored pixels in the Linear Burn mode generally creates a better effect than with the Color Burn. But we see it over here using the gray scale, it's adding a much darker effect to those background pixels. Whereas, the Color Burn added a more contrast effect. The last blending mode to talk about now is that Darker Color. We'll set this left on the Darker Color and we'll set the right one to that original Darken, just so we can see the differences between how these two effects are being produced. Looking at the gray scale, they're gonna do a pretty similar thing. They're both going to evaluate pixels between the blend and base layers and display the one that's darkest. Where we start to see some differences is in the colorization. The Darken mode does actually tend to blend some of those colored effects in with those background colors. Whereas, the Darker Color mode does an actual clean replacement, which leads to, what sometimes it looks like a very messy, pixellized effect. But if you need to actually replace pixels with a specific darker pixel color, that's the blend mode you would choose for that. Now that we've explored all the different blend modes in the multiply set. Next lesson, lesson 3.3, we'll create a rhinoceros with zebra stripes.


