
 Lessons: 17Length: 1.3 hours
- Overview
- Transcript
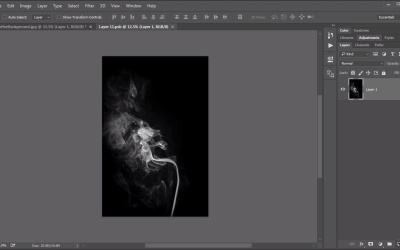
4.3 Coffee Ghost
In this lesson we create a beautiful figure from the steam of a coffee mug using the Screen blending mode.
Related Links
1.Introduction
1.1Introduction01:34
2.Normal Set
2.1Normal and Dissolve02:37
2.2Practical Uses for the Dissolve Mode06:27
3.Multiply Set
3.1Darken and Multiply06:15
3.2Color Burn, Linear Burn, Darker Color05:25
3.3Adding a Digital Tattoo06:01
4.Screen Set
4.1Lighten and Screen03:36
4.2Color Dodge, Linear Dodge, Lighter Color04:36
4.3Coffee Ghost07:25
5.Overlay Set
5.1Overlay, Soft Light, and Hard Light04:39
5.2Vivid Light, Linear Light, Pin Light, Hard Mix06:20
5.3Nondestructive Dodge and Burn06:03
6.Inversion Set
6.1Difference, Exclusion, Subtract, Divide05:52
6.2Inversion Modes: Drawing Effects03:53
7.Component Set
7.1Hue, Saturation, Color, Luminosity05:58
7.2Luminosity Mode: Soft Focus02:45
8.Conclusion
8.1Conclusion00:47
4.3 Coffee Ghost
Hello everybody. Welcome back to Mastering Blending Modes in Adobe Photoshop. This is Lesson 4.3, where we dig into some applications for the screen blending mode. In the course files for this lesson, there are five JPEG files that I want you to be aware of. First of all is this one, the coffee background,jpeg. This is gonna be the setting for our scene. And the idea is that we're going to make what appears to be the figure of a woman coming out of the steam of this coffee cup, and we're gonna call this the coffee ghost. The next file is this dancer.jpeg. And she's gonna serve as the ghostly figure coming out of that cup. There's also three images of different types of steam or smoke that we're going to use to make the effect happen. To start off with, we only need that background file open. So I'm gonna close the rest of these files. And when I'm compositing images together, I mostly like to use them as smart objects. That works much better for me, and an easy way to do that is through the File > Place Embedded. And so if we just place that dancer.jpeg. She comes in as a smart object. Or we can easily reposition her, to be exactly where we need her to be. Notice that she is on a black background. That's intentional. Because if we change her blending mode to screen. That black background completely disappears. We wanna place her so as she does look like she's coming out of that cup. So let's go to Edit > Free Transform and scale her down and position her, so that she looks like she's coming out. Now while you're transforming an object like this, if you hold down the Shift key. It keeps the same ratio for the layer just to make sure that it doesn't get stretched and distorted too much. Another advantage to working with these layers as smart objects, is that we can add nondestructive adjustments to it. For example, I want to really isolate and highlight the white in brighter areas of her figure. So let's go to Image > Adustments > Levels and we'll pull this right hand white slider over a little bit. But mostly we're gonna pull that left-hand slider in, so it makes those darker areas really dark, which means that they're going to mostly disappear because of the screen blending mode. Right about there looks pretty good. Now the colors are not really working well. So let's go to Image > Adjustments > Hue Saturation. And we'll pull that saturation down to remove a lot of those colorized areas. And then that lightness could be pulled down a little bit too. So that's looking a lot better, but it's still way too sharp. If she were indeed to be created out of steam or smoke we wouldn't see the details quite as sharp as we see them here. So to remove some of those details let's go to Filter > Blur > Gaussian Blur. And we'll just use a radius of 2.5 and that helps to soften that quite a bit. There's a little bit more editing to do with her, but before we do that, I wanna add in some of those steam images. Now we could just embed them right away but there's another method that I wanna talk about too. If we just open them up as a regular JPEG file and take a look here, we can drag them over and deposit them onto the canvas and brings them in really large actually but once it's over here we can close that JPEG packed file that we've opened. Now these come in not as a smart object, just as a regular restorized layer. We can convert them then to a smart object, by right clicking and saying Convert to Smart Object. Notice that the background here is also black. Which means we can isolate that steam, by using the screen blending mode. Something in particular I want you to pay attention to, is the way these edges look. There's some very hard edges visible in this image because the white smoke goes all the way to the edge of this photograph. There's a great way to tend to that without having to use a layer mask. If we double click the smart object, we reopen this image but notice it's not the original JPEG file. It's now called layer1.psb. That's fine, don't worry about the name right now. Let's add a new layer to it and use a brush with a very large and soft edge to it. Then also black paint to just paint over these edges, to make sure that any of the edges of the canvas are completely black. And that way we won't see any hard edges in that composite. When you're comfortable with the way that looks, just go ahead and close this. Photoshop will ask about saving it and that's fine, because now that smart object gets updated and that edge work is completely clean. So now we can use our Edit > Free Transform to position this into place. One of the great things about using this as a smart object too, is that you can right click in the middle of transformations and go to Warp. Then we get this warp cage which works really well for adjusting some of these steam and smoke images. Because steam in smoke doesn't show distortions very much. It actually still looks very natural even though we know it is being warped and distorted. As long as you don't stretch it too much like that, it still looks pretty natural. This is a great way to really form and mold the shape of that smoke. And here's the position that I ended up using for this first smoke image. Now it is overlapping a lot of the details that I wanna show with this coffee ghost. So I need to use the mask at this point to remove some of the visible elements. We'll just use that add layer mask button at the bottom the layer's panel. And then I like to use it by a brush. Just a nice large brush with some actual fairly low opacity to it to just very gently brush out some of these elements. Now I don't wanna see the steam towards the bottom underneath the cup very much. I want to look like it's rising up. So, that looks pretty good. And using that same technique in mind, let's add a layer mask to the dancer image as well. Because this part here, with her legs sticking down over in front of the cup, doesn't really work. But this time, let's use a gradient tool, set to the linear gradient. And the foreground, the transparent preset. And we'll just start right here, underneath the lip of the cup, and draw it upwards. There we go. And we can touch up her mask as well. I think those hands still look a little bit too detailed and become somewhat distracting with their detail in there. I wanna fade that out just a little. Very nice. And then I'll use the same technique of pulling in those other smoke images. Changing them to a smart object, set them to screen. Transform them and then mask them out to finish up this final effect. And here's what I ended up with. I was really very selective as to how much of these masks I want showing on these images. For instance, this top one here, I really like the way that this horizontal tendril of steam matches up with her arm, so it almost looks like it's flying off from her arm and I really like the way that worked. The one that's underneath here, I wanted to do the same thing before her leg, so I transformed that around, so it looks like this steam tendril is climbing up the vertical portion where her leg should be. And then let me show you how that mask works. I'll delete the one they currently have there. Now, essentially, I want to add an inverted mask to hide the entire layer. So I'm holding down the Alt or the Option key while clicking on the add layer mask button, and that adds this entire black mask. Which means that the layer is not seen at all. I can take my brush again and this time make sure I'm using white paint and just very gently paint in the visibility of that layer. And that's the whole idea is I want that tendril to look like it's her leg. If I paint over a little bit too much, so it's too far below the edge of that coffee cup, just switch back to black paint and paint that part out again. Knowing the properties of the screen blending mode, makes it very easy to create a lot of really nice image manipulation effects like this. So next step we'll take a look at chapter number 5, where we dig into the overlay blending modes.


