
 Lessons: 17Length: 1.3 hours
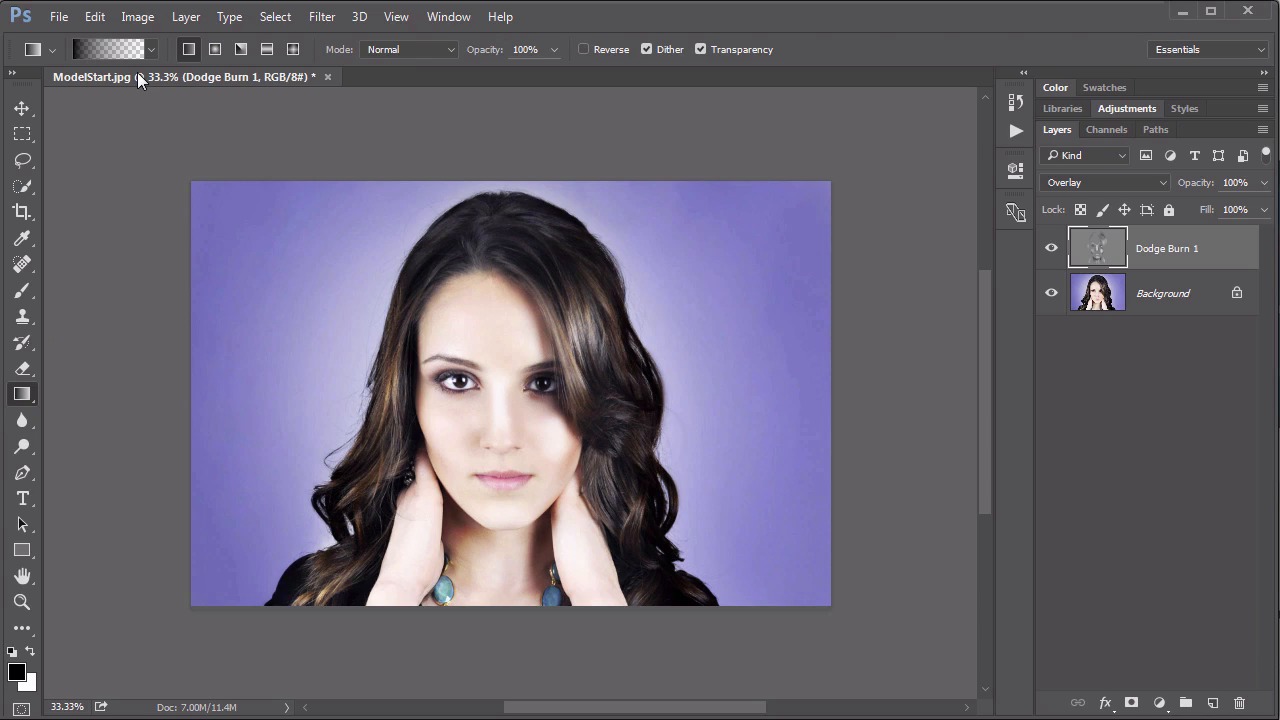
- Overview
- Transcript
5.3 Nondestructive Dodge and Burn
In this lesson we look at one of the most useful applications of the Overlay mode, a nondestructive dodge and burn technique.
Related Links
1.Introduction
1.1Introduction01:34
2.Normal Set
2.1Normal and Dissolve02:37
2.2Practical Uses for the Dissolve Mode06:27
3.Multiply Set
3.1Darken and Multiply06:15
3.2Color Burn, Linear Burn, Darker Color05:25
3.3Adding a Digital Tattoo06:01
4.Screen Set
4.1Lighten and Screen03:36
4.2Color Dodge, Linear Dodge, Lighter Color04:36
4.3Coffee Ghost07:25
5.Overlay Set
5.1Overlay, Soft Light, and Hard Light04:39
5.2Vivid Light, Linear Light, Pin Light, Hard Mix06:20
5.3Nondestructive Dodge and Burn06:03
6.Inversion Set
6.1Difference, Exclusion, Subtract, Divide05:52
6.2Inversion Modes: Drawing Effects03:53
7.Component Set
7.1Hue, Saturation, Color, Luminosity05:58
7.2Luminosity Mode: Soft Focus02:45
8.Conclusion
8.1Conclusion00:47
5.3 Nondestructive Dodge and Burn
Hello everybody, welcome back to mastering blending modes in Adobe Photoshop. This is lesson 5.3, where we use the overlay in soft light blending modes to create a nondestructive dodge and burn effect. In the course files for this lesson, it's this modelstart.jpg. This is what we're going to use as the base to demonstrate this technique. Now this is a very nice image. It's very well lit and very well composed. The lighting is a little bit too even and it is rather flat. We're going to use a nondestructive dodge and burn technique to make this have a little bit more depth to it. In the way we do that is we start off first with a new layer and we'll call this dodge burn one. We're going to fill this layer with 50% gray through Edit > Fill, for Contents, we have this set at 50% gray. Click OK and it totally fills that up. But now, if we change this to overlay, that gray completely disappears. The reason this is important is because those gray pixels are still there, we just can't see them because of the blending mode. Now let's go to our dodge and burn tools. We'll start with the burn tool. We'll have the range set at mid-tones and let's try the exposure at 10%. Pull down on that brush radius a little bit and if you have a pressure sensitive graphics tablet, this would be a good time to use it. But we'll go through to the areas that are dark and start adding another burn effect to these. We'll shade in on our eyes, so she has almost like a little bit of eye shadow there. Just underneath her nose, the shadow area behind her nose. The hollows of her cheeks, underneath her chin and just generally the more shadowy areas of the image. Don't forget to do it in the hair as well. If you're curious what this is actually doing to this layer, you can always turn this back on to Normal and you can see how this layer is starting to have these burned effects in them. Turns that back over to overlay. Now I want to switch to my dodge tool and do a very similar type of thing. I'll have the exposure set at 10%, still using the pressure sensitive graphics tablet, but now I'm going to focus on the highlight areas, in these bright spots and just pull them out even more with some very selective dodging. Create some large dodge areas in her cheeks to give them some depth, on her chin there, some too. Now if you'll notice, I'm using a very large, soft brush to do this. It's not finely detailed. It's just very large broad strokes. A nice technique while you're doing this is right now, I'm on the dodge tool but if I hold down the alt key, it changes to the burn tool. So you can swap back and forth very quickly and very easily and just manipulate the image and form and shape it as you go along. Now it's a gradual effect. In fact, you might not even think you see much of a difference until you turn off that dodge and burn and you can see what a drastic difference that's making. I want to go in and lighten the whites of the eyes some there, too. That's coming along really well. I'm just going to continue on hitting these large highlights and large shadow areas using this dodge and burn effect. We can also use this dodge and burn layer to add a slight vignette to the outside corners and we can do that with a gradient tool. Using the radial gradient, set it to Foreground to Transparent and then we're going to reverse it. So it starts out transparent and goes to the foreground. The foreground color is black but we don't necessarily want it to be a 100% black. We will reduce the opacity down to maybe about 30% or so. Start right in the middle of the image and head on out towards the corners. That gives a nice darkened vignette effect to that background. Now I want to add another layer for a secondary dodge and burn, I'll call this one dodge burn two. Again, we will fill this with 50% gray just like we did before with Edit > Fill > 50% gray. But this one, I'm going to set to soft light instead of overlay. Use the same dodge and burn tools as we did before but in this case, I'll make it much more intensive. I'll have the exposure dialed up to about 30% and I'll also use a much smaller brush. In this way, I can get a very small and detailed brush to do some very darkened and detailed dodge and burn effects. Or when you're doing the dodge, I have a nice small brush here, again, I'm gonna set that exposure up to about 30. And using the very tight dodge tool, you can really increase the highlights in the eyes and the little moisture dots that we see around the eye lids. This adds a very nice, very wet effect to the eyes, likewise, with the lips. We can just focus on those vertical highlight areas, those speculars, that would make her lips look very, very wet and lush. With the burn tool, we can increase that shadow in between them and really any other spot that needs some very fine shadow details. This is a great way to make those really intense and add some visual depth to the image. Here's the effect I ended up with after those two layers of dodging and burning. Now again this may look like it's not much different from the original image but once we look at the original image, we can see just how much more dept and visual interest this technique has. But we're not quite done yet. First, let's add a curves adjustment layer, just from the Adjustments panel, and we'll just do a very slight S curve, just to give it a little bit more contrast. From there, there's just one more technique that i like to use this soft light blending mode on and that's to add a sharpening effect with the high pass filter. First, we need to create a merged layer at the top. I'm gonna hold down the alt key, we're going to Layer > Merge Visible. That creates a merged layer right up here at the top. On this layer, let's go to Filter > Other > High Pass, and pull that radius down to about 5.5 or so. You'll notice what this filter did is it made it predominantly mid-tone gray but we still see the main feature details. When we now turn this to overlay, those mid-tone gray areas disappear but we still get that sharpening effect, which creates a really nice finished effect on this. Once again, let's look at the difference between this finished effect and the original image. And that is the power of using the overlay and soft light blending modes. Next up, we start on Chapter 6, where we take a look at the inversion group of blending modes.


