- Overview
- Transcript
5.1 Overlay, Soft Light, and Hard Light
If the blending modes could have a “middle sibling”, it would be the Overlay set. This set of blending modes focuses on blending the midtones of an image. The first three, Overlay, Soft Light, and Hard Light, each take slightly different approaches to this. In this lesson we look at what those differences are.
1.Introduction1 lesson, 01:34
1.1Introduction01:34
2.Normal Set2 lessons, 09:04
2.1Normal and Dissolve02:37
2.2Practical Uses for the Dissolve Mode06:27
3.Multiply Set3 lessons, 17:41
3.1Darken and Multiply06:15
3.2Color Burn, Linear Burn, Darker Color05:25
3.3Adding a Digital Tattoo06:01
4.Screen Set3 lessons, 15:37
4.1Lighten and Screen03:36
4.2Color Dodge, Linear Dodge, Lighter Color04:36
4.3Coffee Ghost07:25
5.Overlay Set3 lessons, 17:02
5.1Overlay, Soft Light, and Hard Light04:39
5.2Vivid Light, Linear Light, Pin Light, Hard Mix06:20
5.3Nondestructive Dodge and Burn06:03
6.Inversion Set2 lessons, 09:45
6.1Difference, Exclusion, Subtract, Divide05:52
6.2Inversion Modes: Drawing Effects03:53
7.Component Set2 lessons, 08:43
7.1Hue, Saturation, Color, Luminosity05:58
7.2Luminosity Mode: Soft Focus02:45
8.Conclusion1 lesson, 00:47
8.1Conclusion00:47
5.1 Overlay, Soft Light, and Hard Light
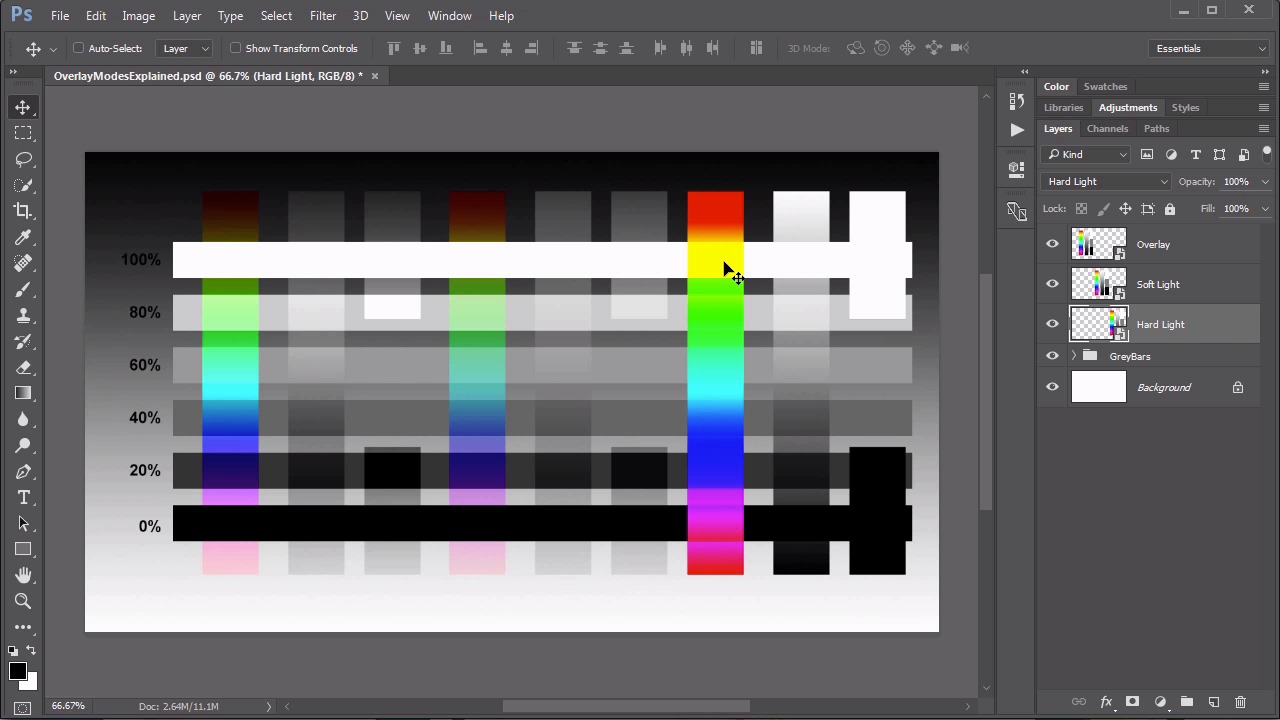
Hello everybody. Welcome back to mastering blending modes in Adobe Photoshop. This is lesson 5.1, where we take a look at the next set of blending modes. This is the overlay set. The overlay set, is the set of blending modes that starts with the overlay. It's the fourth set in the series but generally considered the third set because the first set few people actually count as a set of blending modes. Regardless of that the overlay and the soft light are the two that are most commonly used. But because hard light is so closely related to the soft light, we're going to review that one as well. Let's start with overlay. So our color bars on the left here have now been set to overlay. Do you remember how the screen mode removed all the blacks? The multiply mode removed all the white. Well the overlay mode removes the mid-tone grays. Specifically the 50% grey is rendered completely invisible by the overlay blending mode. And that's the entire point of this blending mode. The overlay mode is creating a screen or multiply effect based on the base colors. So it takes the base color and then mixes in the blend color to get the result. Whereas with the next one, the soft light, is a very similar idea, but it uses the blend color as the starting point, instead of the base color. So instead of taking the base color and mixing in the blend, it goes the other way. It starts with the blend color and it mixes in the base. As you can see it creates some very similar results but there are some specific differences to it. You can see how the overlay mode tends to have a brighter result when it comes to a lot Of the different colors. The soft light note is much more subtle. And mathematically the way this is working, is it detects the luminous values of the color in the blend mode. If the one color is lighter than the 50% gray. It creates the screen effect. If it's darker than 50% gray, it creates a multiply effect. If it is 50% gray, it's removed completely. It's supposed to look like a diffused spotlight being shown onto the base color. Moving on to the next mode would be the hard light, that would over here on the far right. The hard light mode also removes those 50% grays. But notice that the white is completely white still, and the black is completely black. Those two didn't change at all. So it's essentially the same concept. Because the 50% grey is completely removed, but it has a lot more contrast added to it. You can see the color bar hardly has any blending at all. It's almost as if it's just sitting over it with a little bit of transparency added to it. That's because, with the hard light, the available blending gamut, so to speak, is very narrow. Because if the mid tone grey is completely removed. The white is completely white, and the black is completely black. There's not a lot of room between those three that's going to give you a lot of available blending opportunities. Therefore, we end up with a much more higher contrast effect. So let's try these blending modes over the top of an image. We'll start again with the one on the far left and we'll set it to overlay. Now, take a close look at how that blending is working. Notice the harshness of the whites and the blacks. It is adding a screen multiply effect, but it's doing so in a very intense manner. The mid tones are completely removed. And the color bar is showing quite a bit of color in there. It's colorizing it very dramatically. So let's move on to the soft light. Soft light has a similar effect but notice it's much more subtle. We're seeing a lot more of the original base color, showing through on the color bar. Also notice that the white. Is not fully white with what the soft light blending mode. Neither is the black rendered fully black. Now there is some shadows in there. That do appear to be very, very black. But that's because in the original image they were already really close to black. If we move this around a little more. You can see that that black is not rendering a full black over pixels that are not already close to it. Likewise with the white. The white is not rendered fully white. So overall it's a much a gentler effect. In the hard light. As we would expect. Is a much harsher effect. The white is fully opaque, completely white. Likewise the black is a fully opaque completely black. The grey tone has completely removed. The color bar is showing a lot of color in there. There's barely any of that pixel information from the background even showing through. And we're getting some very drastic contrast within the black to white color gradient. The range of useful mid tones is actually very small. So I'm looking at all three of these together. If we were to order these by order of the intensity of the effect. The soft light really should come first. And the overlay would rest solidly in the middle then the hard lights at the far end with the most intense effect. Next up is lesson 5.2, where we continue with the overlay set and take a look at the vivid light, linear light, pin light and hard mix blending modes.


