
 Lessons: 17Length: 1.3 hours
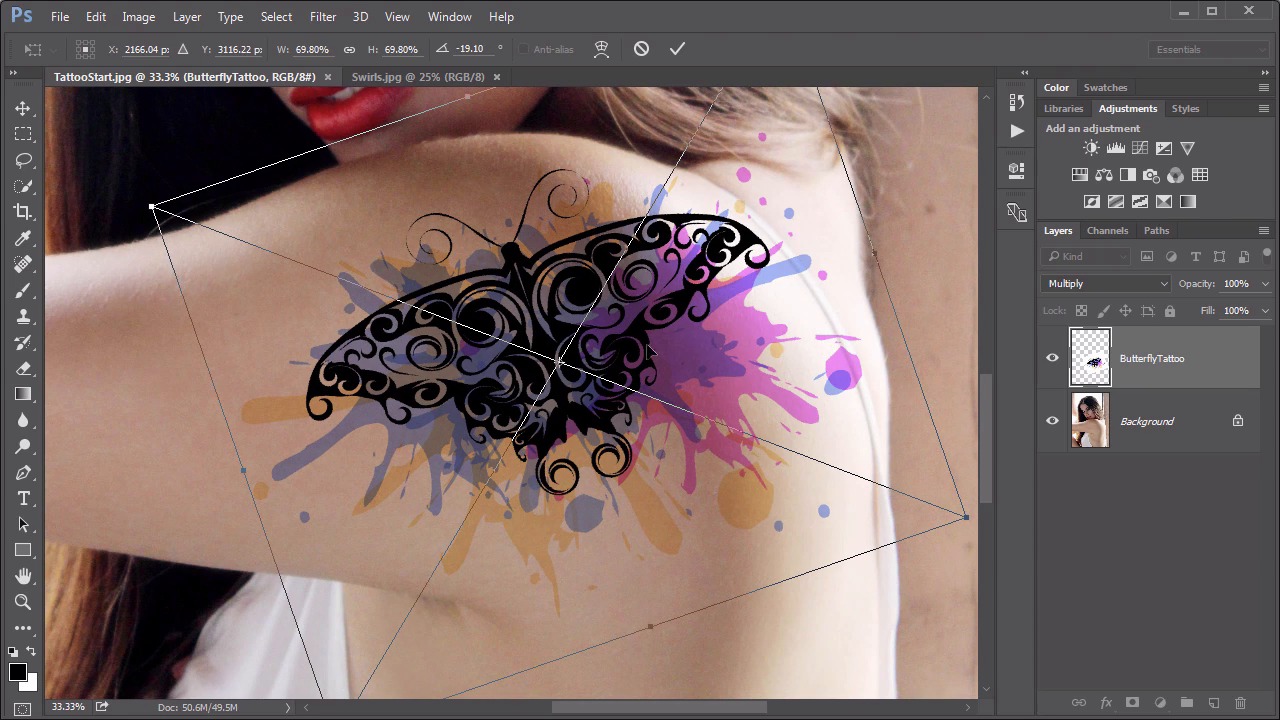
- Overview
- Transcript
3.3 Adding a Digital Tattoo
In this lesson we use the Multiply blending modes to add a convincing tattoo to a model.
Related Links
1.Introduction
1.1Introduction01:34
2.Normal Set
2.1Normal and Dissolve02:37
2.2Practical Uses for the Dissolve Mode06:27
3.Multiply Set
3.1Darken and Multiply06:15
3.2Color Burn, Linear Burn, Darker Color05:25
3.3Adding a Digital Tattoo06:01
4.Screen Set
4.1Lighten and Screen03:36
4.2Color Dodge, Linear Dodge, Lighter Color04:36
4.3Coffee Ghost07:25
5.Overlay Set
5.1Overlay, Soft Light, and Hard Light04:39
5.2Vivid Light, Linear Light, Pin Light, Hard Mix06:20
5.3Nondestructive Dodge and Burn06:03
6.Inversion Set
6.1Difference, Exclusion, Subtract, Divide05:52
6.2Inversion Modes: Drawing Effects03:53
7.Component Set
7.1Hue, Saturation, Color, Luminosity05:58
7.2Luminosity Mode: Soft Focus02:45
8.Conclusion
8.1Conclusion00:47
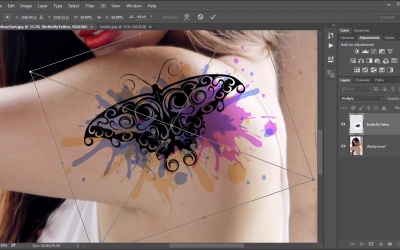
3.3 Adding a Digital Tattoo
Hello everybody, welcome back to Mastering Blending Modes in Adobe Photoshop. This is lesson 3.3. Where we take a look at a practical application of the multiplied blending mode. In the course files for this lesson there are three specific files. That I want you to take a look at. First, is the TattooStart.jpeg of this young woman with the shoulder that looks like a blank canvas for a tattoo artist. There's a swirls.jpeg and a butterfly tattoo.psd file. And this is the file that we're going to start with here. If you look at the layers for this file, you see there's a butterfly shape and there's a splatter shape. The idea is to have these colorful splatters sitting behind that butterfly and that will be the basis for the tattoo. First of all, let's move the spider beneath the butterfly shape and start positioning it. And you might notice that certain portions of this butterfly shape are whited out. Because the way these swirls ended up being constructed, it had to have some white areas in there. But that's easy enough to get rid of by simply changing the blending mode to multiply. And that white completely disappears. And then the general idea is to begin moving the splatter around. To position it in ways that looks interesting. And looks like an almost organic ink splatter but still very colorful and attractive. We'll start with one about right here, so and maybe pull down the opacity a little bit to lighten that, just a touch. And then let's make a copy of it. Here's an easy way to make a copy of layers like this. With the move tool selected, hold down the alter the option key, and just drag on that layer. And let's add another version of it, say over here. We'll double click on it and we'll change the color of this one. Make this one blue. Then let's add another one, a little bit behind that. And we'll use our free transform. I edit, for transform to rotate that around. And maybe scale it up a little bit and change the color this one to an oranges color. And then let's move this orange one down below the other two, because what I wanna do is have these colors interact better. And the way I wanna do that is changing the blending mode to multiply for these top layers. And I like the way that creates a much more attractive and organic way of mixing those colors together than it did just with the opacity. In fact we can put that opacity back up and you can still see those other colors behind it. So we'll set multiply to the pink one too, and then continue using this technique to create more copies of these splatter layers, move them around, change their colors and just create a very colorful interaction of these paint splashes, so here's the arrangement of paint splatters that I ended up with behind my butterfly image. So let's go ahead and save and close this file, so we can use it as a smart object in the tattoo start. And we'll do that by going to File > Place embedded and select that butterfly tattoo that we just created. And you'll see it comes in as a smart object. And we can just loosely place it about where we want to be. Notice that, while we're still placing it we can change the blending mode before we even have to commit the transform. So we'll go ahead and change it to multiply, so we can see where it's going. So position it onto her shoulder. Now we wanted to follow around that curve of her shoulder. The best way to do that is with the warp transformation. So I haven't even applied the transformation of the original placement. I can right click and say warp. Now if you've already applied yours that's fine. You can still get to it through Edit > Transform > Warp. But then I can start dragging these cage handles to form the tattoo to cover over the shape of her shoulder, and that looks good about there. Now I do a very similar thing with that swirls.jpg, in fact, I don't need it open because I'm also going to include it as a smart object. Let's go to File > Place embedded again. Use the swirls. It comes in as a smart object. And this time I actually want to flip this horizontally. So I'm just going to drag that right hand side completely over and then scale and position this into place. Rotate a little bit, I'm gonna use the exact same technique that I used on the butterfly. As in change the blending mode to multiply and then warp it. To make it fit into the curve of her shoulder blade. I like the way that that fits about there. Now the colors behind the butterfly are getting a little bit lost. They're a little muted for what I'm trying to do here. So let's add a vibrance adjustment layer and clip it to the butterfly tattoo layer. We do that by holding down the Alt or the Option key and mousing right in between those layers until we see that cursor change. Then we click and it clips it right to it. This means this vibrance adjustment layer will only affect the butterfly tattoo layer. And we'll increase the vibrance of that so we get a lot of color. Reintroduced into that tattoo. At this point, the tattoo is looking very colorful and very dark. In fact it looks artificially so. We're not seeing any of the skin texture through it nor is the lighting, reflecting with the lighting should be in the scene. Here's a great way to correct that. First, let's group all of these together. The butterfly tattoo, the vibrance, and the swirls layer, and select all of them by holding down the shift key and going to layer, group layers. This is the tattoo group. For the moment I'm going to hide that. So we're looking at just the base photograph again. Now what I wanna do, is load the luminous values of this photograph. So I'm going over to the channel's panel, holding down the control or the command key, and clicking right on that RGB composite channel. What this does, is it creates a selection based on the luminous values of those pixels. Which means I can go back here, to the layers panel, reveal a tattoo again, and this time I wanna create an inverted mask from that selection. So I'm holding down the Alt and the option key. Well clicking on that add layer mask button. And look at the difference that that made. Now we're seeing this highlight of her skin. Through the tattoo. So it looks a lot more realistic. We can actually see the texture of her skin as well. Although it does look a little bit too muted. So to change that we're still focusing on this mask that we added to this group. Go to Image > Adjustment > Levels. We'll just pull down on this right handle to increase the visibility of the visible portions of it just a little. Until we get a pretty convincing digital tattoo. All thanks to the magic of the multiply blending mode. Next up is chapter four, where we take a look at the lighten and screen blending modes.


