
 Lessons: 11Length: 1.4 hours
- Overview
- Transcript
4.2 Create a Wool Texture
No more ugly Christmas sweaters. Make your own wool texture with the help of the Mesh Tool and the Pattern Tool.
1.Introduction
1.1Introduction01:16
2.Organic Textures
2.1Create a Grass Texture08:36
2.2Create a Sand Texture08:20
2.3Create a Snake-Skin Texture11:21
3.Material Textures
3.1Create a Brushed Metal Texture09:17
3.2Create a Wood Texture07:41
3.3Create a Leather Texture09:20
4.Textile Textures
4.1Create a Denim Texture06:41
4.2Create a Wool Texture09:48
4.3Create a Carpet Texture11:11
5.Conclusion
5.1Conclusion01:43
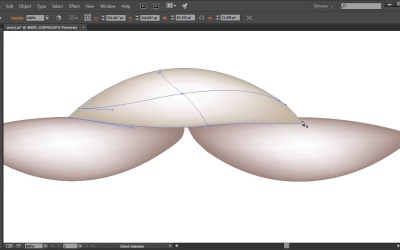
4.2 Create a Wool Texture
Hello there, and welcome back to Creating Custom Textures in Adobe Illustrator, here on tuts+. I am Simona, and we are about to start the lesson, create a bold texture. So, as usual, let's get right to it, and let's open up Adobe Illustrator. So here in Adobe Illustrator, I would like to create with you a wool texture. And what I mean about a wool texture, let's think of a knitted sweater. Sometimes you see the V-like shapes, other times you see loops, and in this lesson I would like to show you how we can create the loops for a wool texture that will look like a sweater. So the first thing we want to do, we want to actually choose the pen tool. So over here with the pen tool selected, I will just create a simple shape. Just follow along. As you can see, I'm making a light arch here, and then I connect both and then I will just close it on the other side. It's not very complicated as you can tell. Then I would like to change the fill color, and I'm going to open up the Swatches panel. And I'm going to choose a light color here from our standard default Swatches panel. And I will turn off the stroke. Now let me zoom in a little bit so we can see better what's happening. So here, this is the shape that we'll use to create our little cute looking wool texture. Right now, of course, you might think, what is she doing? This doesn't look like anything. Just stick with me. It will all make sense in a minute. So once we have the shape, let's make a copy of it, let's drag it below, and with the free transform tool, let's rotate it by 180 degrees. Then I will make another copy on the other side, just like this, and now we have to think of, usually, that this part would be overlapping the other two. And then, they would leave a little bit in the middle, creating a small gap. But first, we need to change the color as well. So maybe, these two shapes here I will select, and I will make them a little bit darker, just so we can see what's happening. But of course, I won't use the stroke, I will use the fill. I want this shape to be on top. So I'll make sure I'll place it on top. And after that, I will select the white here in our Swatches panel. Then, I will use the mesh tool and then I will click in the middle of our first shape here on top. And because I've chosen the white as a fill, when I add a mesh point, it will color the middle with white. Now you can see we're already getting some color on the edges here. And this is important so we have some light fall off for our wool texture. We want to create a pattern that will look like a wool sweater, so again, we repeat this step. We will choose the white, then we will choose the mesh tool from over here in the tool bar. By the way, the shortcut for this is U on the keyboard. And then I will select the shape. Actually, I don't have to select it, I just have to hover over it. I will see the plus sign for the mesh, and I will add a mesh point into the middle just like this. Quite simple, isn't it? Now that we added the mesh points, what we want to do now is we want to alter the shapes. Now let me zoom in so we can see it better. Right now we want to create a knitted sort of wool texture. So for our pieces to appear like that we need to change them a little bit. We have to alter them slightly and I'm just selecting the direct selection tool, grabbing the anchor point here on the left side, and I'm warping the shape a tiny bit. Just like this. Then I will go over to the next and I will do the same. I grab the endpoint and I transform it slightly. How you do it, this is really up to you. You can, of course, take a reference photo so that it can help you. Or you can just follow me and do the same thing. I'm just really slightly changing it here. It's not really that complicated, but we want to have the look as if this top part here is above the bottom pieces. Sometimes you really have to zoom in to just see what kind of anchor point we are grabbing. So it takes a little bit of work but it's not too complicated. You can see here it looks a little bit funny so we will adjust this, pull the anchor point out a little bit, change the handles and then we will grab this one here again. Maybe it needs to be a little bit higher and so forth. We can also pull this up a little bit. At the same time, we also want to grab the endpoint here on the left side. Pull this up a little bit. Change the handle. Go over to the other side. Grab it as well and pull it up. And maybe we have to pull it down here. Select this anchor point again. You can also just grab one part here in the mesh and you can extend it. Let me show you again how that works. So instead of grabbing an anchor point, I can use the direct selection tool and then go and grab it and pull it down. Same thing here, if I wanted to have it a little bit further down or a little bit further up. And of course, we want to fix this here and let me zoom out again. And since I've already finished one for us, let me hide this layer here and let me show you the finished three pieces for our wool texture. So this is what they look like. As you can see, I just slightly changed the shape by grabbing the anchor points, and transforming it a tiny bit. It might take some time until you have the favorite outcome, but it's not complicated. The next thing we want to do, we want to duplicate a few of those shape. And not really much, we just have to copy this top shape here over to the side and align it. And now we have a shape that we can create into a pattern. So again all we have to do is we select all of those shapes. We go to Object > Pattern > Make. Here in the Pattern options panel, we can see that we have our bounding box, our tile. And of course you can see there that it's not overlapping. It's not tied together either. We need to change this. So first, we have to make sure that size tile to art is not checked, and so is move tile to art. We don't want both to be checked. So if you have them checked, uncheck them please. After that, we want to press on the button up here for the tiles, so we can change it. If you just hover over it, it will say pattern tile tool. And then we'll grab the handle here on the side, and we'll pull it inward. And as you can see now, our pieces are getting tiled together and now we have rows, wool woven like shapes. Of course we want to that with the bottom or the top as well. So let me grab the bottom here. And let's move it tighter together. And that sometimes takes a little bit of a play, depending on how tight you want it together. And this is pretty much it for the pattern. I don't think we need to make any more changes, so let's give it a name. Let's call it wool. And then we can press Done. As you remember from previous lessons, or from pattern making, our new pattern is now here in our Swatches panel. You can see it here. And now, I can create any shape. For example, if I wanted to create a scarf, I can create a long rectangle, then click on the pattern that we've created, and it will fill it. Of course it's pretty big so we can easily change that. We have a scale tool, we'll just make sure in the pop up when we double click it, we'll uncheck Transform Objects and have Transform Patterns checked. And then change it to 50% maybe. Check the Preview button, and then you can see if it's small enough for you. We could even bring it down to 25% of the original. And then we can press OK. Now you have a pattern or a texture where you could even create scarves, sweaters. One thing, though, I have to tell you, that we did not create a background for it. So in case you wanted to have this on another color, it would show through. So let me show you what I mean. If I create a rectangle in the back, and I fill it with a darker one, and then send it to the back. Now we can see that the color is showing through between the gaps of our wool pieces that we've created. We can add this of course to the pattern if you want to, but sometimes you might just want to have a different color showing through. Depending what kind of object or design you create. And this is pretty much it for this lesson. Again, it is not very complicated to create textures here in Adobe Illustrator. Sometimes it just takes a little bit of know how, how to create the shapes and how they need to look and how they need to be organized. And now, I would like to move on to the next lesson and there I would like to create with you a carpet texture.


