
 Lessons: 11Length: 1.4 hours
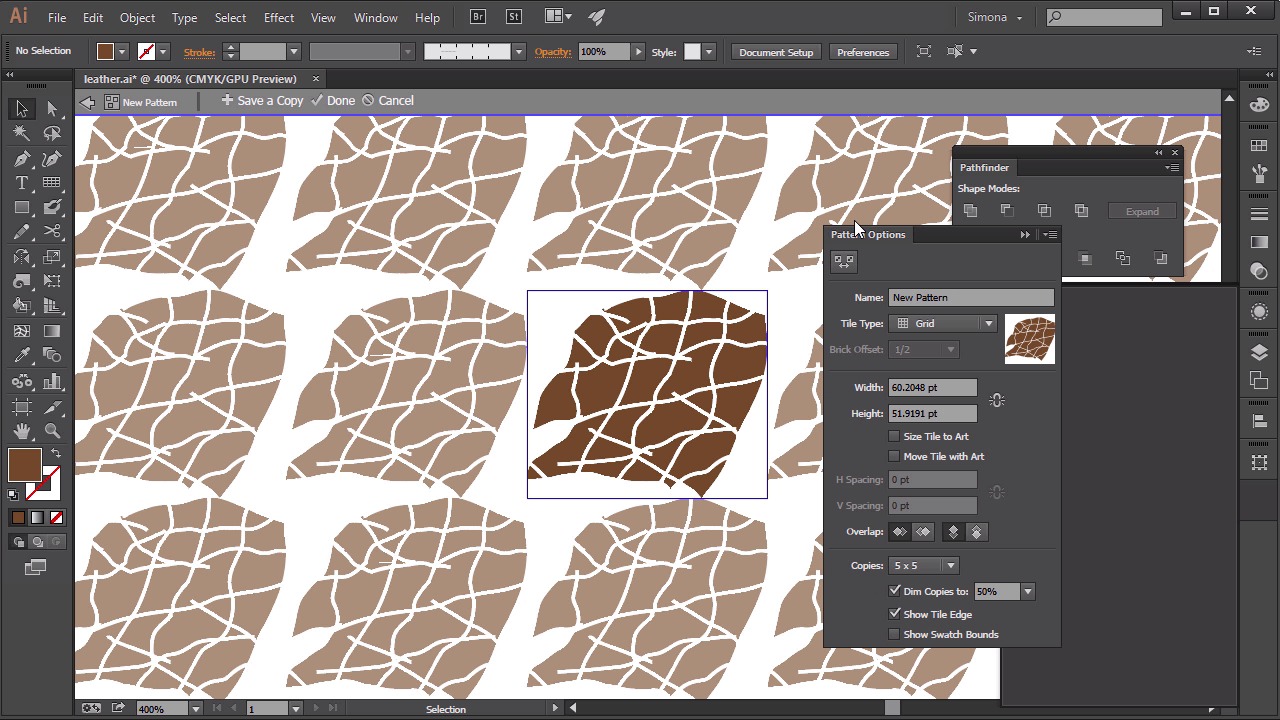
- Overview
- Transcript
3.3 Create a Leather Texture
Patterns are everything. Here you will learn how to make your own leather pattern with the Pencil Tool!
1.Introduction
1.1Introduction01:16
2.Organic Textures
2.1Create a Grass Texture08:36
2.2Create a Sand Texture08:20
2.3Create a Snake-Skin Texture11:21
3.Material Textures
3.1Create a Brushed Metal Texture09:17
3.2Create a Wood Texture07:41
3.3Create a Leather Texture09:20
4.Textile Textures
4.1Create a Denim Texture06:41
4.2Create a Wool Texture09:48
4.3Create a Carpet Texture11:11
5.Conclusion
5.1Conclusion01:43
3.3 Create a Leather Texture
Hello there, and welcome back to Custom Textures in Adobe Illustrator here on tuts+. My name is Simona, and we are about to start the lesson Create a Leather Texture, so let's start right away, and let's open up Adobe Illustrator. Creating a leather texture is not really a common practice under designers. But once you know how to create it, you have tons of applications where you can use it. You can create your own little icons, your tiny little leather purses, your wallets, and you can even take it further and create some animal skins. So let me show you how we can create a leather texture here. So what does a leather texture really look like? Think of something cracked, something with grooves. So let me show you how we can create this. The first thing we want to do, we want to select none for the fill, and for the stroke we want to choose like a dark brown, for example this one here. After that, we will use the pencil tool. And let's double click the pencil tool and let's make sure that the fidelity is set to accurate instead of smooth. We don't want exactly smooth lines, we want jagged lines so we can create a cracked like surface. So let's click OK. After that we want to start creating a grid like section. And what I mean by this, just start making a line here, and then a line on the bottom, and then a line in the middle, a line over here, and so forth. Sometimes they can even overlap and then some vertically, randomly. It doesn't have to be like mine but we don't want to use the grid tool and we don't want to use straight lines or the pen tool. That's why we're using the pencil tool and I re-created a group like this. Let me zoom in here, so we can see it better. And since sometimes it takes a while to create your perfect grid and mine doesn't work that need right now, let me select it and delete it but I've already prepared a grid for us. So let me show it to you here. This is what we will be working with. As you can see I just randomly used the pen tool and created lines, and when we selected some are connected, some are overlapping, some are very short, others are diagonal, vertical, horizontal. And it's really up to you. The next step what we want to do, we want to select all of those lines and then we want to outline the stroke. We can do so by going to object, path, outline stroke. Once we have done that, let's open up the path finder panel here in the tool bar and let's select unite. Now we have everything united. When we go back this watches panel let's select the fill and let's change it to a lighter brown. The reason why I'm doing this is we need to create the rectangle with the rectangle tool over here and then draw a rectangle on top of our lines. Then we would like to send it to the back. And we still need to see our lines, that is why I chose a lighter color for our rectangle. Then we need to separate everything. All we want to keep actually are the middle pieces in between. So we select all of it then we're going to the PathFinder panel again and let me drag it out for you. And then we're going to choose divide. Once we have done that, with the Direct Selection tool, we can select the divided shape of the rectangle, delete it, and then at the same time select the grid here. And so we're not deleting everything including the little shapes in between. We need to go to objects and ungroup the shapes. After that we can just select the grid lines. I'm selecting them and dragging them out so you can see what I'm talking about. Now we can delete this as well, and now we are left with this shape. This is the cut out the in between lines, and this will serve us for our cracked, leather skin-like look. Now what we want to do is, we want to create a pattern out of these shapes. So we select them all, then we're going to object, pattern, make. And here on the pattern options panel you can see that our shape is not overlapping, we have gaps in between. And, of course, this wouldn't make a good leather texture. Now let's zoom in a little bit so we can see things better and I would like to show you how we can close those gaps. Simple, we just have to use the pencil tool again, and then we'll start adding shapes randomly to it. Of course in a similar shape and then you just select the same fill color and you start closing the gaps for our pattern here in between, just like I'm doing. You keep filling them. Another one on top of here. Maybe like this looking. And we want to make sure that we create the same gaps in between. We could have some odd shapes, just like this one and filling it up and then choosing the brown to fill it. And this was done closing our gap but before you watch me filling this all, I want to show you the finished pattern that I have created for us. So let me cancel here. And then I am going into this swatches panel, and here I already have a pattern called leather. If I double click it, I get the pattern options panel again, and as you can see here, this is what I've done. I've just filled our rectangle here with the missing shapes. And if I zoom out, you can see that we are having a pattern now, that we can use for our leather texture. So let me cancel here. Let me also delete those shapes here. And let's apply the texture so can have a good idea on how you can build your leather pattern into a leather texture. First, we want to create a rectangle. So I'm drawing a rectangle here in the art board. And we might want to change the color and make it a little bit darker. After that, you want to add an effect. So we're going to effect but this time we're not going to choose the vector effect. We're going to choose the Photoshop effects. And we're going to use Artistic Sponge. So when you get the pop up menu, you will choose for this brush size, zero, the definition approximately four and the smoothness one. Then we click okay. Now we have a rectangle with the sponge effect applied to it. Now we want to create our pattern on top. So all we have to do is make a copy of the rectangle. Of course, we want to remove our effect. So I'm opening up the appearance panel, and I am deleting the effect that we've added. And then we are opening up the swatches panel, and we're going to apply the pattern of the letter. Now you can see we've applied a light and leather pattern but it's way too big so all we have to do is double click the scale to and in the pop up window we will uncheck transform objects and then use uniform. Set it to 50%. Check with the preview and if you are satisfied we press OK. After that, we want to play with the opacity of the new shade with the pattern. So we'll select it, go to Opacity, set it to Overlay, and maybe bring it down to 60%. And as you can see now when you look at it, you get the idea that we now could think that this is a leather texture. And with this shape you could simply create any kind of design where you would like to apply a leather texture. Now let me just select all of this here and hide it, and then I would like to show you the finished leather wallet that I have created with this exact same pattern. And here's a leather wallet. As you can see, we see the cracked surface of the leather, and I've created some stitches and some highlights and some buttons. But all I've used was this exact pattern that we've just created here in Adobe Illustrator. All you have to do is play with highlights and Shadows, and opacities. And now we are at the end of this lesson. I hope you enjoyed this. Now I think it's time, to move on to the next lesson, where we can create a denim texture.


