
 Lessons: 11Length: 1.4 hours
- Overview
- Transcript
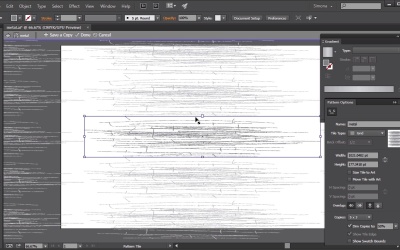
3.1 Create a Brushed Metal Texture
Learn how to create a brushed metal texture that you can turn into a graphic style.
1.Introduction
1.1Introduction01:16
2.Organic Textures
2.1Create a Grass Texture08:36
2.2Create a Sand Texture08:20
2.3Create a Snake-Skin Texture11:21
3.Material Textures
3.1Create a Brushed Metal Texture09:17
3.2Create a Wood Texture07:41
3.3Create a Leather Texture09:20
4.Textile Textures
4.1Create a Denim Texture06:41
4.2Create a Wool Texture09:48
4.3Create a Carpet Texture11:11
5.Conclusion
5.1Conclusion01:43
3.1 Create a Brushed Metal Texture
Hello there and welcome back to Custom Textures in Adobe Illustrator here on tuts+. I'm Simone and we're about to start the lesson Create a Brushed Metal Texture. So let's start right away and let's open up Adobe Illustrator. Metal patterns and textures are popular and in the online world you can find tons of resources and even free textures to download. In this lesson though I would like to show you how you can create your own brush metal texture in Adobe Illustrator. First metal is a reflective surface, usually very shiny and brilliant. But some brushed metals have a more dull and less reflective surface. Now, how can we create a brushed metal texture in Illustrator? People usually jump right over to Photoshop when they want to create a brushed metal or brushed aluminum texture, but we can achieve a pretty good outcome here in Illustrator. And the texture stays in vector and is scaleable. So first we will create a rectangle of any size. Then let's fill it with a gradient. So I open up the gradient panel here and then I choose a gradient here in the swatches panel and then in the gradient panel, I want to change the radius to 90 degrees. So now that the black is on top and the white is on the bottom, I would like to add another gradient stop right here in the middle. It doesn't have to be exact, just wing it. Then you want to change the white gradient stop on the left here to 40% black. So, when I double click it I can change it to 40% black here. Then the middle gradient we will change to 20% black, so I will double click it here and I will change it to 20% black. And then we want to change the other side into 40% black as well. So I will change that. Again, we are double-clicking it, and then I change the value or I will choose it from the swatches panel I get. Isn't it complicated, but as you can see we now have a light aluminum or metal look. Now we will create our brushed and slightly distressed look. As usual there are many ways of creating an effect. I could use the Photoshop effects Illustrator has to offer. But I would like to create with you a custom pattern that looks like brushed metal with a tiny distressed finish. So let's use the pencil tool over here and then let's set the stroke to black. Then the size, we'll set it to one point. And then we start creating lines like that. Horizontally, from right to left, from left to right. Really just a random scribbling here. You want to get the brush effect so horizontal lines work well. While we're at it, let's also add some tiny vertical lines. Randomly again here and there. This again is up to you how many lines you create. I have already created a finished piece here so let me show it to you. As you can see it's not too complicated looking or too dense. After we have finished with your lines we want to alter them a bit. We will use the free hands form tool. And then we will stretch it horizontally just like that and then squeeze it vertically. Not too much, but we will double it in length and we'll squeeze it down a third. After that let's change the stroke to about 60% black. We can always work with the grayscale group here in the swatches panel. Now we want to create a pattern out of it. So let's select the lines, and then we go to Object, Pattern, Make. In the pattern options pop up, we will give it a new name. So let's call it Metal. As you can see it is not overlapping and it has gaps. In case we have a check mark next to the size tile to art, let's uncheck this. Now we want to remove the gaps between the tiles. So we can do that by clicking on this button here. The pattern tile tool. Once we click it we can see the bounding box and then we can change it and re size it. Let me zoom in a bit. Let's make sure we grab the handles here on the side and move them inward. See now that the tiles are getting a little closer together?. We are removing the gaps in between. So, let's move it towards the inside a bit more, then we will change the height, as well. Once we are at an overlap we are happy with, let's choose the tile type. Here we can choose from Grid, Brick by Row, Brick by Column, Hex by Column, and Hex by Row. Let's choose Brick by Row. This will give you a little bit of a more dynamic overlap since the house get organized by a brick pattern. And now we can click Done. We can see our new pattern now here in the swatches panel. Let's go and create a copy of the rectangle that we filled with the gradient here. So all we do, we have to press Cmd or Ctrl+ C and F. Now we have the exact same copy on top. And now we can fill it with the pattern that we've just created. Depending on the intensity we want to achieve we play with the opacity. Maybe we want it intense. Or we can choose Screen for faint look or we can leave it at normal and play with the percentage of the opacity. I will go and set mine to overlay, 100%. Now this looks pretty good at the moment but instead of creating another pattern, I would like to show you another way how we can make this texture permanent and how we can use it over and over again and even apply it to live text. Let's create a graphic style out of it. But before we can do that, we have to take a step back and make some changes. You can not group shapes with patterns or effects and create a graphic style out of them. You will be able to create a new graphic style but the style will be empty. So let me show you what I mean. Let's take those shapes here. The one with the pattern and below the one with the gradient. The I will group them and then I open up the Graphics Style panel on the window Graphic Styles, and then in the fly out menu over here, the top right I will select a new graphics style. It will be added to the panel but as you can see it is empty and if I draw a rectangle and apply the style nothing happens. So what do we need to do? We need to work with the appearances. What I mean by this is add the gradient and the pattern to the rectangle via the appearance panel. So let me show you how. First let's ungroup the shapes. Then let's delete the pattern shape on top. And then we open up the appearance panel over here, or we go to window, Appearance. Then we add a new fill via the icon here. Then we choose the pattern from the drop down in the swatches panel. And then we set the opacity to Overlay. Now this is exactly what we had done before, but this time it is all on one single shape. Now when we go to the Graphics Style panel and click New Graphics Style, you can see that we now can add it to the panel. And then when I create a new shape. Let's try the star shape here. And then we click the graphic style we've just added, we will get the brushed metal look. Now this is cool since I can use it over and over again, and I can apply to any shape. And I don't have to resize anything. And we can also apply to text, the text is live, so you can change it any time. Here let's have a look. I will type metal then I'll size it up so we can see it better. And then I add the graphic style. And look, I can change the text or add any context to it. And this is it. We have an awesome vector brushed metal texture that we can add to any shape Even text. Let me show you how I fused it. Here's a metal shield I have created. I played a bit with the opacity and overlay of the shapes, but my base texture is the one we've just created together. Now, let's move on to the next lesson, and let's learn how to set up another popular texture. Let's create wood.


