
 Lessons: 11Length: 1.4 hours
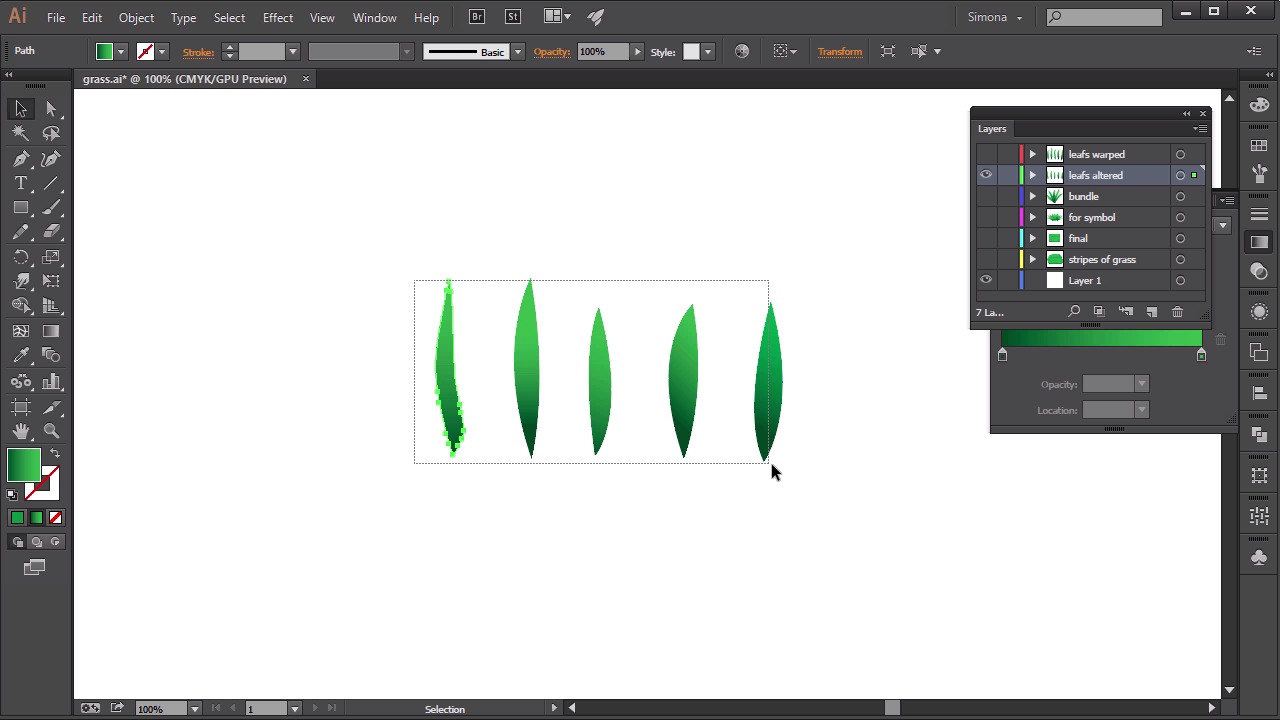
- Overview
- Transcript
2.1 Create a Grass Texture
This lesson will give you the inside scoop on how to create a grass texture in Illustrator with the Symbol Tools.
1.Introduction
1.1Introduction01:16
2.Organic Textures
2.1Create a Grass Texture08:36
2.2Create a Sand Texture08:20
2.3Create a Snake-Skin Texture11:21
3.Material Textures
3.1Create a Brushed Metal Texture09:17
3.2Create a Wood Texture07:41
3.3Create a Leather Texture09:20
4.Textile Textures
4.1Create a Denim Texture06:41
4.2Create a Wool Texture09:48
4.3Create a Carpet Texture11:11
5.Conclusion
5.1Conclusion01:43
2.1 Create a Grass Texture
Hello there, and welcome back to Custom Textures in Adobe Illustrator here on Tuts+. I am Simona and we are about to start the lesson, create a grass texture. So let's start right away and let's open up Adobe Illustrator. I already created a document called Grass. But feel to name yours anything that makes sense to you. Many artist designers and creators use Photoshop for creating textures and of course it is a great tool but I would like to show you how you can use illustrated to create some awesome textures as well. So what do we have to do to create a grass texture? Well first lets start by creating grass like shapes with the pen tool we can find the pen tool over here in the tool bar or by using the shortcut P. And then we want to create a shape that would resemble a leave of grass. So with the pen tool selected, I will just click once here and then create a shape like this just as you can see on the screen right now. It doesn't have to be fancy. Just a simply shape. After that we can make a duplicate of it, and we can use the shortcut option or add. And then when we drag the shape over here to the side we will have a duplicate of it. And then with the shape still selected, we press Cmd or Ctrl and D on the keyboard, three times. Now we have five leaf-like shapes. We can color the shapes now with a dark green to light green gradient. I have already created one so when we have a look here in the swatches panel, we can just select it and since I highlighted all the shapes, the gradient gets applied. Now the gradient falls from the left to right. But we want it to be dark on the bottom and light on the top. So let's open up the gradient panel over here. And then we will select the first shape. We want the gradient radius to be different. In order to set the dark green to the bottom, all we have to do is set the radius here to 90 degrees. And then we will have the dark going to the lighter green. So, let's select all of the shapes, and then repeat this step. The next step is to make slight changes to the shape. I'm going to use the direct selection tool, shortcut for this is a, and then I'm going to select the anchor points, and make, for example, this shape taller. Then I will select the handles of the angle point and then change the shape a bit. Let's do those steps to all the shapes so all of them will look a little bit different. We want to use those shapes to build up our grass and it's better looking when we have them look differently. I have already altered them so here they are. Now that we have some good looking grass shapes, we need to apply another step before we can create a symbol out of them. I think it would look just a bit better if we altered the shapes a bit more and made them more organic looking. Grass is a soft and flimsy kind of material so we want to have them as much like grass looking as possible. Illustrator has an awesome tool to alter shapes. It's called the warp tool and we can find it over here in the toolbar. It is right below the width tool and we can use the shortcut shift + R to access it. But before we use it let's have a look at the settings. Double click the tool icon. And in the pop up window, you will see the warp tool options. We can play with the width and the height, the angle and the intensity. We also have warp options for the detail and for simplifying things. But for now let's leave all as is then when we select the shape and move the brush toward it, you will see how we can warp the shape and push it around. Now, how you work the shapes is really up to you. I will try to make it grass-like looking. There is no right or wrong way, just let your creativity go. I already prepared a set for us and this is the final result here. Now the next step is to group the shapes all together. I also prepared a group for us and all I did was rotate the shapes and overlap them on the bottom here. You can see that now, we have a bundle of grass. But again before creating a symbol, I thought it would be even be better to actually create copies again. I created altogether 5 copies. And I placed them side by side. Some are rotated a bit, some are reflected to the other direction. And let me show you how the final bundle of grass looks like. Here it is. I grouped it all together and now we can create a symbol. The reason why we want to create a symbol is simple. I would like to show the symbol tool and how we can use it to create our final grass texture. So let's open up the zoom panel over here. If you do not see it just go to window symbols. Let's drag our grass bundle into the symbols panel and then in the pop up window we will give it a name. For example grass. So I will just type grass. Then I will choose graphic instead of movie. And then I will click okay. Now the symbol grass has been added to our symbols panel. And if we have a look over here, we can now select it and then we can create a grass texture out of it. So, first let me hide those shapes here and then on a new layer I will select the symbol spray tool here on the side in the toolbar. Again the shortcut is shift plus S and then I make sure I have the grass symbols panel selected and now what we want to do is we want to create a horizontal line from left to right on our new layer. But, before we do this, let's double-click the simple spray tool, and let's set the intensity to ten, and the simple set density to five. Everything else stays the same. Now we can click and then create the horizontal line of grass. See how we now get a strip of dense grass? Next, what we want to do is, we want to lock the symbol shape that we've just created. I will add some more symbols. If you don't lock it, it will add more symbols to that horizontal line. But I want to create another horizontal line of grass, but this time from the right to left. So we lock the shape, shortcut is command or control and 2, or under object > lock selection. And then we create another line of grass just like this. Remember, this time from the right to the left. Now we will repeat this a few more times, but instead of you watching me I have already created it for us let me hide all of it here and then I will show you the final result. Now this is our grass texture It's pretty neat looking, but before we end this lesson, I would like to show you one more tip how you can make your grass a bit more dynamic and organic looking. Since we have several instances of the spray grass symbol here, we can make use of more symbols tools here in the tool panel. Let's open up the symbol tool panel here and let's select one instance. Then we choose the symbol shifter tool and then when clicking on the grass we can shift the symbols of the grass bundles around. See? We can make it a bit more dynamic looking. You can also use the symbols scruncher tool just like this. Or the symbol sizer or symbol spinner tool. And here's the final grass texture. And we are at the end of this lesson. Yours might look different, but don't worry. If I had to create another grass texture, I bet mine would look different as well. Now let's head over to the next lesson and learn how to create another organic texture. Let's create sand.


