
 Lessons: 11Length: 1.4 hours
- Overview
- Transcript
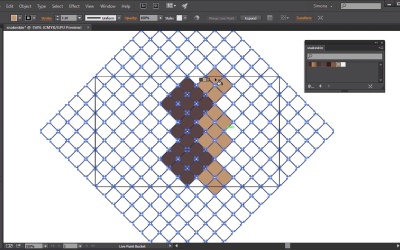
2.3 Create a Snake-Skin Texture
Snake-skin boot? No problem, let's create a neat pattern that will look like a snake skin with the help of the Grid Tool and Gradients.
1.Introduction
1.1Introduction01:16
2.Organic Textures
2.1Create a Grass Texture08:36
2.2Create a Sand Texture08:20
2.3Create a Snake-Skin Texture11:21
3.Material Textures
3.1Create a Brushed Metal Texture09:17
3.2Create a Wood Texture07:41
3.3Create a Leather Texture09:20
4.Textile Textures
4.1Create a Denim Texture06:41
4.2Create a Wool Texture09:48
4.3Create a Carpet Texture11:11
5.Conclusion
5.1Conclusion01:43
2.3 Create a Snake-Skin Texture
Hello there, and welcome back to Custom Textures in Adobe Illustrator here on Tuts+. I am Simona, and we are about to start the lesson, Create a Snake Skin Texture. So let's start right away, and let's open up Adobe Illustrator. Ever wanted to create a snake-skin texture and didn't know how to? And, it kept you up all night. Maybe, and maybe not. But this lesson is just all about that. So let me show you how you can create your very own snake-skin here in Adobe Illustrator. First, let's talk quickly about what we need to make. This next scale is nothing more than a random pattern of colored shapes. Or so-called scales in different shapes and sizes. The colors often a variation of camouflage colors. So, one of the first steps is to create a grid of scales or shapes. We will keep it simple for now so just follow along. Since I'm a big fan of easy steps, lets work with the Grid Tool for starters. The Grid Tool we can find here on the left underneath the Line Tool, right next to the Rectangle Tool. I already picked a size so let's double-click on the tool. And in the rectangle grid tool option window, we will set the size to 400 points for both the width and the height. And horizontal dividers we will set to 15. And so we will do for the vertical dividers. Then we will click OK. Now we have a square a grid divided into 16 squares. The stroke is set to black and we have a good start for our snake skin texture. Then with the grid shapes like that we will open up the path find the panel and so let divide. This will help up adding effects later on. The next step is rotate the grid by 45 degrees. So let's select the free transform tool, shortcut for this is E. And while we press the shift key, we can rotate it by 45 degree increments. So all we have to do is rotate it once and boom, 45 degrees. Now this way we have the diamond-like shapes for our snake-skin scales. Next let's create a rectangle to select a part of the grid. We want to focus on having ten diamond shapes horizontally and six diamond shapes vertically. In order to have the rectangle snap into place, let's turn on the smart guides. We can find them under view, smart guides. Or you can use the short cut command or control plus u. Now when we select the rectangle tool and create a rectangle and drag it along the grid shape here. We can snap it directly onto the edges. And now we have a divider, a rectangle, that will help us to color and alter our skin texture later on. The rectangle has a fill of none, and just a black stroke at the moment. And will just act as a guide for now. Later we will use it to crop the colored and textured pattern. Now we can start adding a pattern, via colors, to our diamond scales. I already created a swatch group with colors and gradients for our snake skin, and you can open it from the source file folder. It's called snakeskin AI. And when you open it, it will open up as a panel. Here you can see that we have beige and brown tones. A light color and plus two gradients. But before coloring and adding a pattern, we need to add some effect to the grid. First we want to add rounded corners. So let's select the grid shape. Then let's go to effect- stylize- rounded corners. Here in the pop-up I will choose a size of 4 points. We can check the preview button just to see if that's enough. Maybe you want it more round, maybe you want it less. It's up to you. Then we click OK. Now you can see that the diamond shapes have rounded corners. After that, and if you are happy with the rounded corners, we'll expand the appearance of it. All we have to do is go to Object > Expand Appearance. And now we are ready to add some color. So let's select a color. I'm choosing the brown here. Then we select a grid. And then we will choose the Live Paint Bucket tool. Now the beauty of the Live Paint Bucket is that we can click and drag as many shapes as we want to color. So let me show you. I want to start with four middle shapes here and color them brown. Then I will select the nine shapes above in a bigger diamond shape. And then repeat the same below. And as you can see, all I just do is I click, I hold the mouse button, and then I drag along and select all of the shapes that I want to color. Next, I want to add a lighter color on the side here. I will pick the beige color, and again, with the live paint bucket, I can add another color to the shapes. You can see, it's really easy, and please add any kind of color pattern that you want. I'm trying here to create a snake-skin pattern. I already finished the light paint pocket coloring for us and if I turn off the layer here, and the other one on, you can see the finished coloring and the pattern that I've added. Now in order to crop the grid, and the coloring and around the corners into a repeatable rectangle. First we need to turn off the stroke. So let's select a grid and set the stroke to None. Then we go to Object > Expand, and now we can select both the expanded shapes and the rectangle. And then we will go to the Pathfinder panel. And here we will click Crop. And now we have our cropped rectangle. And as you can see, the sides are cut straight as well. And this is very important for a repeatable pattern that we want to make. Of course we are not finished yet. It all looks a little bit flat too. So let's keep going. The next step is to create a gap between our scales. There are always several ways to do things. And I could suggest to you using a stroke and send it to the inside, but I think the better way is to use the past offset to. So, let's select the shapes. And, then we will go to object, path, offset path. And, here, we will set the value to minus one point. Then, we click okay. Now do not deselect the shapes. Make a copy to the clipboard. You can do that by simply pressing Cmd or Ctrl+C and then after that, delete the shapes and the original ones. Then press Cmd or Ctrl+F on the keyboard and voila. We have the offset shapes. And now we also have a gap between each shape. You might have to do some clean up, but this is not a big deal. You can see that we have some leftover pieces here and all we need to do is select them one by one, and then delete them. Now we want to transform the shapes a bit more and make them more diamond-like looking. So all we need to do is, use the free transform tool and squeeze the height. It is up to you how much but I try to stay close to a snake-skin, and now it's time to add the gradient colors. This part is totally up to your interpretation, and I thought it works best by adding the gradients randomly with a tiny bit of order. So I select the vertical row here and then I add the dark gradient to them. Then I select the same row over here and then over there and add the gradient again. This might take some time. You might play around with it. And maybe you want to change the color around, change the gradient, it is totally up to you. Of course it is a subtle change again but it will still give a bit of a difference and a little bit of a dimension to the shapes. Then I select the shapes over here, and I will add the lighter gradient to it. After that, I will just select a few random shapes just like that and make them darker by choosing this swatch here. I think you're getting the idea. I finish the shapes here, and this is the final skin texture with the gradients and such. Now one more step before we can add a pattern swatch to our swatches panel. We need to add a background color. So let's create a rectangle with the rectangle tool. Then we choose the light color here in the snake skin panel and then we create a background for the pattern. This is really just to fill the gaps between the scales with the color. And since we still have the smart guides on. We can easily put it into place. Now we will send it to the back. And now we can create a pattern out of our shapes. We might need to zoom in and check that the rectangle is in the correct position and has the correct size. If it is not we can always adjust it. And again with the smart guides we can make it snap into place. Now one more thing we have to pay attention to is the gradients here. The gradient? They have to be mirrored so when the pattern gets repeated, we have a seamless pattern. Now one more last step and then we have our texture or pattern for the snakeskin. Let's select the shapes all together. And then we go to Object > Pattern, and select Make. Here we want to call our pattern Snake Skin. You might see tiny gaps between the tiles, but there shouldn't be any. Sometimes there's a glitch with Illustrator and it would show gaps. But once you zoom in and out, or when you apply the pattern, they disappear. And then we can click done, and that's it. Here's an example of how this snakeskin texture could be used. For example, as a phone case. And now we are at the end of this lesson. But don't worry, there is more. I will see you in the next lesson where we will create a brush metal texture in Adobe Illustrator


