
 Lessons: 11Length: 1.4 hours
- Overview
- Transcript
4.1 Create a Denim Texture
Illustrator's effects are really powerful. Create your own denim texture here in this lesson.
1.Introduction
1.1Introduction01:16
2.Organic Textures
2.1Create a Grass Texture08:36
2.2Create a Sand Texture08:20
2.3Create a Snake-Skin Texture11:21
3.Material Textures
3.1Create a Brushed Metal Texture09:17
3.2Create a Wood Texture07:41
3.3Create a Leather Texture09:20
4.Textile Textures
4.1Create a Denim Texture06:41
4.2Create a Wool Texture09:48
4.3Create a Carpet Texture11:11
5.Conclusion
5.1Conclusion01:43
4.1 Create a Denim Texture
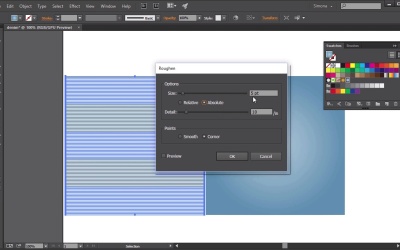
Hello there, and welcome back to creating custom textures, in Adobe Illustrator here, in Tuts+. My name is Simona, and we are about to start the lesson create a denim texture. So let's start right away, and let's open up Adobe Illustrator. Creating a denim texture is fun. So let's get right to it. This is not a complicated texture, so you will learn in no time how to create your own jeans pockets and such. First, we need to create a rectangle here. So I will choose the rectangle tool, and I will click on the art board. And in the pop up window, I will set the width to 400 points. And the height to 400 points as well. Then I will click OK. At the same time, we want to turn off of the CMYK. Now the fill for our rectangle at the moment is white, but I would like the fill it with radial gradient of blue hues. I've already created one for us so when I open up the swatches panel here I can apply it right away. As you can see it is not a complicated one. It's a radial gradient with light in the middle going to a darker blue to the outside. Now again I would like to create a rectange. So I will choose the rectange tool and then click once on the artboard. And in the pop-up, I will leave the width for 400 points but I will change the height to 1 point. We have the same width as our rectange or square, and now we can create the elements for the denim texture. First thing I want to do, I want to move it over here to the other side, and then I would like to create a copy. I will drag the copy to the bottom and after that, I want to select both of those thin stripes. And I want to go to Object > Blend. I would like to create a blend out of it. So we will create Make. After that we have to go back to Object > Blend > Blend Options. Here in the blend options, when you see in the window the spacing, we wil like to change it from smooth color to specific steps. And here we have to play around with it. Maybe we want to try 100 steps and then turn on the preview. And if we think that's enough or maybe we want 110 steps this is really up to you. I think I will leave it at 100 steps. And I'll press OK. After that I want to expand the Blend. So I will go to Object > Blend > Expand. Now we have each line on its own. But it is still grouped together, and we will leave it as such. Now we will like to add an effect to it. We want to create the denim texture. So we will select the expanded blend lines, go to Effect > Distort &Transform, and we will choose Roughen. Here in the pop up window I would like to set it, instead of relative to absolute, change the point size to 2. And then I would like to bring up the detail to about 50. I can turn on the preview and it might take some time. And as you can see here, we're creating a slightly distressed look. At the same time, you might want to play with the detail a little bit. If you turn off the preview it will act a little bit faster. We can maybe bring it up to 76 and click to Preview and then we get a little bit more distressed look. Or we could even go all the way up to 100. This is really up to you. I think I will leave it maybe at 80 or 81. Then I will press OK. Once this is done, I would like to expand this effect. So I'll go to Object > Expand Appearance. Now we have a distressed look that we can move over on to our square. But first we would like to change the opacity. Here in the opacity settings I will choose soft light. And at the same time, with the distressed look still selected, I will change the color, and I will choose a black. Then I will move it over onto our square. And as you can see, we are already getting a little bit of a denim look. But we need to do one more step. First we need to select the distress shape and then we're creating a copy into the front. And then we're going to choose the free transform tool. I will then rotate it by 45 degrees and I will change the opacity blending mode from soft light to overlay. And now when I de-select so I can see what's happening, you can see now we have a denim-like texture. Now if I'm happy with this, and then I will create another rectangle on top, and let's say I want to also change the radius of the corners a little bit. And then I will select all, then I will go to Object > Clipping Mask > Make. And now as you can see, we have the start of our dimming texture. If I zoom in here, you can see that it gives us quite the effect of a dimming texture. It wasn't really that complicated, we really just worked with three shapes. One shape with the radial gradient, then the blue U's. Then we created a shape out of thin lines, and we used the blend tool, colored them black, changed your passivity settings to soft light and we applied an effect. I will show you again here under Effect > Distort Transform > Roughen, made a copy on top, changed the opacity settings to Overlay, rotated it by 45 degrees, and then I created the shape and clipped it all together. Now, the sky's the limit, and you could apply this kind of texture to any kind of shape you like. You can also add stitches to them, you can add buttons, you can make it into little flags, it doesn't have to be necessarily a jeans pocket. It can be a tag but, at the same time, you now know how to create a denim texture and this is it. We are at the end of this lesson. Now let's go on to the next lesson and let's create a wool texture here in Adobe Illustrator.


