
 Lessons: 15Length: 2.2 hours
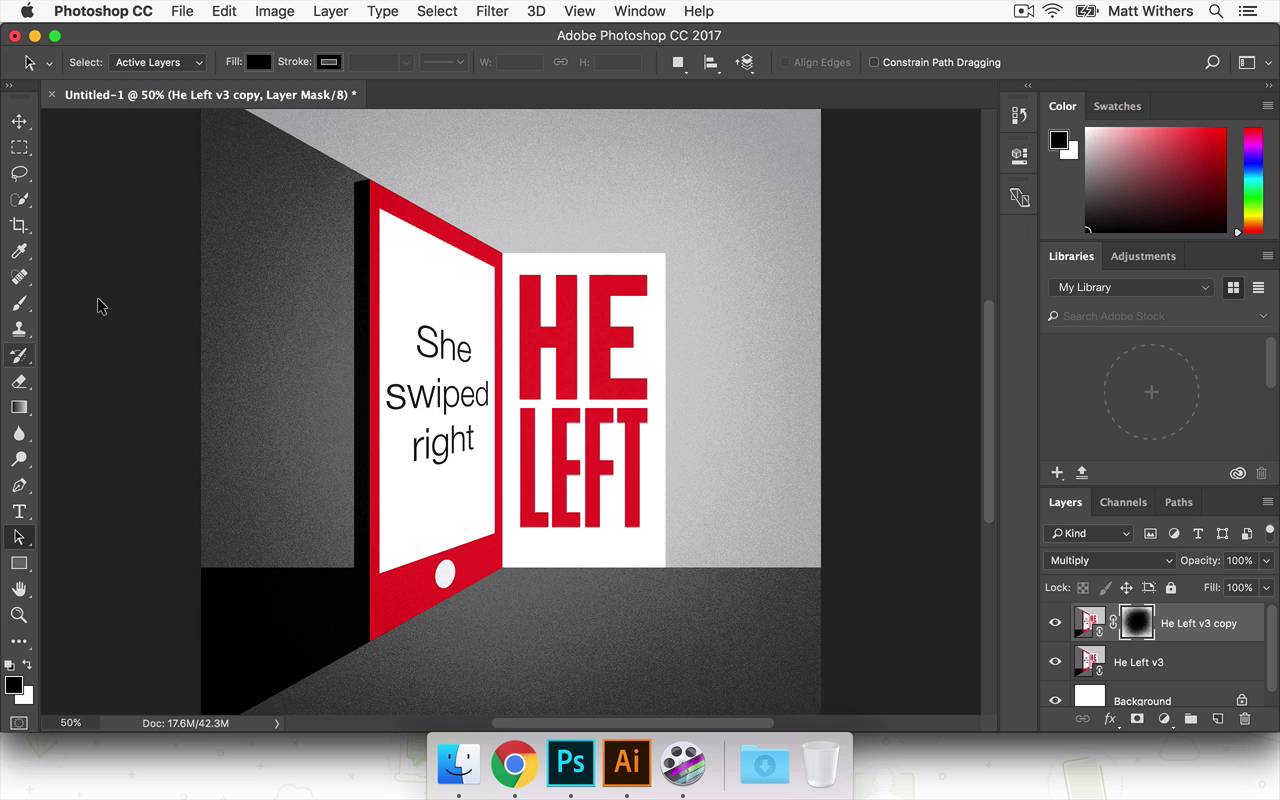
- Overview
- Transcript
5.6 Grain Effect
For the final touches, I'll be taking the design into Adobe Photoshop, where I'll demonstrate a technique for how to add a grain effect to your design.
- Source File: He Left v3.psd
1.Introduction
1.1Introduction00:56
1.2Thinking Creatively02:50
1.3Two Voices02:50
2.The Concept Stage
2.1The Stories14:17
2.2Forming Ideas10:39
3.Research
3.1Mood Boards14:05
4.Refining Ideas
4.1Sketching07:53
4.2Perfecting the Final Sketch07:35
5.Creating the Artwork
5.1The Basic Shapes09:52
5.2'She Swiped Right'06:08
5.3'He Left'20:41
5.4Applying Colour11:31
5.5Perfecting the Design09:30
5.6Grain Effect11:07
6.Conclusion
6.1Conclusion00:44
5.6 Grain Effect
Hi everyone, welcome back to the course. In this nearly final lesson, we're just getting to the end of creating our artwork here. So we've just been finishing up in Illustrator, refining our design, and we're about to take it into Photoshop to start bringing in some textures, making it feel a little more gritty to kinda get that emotion across from this story. So, here we are in Illustrator. Everything's set up good to go, everything's saved. So I'm gonna go into Photoshop. We're gonna create a new document in print, and we're gonna make it the same size of our art board from Illustrator. 300 RGB, that's good. And we're going to place our image in. And we're going to chose a crop box, so then everything inside our art board or the crop will just be used. And maybe you remember from the last lesson, we had some of the shapes, like, bleeding off the edge. So that bleed won't be involved in bringing them in here into Photoshop it would just be what was in the art board. So there we have it, and what we're going to do first is, I'm going to duplicate that layer. And then I'm going to use Multiply. So it kind of, it's created a darker version of it on top. So if you toggle that one enough, you can see the difference in tones that's brought to the design. And then what we're going to do is create a clipping mask down here. Then what we're going to do is add a layer mask down here. And we're going to use our brushes, and we're going to make it quite large for size about 1,000 pixels, hardness completely off, and then we're going to in here have Dissolve selected. Let's try the Opacity up quite high, and we are going to start taking away some of the top layer, down here, and then, so when you have your vector mask selected, be sure to do that before you start clicking away. You'll notice down here that these colors are black and white. So if you were to hit X, it toggles between them. So, when you've got white selected, it adds on, it brings back what you've just taken away. But if you have X selected, it erases wherever you're clicking. And so what I want to do, what I'm trying to achieve is sort of like a dark glow coming around the end of the page. Gonna make my brush slightly larger. That's by pressing the bracket size Okay, that's looking good. I'm gonna just reduce the opacity and do another version inside. Just to get a few more of those different dark and light tones from. So that's what the dissolve brush achieves, if I were to put it on to normal. it would just be, a soft edge, but when you have Dissolve selected, it kinda creates this grainy look, which is what I'm trying to bring in here. Just gonna make the brush size larger again, and I'm going to kinda knock out from the center just to make it finally uniform and less like you'd be able to see where I've clicked. But just hopefully we'll make it look like it's glowing out from the center. Okay coo,l so that's looking really good, I really like the grainy effect we've got going on there. And so that's just very simply using the brush and just the preset things that come with Photoshop, haven't downloaded anything special there. Everything should be already on your version of Photoshop to use that, and then that's just using Dissolve and playing with the opacity to get the look you want. So that's looking good, I'm gonna save that up just so we don't lose our progress. Call it the same version as the Illustrator file but save it as a Photoshop file. And then I've two more things I'm gonna do to this, I am wanting to make the he left sort of stand out from the page slightly. So and also, I want a glow coming from the light sources from the screen there and the doorway. So what I've done, a way I've set up in Illustrator, two more light boards with He Left place exactly in the same place. On this art board as it is shown on this one. So when I place this art board into Photoshop, HE LEFT will align perfectly over the top of this version. And if you're not following, hopefully you'll see what I mean in a minute, when I do it. And then, also, over here, I've got the doorway and the screen. I have those saved as well on another out board, so let me demonstrate what that is going to achieve. So, if I place in, The second art board and go to Crop Box again. So now you can see here that, that version, that He Left just by itself is, if I were to take these two away, that's just hanging perfectly in place. But when you bring them back you can't see where it is yet, because it's so perfectly placed in place. So what I'm going to do here is I'm going to go down to blur, goes from Gaussian blur, however you say that word. It's always been a mystery to me. And we're going to make it about 20 pixels, and you can see it here in the background. The more you, the higher the number the more blurry it gets. So far it looks, That makes good about there. And then we're going to create another vector mask. And we're gonna get our brush again. Probably make the brush size slightly smaller and start knocking away. And it creates this really nice grainy effect around the text. Just subtle, but just kind of brings that bit of an edge to the design again. I'm trying to think it's gonna work really nicely. Okay cool, so that's looking good. Then we are going to do the same but with the light sources, So there on here but they're white and it's on a white background which is why we can't see them. Select Crop Box again. So now they are, oops. We're gonna move them behind our other text we just placed in. And so at the moment, they are these great, big horrible rectangles which just look terrible. But if we blur them out again, I'm gonna go for a big blur on these ones I think. Yeah, something like that. And then we're gonna use our vector mask again, can use our brush to create that grainy effect. And you can just see it starts to bleed in over top of of the greys there, so it just helps to create this really nice glow effect Just subtle abouts to bring a little something else to the design. Now, you can very easily play around with those all day. Bring in some, do the same with the red of the phone here and if you make that glow as well. Make that pop a bit, but I think I'm pleased as that is. I like the grainy texture that we brought to it. I think that really kinda gets across some of the feelings we are talking about before and the kind of anguish of a breakup and betrayal and everything. I think it really nicely gets across the mood of the story. So I'm really happy with what we've achieved there. So thanks for watching this lesson. Join me again in the last lesson of the course where I'll be summing of everything that we've learnt. So thanks for watching and see you next time.


