
 Lessons: 12Length: 1.2 hours
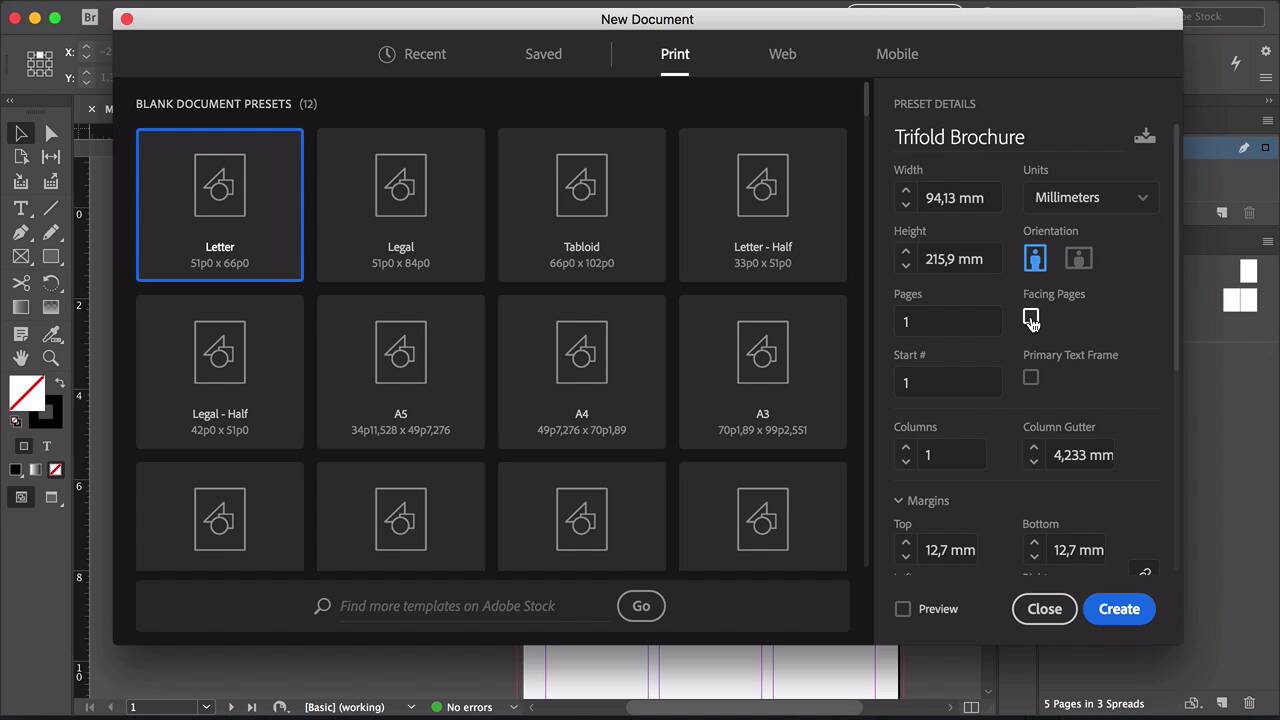
- Overview
- Transcript
2.1 The Essentials
In this lesson you'll learn how to set up presets, a one-page document, and a trifold brochure document that will form a foundation for future projects. We’ll walk through the important components to consider when setting up a new document, like margins, bleeds, slug, color modes, and resolution.
1.Introduction
1.1Introduction01:20
1.2InDesign vs. Affinity Publisher04:41
2.Getting Started
2.1The Essentials07:09
2.23 Ways to Create an Effective Workspace08:23
2.3The Structure of Your Document05:55
3.Design Elements
3.13 Foolproof Ways to Choose a Color Palette03:42
3.24 Typography Tips14:35
3.33 Essential Steps for Importing Images05:14
3.45 Ways to Create Impact in Your Design07:36
4.Printing
4.14 Steps to Get Your File Ready for Print04:26
4.2Exporting Files for Print05:01
5.Conclusion
5.1Conclusion01:59
2.1 The Essentials
Hi there, and welcome back to this course, The Basics of Print Design. In this course, we'll start by showing you the essential elements you need to know in order to start a new document in InDesign. So let's start by setting up a magazine. Head over to InDesign and click on Create New. Here you will find all the different sizes of the documents that you worked on previously. And then here at the top, you'll find the Print, Web, and Mobile options, and that will dictate the resolution that you will be using for this document. So for example, for this specific project, we want to use Print because we want it to be at 300 DPI. That's the print resolution, web and mobile is 72. For this lesson, we will use A4. And here I will change the name to Preset1. Change the units to whatever you're comfortable with. I am comfortable with inches and millimeters. And I’ll just rename this to Magazine so that way we can just directly save the file. Set the pages to 5, number of columns to 3, here we can change the gutter to 0.25 inches. And the columns will be created within the margins that we choose here at the bottom. The gutter is the space in between each one of the columns. And these columns are useful because they can work as a grid, and it can help you set up your file in a more organized and clean way. Let's head down here. You can change the margins here, going up and down. And you can unlock or lock, if you want to have equal margin size all around the page. Since I want only the top to be bigger, then I will unlock it, and change the top, and leave the other three as 0.5 inches. Bleed is a term used to describe part of your document that has images or elements that are touching the edge of the page. So these elements extend beyond the trim, and that extension is called a bleed. So when the magazine gets trimmed, you'll have no white margin around it. The norm is to have a 0.125 inches of bleed, or 0.3 millimeters, and that should be just enough to avoid any white edges on your print. Always communicate with your printer, because they will tell you the right amount of bleed that you need. The slug extends to the bottom of the page. And this is used to add a title or a date to identify a document. And of course, we have the preview check here. If you check the preview, then you'll get a quick view of what the document you setup is going to look like. And if we're happy with that, we can click on Create. So let's move on to setting up a trifold brochure. In InDesign, select Print. I'll name this file Trifold Brochure. So what's going to happen now is we're gonna take the size that we want the trifold brochure to be, the final size. And that will be the trifold brochure open. For this, you need the paper to be horizontal. And then measure the final width, and then divide it by 3. To that, add 1 millimeter to allow for the fold. So in my case, that would be 94.13 millimeters. And leave the height as it is. And check facing pages. Number of pages to 6. We'll leave the columns to 1, margins to 10 millimeter, bleeds to 3. And if you want to save this document as a preset, head back up and click on the Save document preset button. So that way you don't have to be constantly setting this up again over and over again. And then if you go to the Saved tab at the top, you'll have the preset right there. So click on Create. And now let's open the Pages panel. So we're going to create a new master page. And this new master will be slightly narrower to accommodate and compensate for the folds within the brochure. So set the width to 91, click OK. Right-click on B-Master and select Apply master. Make sure that Apply Master is set to B-master and select to pages 1 to 6. Click on Use master page size. And you'll notice that pages 1and 6 are already looking a little bit narrower. So now we need to group panels 1 to 3, and that will be one side of the brochure. And panels 4 to 6 will be the other side of the brochure. To do this, head over to the Pages panel. On the main menu, deselect Allow Document Pages to Shuffle. And we will simply drag panel number 2 to panel number 1. And panel number 3 to 1 and 2. And the same for 4, 5, and 6. So that configuration that you should have is BAA and AAB. Panels 1 to 3 are the inside panels, and panels 4 to 6 are the outside panels. And now you're all set to design your trifold brochure. This last part is editing the page size, columns, margins and bleeds. So what happens once you've already set everything up and then you find out that maybe, or you changed your mind that maybe you want a little bit of margin on one side or less margins on another side. That's not a problem, you can still make changes on your document. So to change the margins and columns, head over to Layout > Margins and Columns. Unlock Adjust Locked Content. In here you can modify things as you wish. The same goes for the columns and the gutter. And then you can click OK and you're all set. If you want to make the changes on the whole document, you can do that by going to A-Master, and then make the changes there. To adjust the layout, head over to File > Adjust Layout. Here, you can change the page size. And here, you can also change, again, the margins and the bleed. So if we doubled the bleeds, you'll be able to notice it now, when we click OK. And there you go. And if you want to go back, press Cmd+Z. And that's it for this lesson. Next I'll show you three ways to create an effective workspace, where I'll show you how to set up your workspace in a way that it will give you an efficient workflow. I'll see you there.


