
 Lessons: 12Length: 1.2 hours
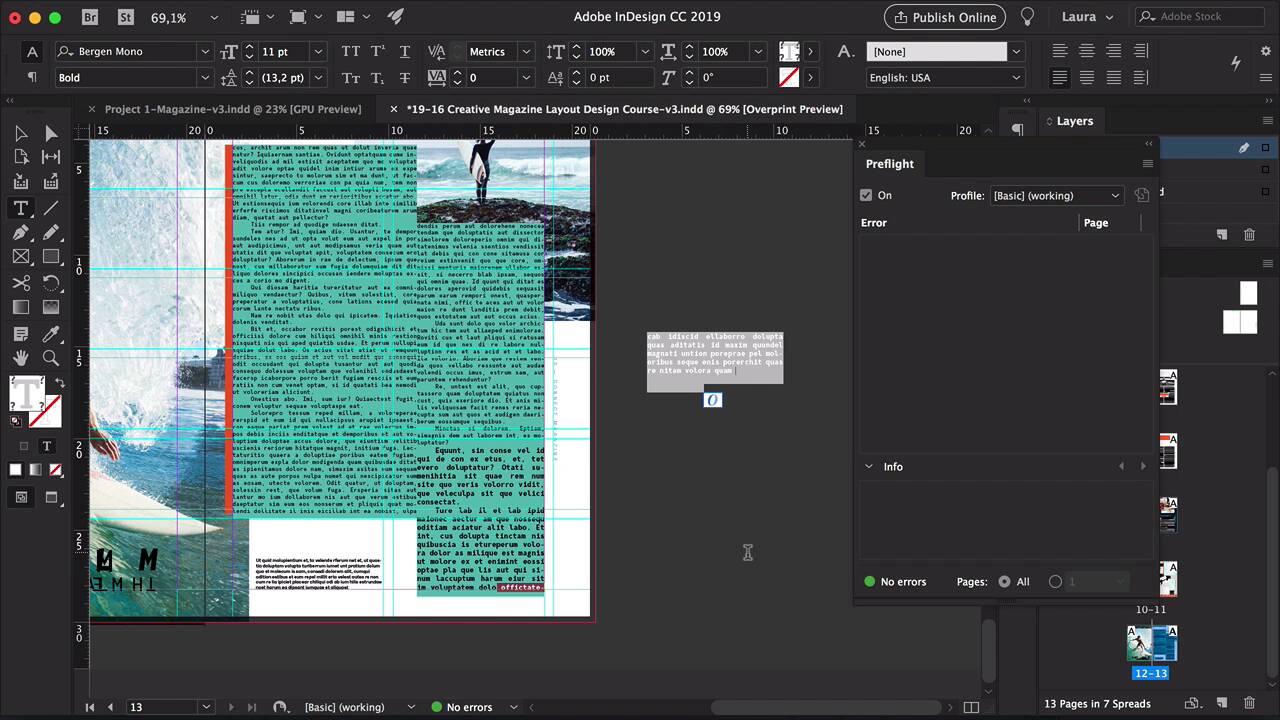
- Overview
- Transcript
4.1 4 Steps to Get Your File Ready for Print
Depending on what you are printing, you’ll have to follow a few simple but important steps to make sure your file is ready to print. In this lesson, we’ll talk about a few items you need to check to avoid errors before the printing phase.
1.Introduction
1.1Introduction01:20
1.2InDesign vs. Affinity Publisher04:41
2.Getting Started
2.1The Essentials07:09
2.23 Ways to Create an Effective Workspace08:23
2.3The Structure of Your Document05:55
3.Design Elements
3.13 Foolproof Ways to Choose a Color Palette03:42
3.24 Typography Tips14:35
3.33 Essential Steps for Importing Images05:14
3.45 Ways to Create Impact in Your Design07:36
4.Printing
4.14 Steps to Get Your File Ready for Print04:26
4.2Exporting Files for Print05:01
5.Conclusion
5.1Conclusion01:59
4.1 4 Steps to Get Your File Ready for Print
Hi there and welcome back to the course, Basics of Print Design. In this lesson we will show you four steps you need to take to make sure your file's ready for print. Hopefully this will help you avoid any errors that may come in the printing process. So let's take a look. The first step is checking for bleeding elements. When an image is touching the edge of a page, that's called a bleeding image. And in InDesign a bleed guide allows us to take that image and extend it all the way up to the bleed. So, when the project is printed, you won't have any weird white edge where the image is supposed to be. It works as a buffer. And for instance here I have the orange background and I want the orange background to be touching the bleed. And here, I don't have a background, it's only white, so this is not necessary. So, see this red line, that's the bleed guideline. We just need to make sure that all the elements are meant to be bleeding off the page are actually touching the bleeds. Number two is fix preflight errors. You'll notice here in the InDesign workspace, at the very bottom, there is a red dot and it says 1 error. You can double-click there, and that will allow us to open the Preflight panel. The Preflight panel will let us know if there is any text overflowing, any images are missing, and any kind of error that our document could have. I have here overset text, under text frame and that's on page 13, so I'll click on that. It will take me directly where the error is. It is in this text frame. So, there are a couple of options to do here. If I have room, I can stretch the text box. If I don't have the room and this is not real text, but if you're working in the real world what would happen is, you would go back to your client or your editor. And ask them if they could maybe cut some lines or shorten the text in one way or another. Maybe you could use typesetting, and try to condense things a little bit more, and just try to make the text fit. But honestly, if you have more than one line, that can be a little bit difficult. In this file, we're just going to delete that. And then we have no errors. Next step is checking linked images. So, I have all of my linked images here on the side. I have no errors. But I just want to show you what would happen if you're not organizing your files well, what could potentially happen. I'll move this file to the side. And instantly, I'm getting an error. So, Links > Missing link > page 1. So, it's telling me that that link is missing. So, this is why I encourage you to keep all of your images from that specific project in one place so you know where to find them. So, here I'll move the image back into the Images folder and it gets fixed instantly. And last is image sizes. So, this is just to make sure that all the images that we're using in the project are not being used larger than they should. A neat trick here is to go to the Links panel. Select Panel Options and select Scale. In here we'll get the scale that we are using the images at. So, you will notice that everything is under 130. We have one image 121, which is the most I would stretch something. I wouldn't go over 120. Ideally you should keep it under 100, but you can use it up to 120%. And that's it. These are the four steps that you need to take when you're sending a big file, especially a big file to print. As long as you check the essential elements, your file's going to be printed okay. Of course, always double check with your printer. Make sure that when they're looking at the files, everything is correct. So, now that we've checked for everything, in the next lesson, I'll show you how to export a file for printing and how to package your file. I'll see you there.


