- Overview
- Transcript
2.1 Setting Up a Menu Card File
In this lesson, we’ll start our restaurant menu design by opening InDesign and setting up a single-page document. You’ll learn about margins and bleeds and the difference between having your menu printed professionally and using your own printer. You'll learn how to set up layers that will allow you to keep your file organized so that you can focus on the creative part of putting together your food menu design.
1.Introduction4 lessons, 20:32
1.1Welcome to "Restaurant Menu Design in Adobe InDesign"01:01
1.2Restaurant Menu Design Assets and Software02:04
1.3How to Edit a Restaurant Menu Template12:26
1.4Tips and Tricks05:01
2.How to Create a Menu Card5 lessons, 38:27
2.1Setting Up a Menu Card File03:39
2.2Color Swatches and Styles13:12
2.3Using Tables in InDesign05:50
2.4How to Design a Restaurant Menu Card11:44
2.5Preparing the File for Print04:02
3.How to Create a Trifold Menu4 lessons, 24:53
3.1Setting Up a Trifold Menu Design File05:42
3.2Color Swatches, Paragraph Styles, and Tables08:05
3.3Completing Your Trifold Menu Design07:56
3.4Preparing the Trifold Menu File for Print03:10
4.Conclusion1 lesson, 02:02
4.1Conclusion02:02
2.1 Setting Up a Menu Card File
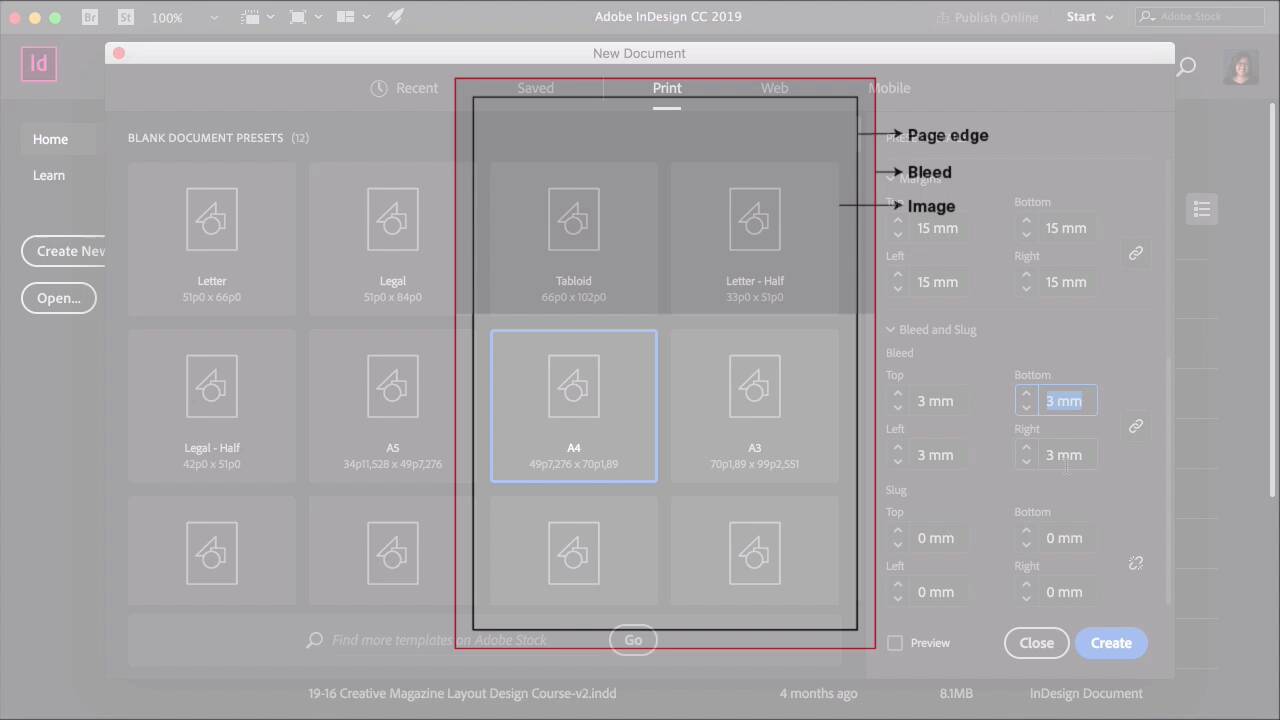
Hi there, and welcome back to this course. In this lesson, you will learn how to set up an InDesign document and how you can organize your layers to keep a tidy file. So let's look at our files here again, double-click on Menu Card. We are using Carters as a font and paper textures as our background. Head over to InDesign, Click on Create New. Set the name to Menu Card. We need to change the units to millimeters. Let's head over to Print here at a top, select A4, and now we can change the units. So change from Picas to Millimeters, uncheck Facing Pages. Set the column numbers to 3. Column Gutter, which is the space between the columns, to 5 millimeters. Set the Margins to 15 millimeters. And set the Bleed to 3 millimeters. Now the bleeds are going to come in handy when you are sending a file to a professional printer. The bleed is the line that goes beyond the edge of where the sheet of paper will be trimmed. And this is just to ensure that if you are using an image that is going off the page, that when this page is trimmed, you won't have any white gaps around it. So 3 millimeters is the rule. If you are printing a file from home from your office printer or your personal printer, then you probably wouldn't need this because smaller printers don't print all the way to the edge of the page. Click on Create, and here we have this. So this is our bleeds, our columns, our gutters. Let's bring out the rules. You can bring out the rules by pressing Cmd+R on your keyboard. From the vertical rule on the left side, drag a guide, and place it right in the middle of the page at 105 millimeters. This will help us to have the option to create either a three-column layout or a two-column layout. Select the square tool by pressing M on your keyboard, or from the Tool panel. And what I want to do here is just measure the gutter. And add some gutter to this new guide that I just created. So let's move it over, place it in the center, two more guides, and there we have it. We have two columns on top of our three columns on the page. To keep our files organized, we will use layers. So head over to the Layers panel, double-click on Layer 1. Rename this as Background. Create a new layer here and Layer 2 will be content. And here, we can hide and view the layers. I'll use the Rectangle Tool here to draw a square, and you can see that we can also move objects in between the layers from transferring one square to the other here on the right side. And that's it for this initial setup for our InDesign Menu Card template. On the next lesson, we will set up our color swatches and paragraph styles. These two elements will help us edit the template easily. I'll see you there.


