
 Lessons: 14Length: 1.4 hours
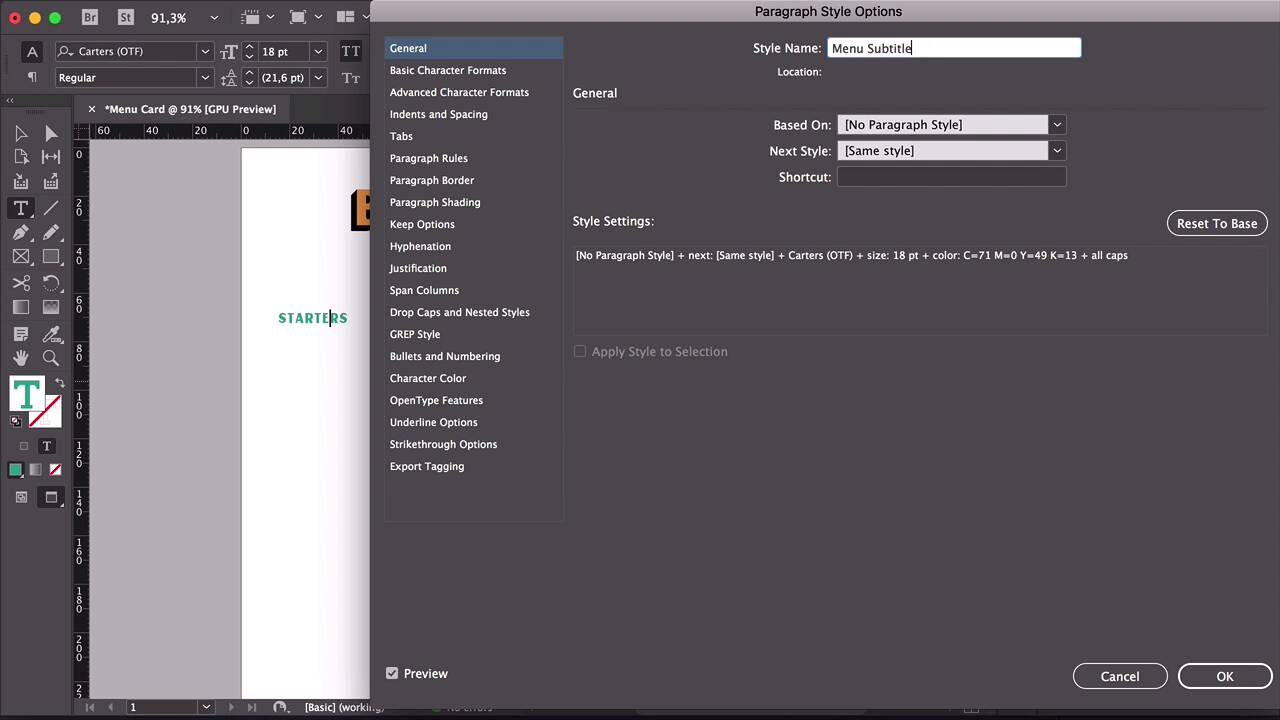
- Overview
- Transcript
2.2 Color Swatches and Styles
In order to make it easy for you or your clients to edit a restaurant menu template, it's important to set up these two options correctly. Color Swatches and Paragraph Styles allow us to edit the options even after you’ve completed your project. This is the most efficient way to edit a restaurant menu template without too much fuss.
1.Introduction
1.1Welcome to "Restaurant Menu Design in Adobe InDesign"01:01
1.2Restaurant Menu Design Assets and Software02:04
1.3How to Edit a Restaurant Menu Template12:26
1.4Tips and Tricks05:01
2.How to Create a Menu Card
2.1Setting Up a Menu Card File03:39
2.2Color Swatches and Styles13:12
2.3Using Tables in InDesign05:50
2.4How to Design a Restaurant Menu Card11:44
2.5Preparing the File for Print04:02
3.How to Create a Trifold Menu
3.1Setting Up a Trifold Menu Design File05:42
3.2Color Swatches, Paragraph Styles, and Tables08:05
3.3Completing Your Trifold Menu Design07:56
3.4Preparing the Trifold Menu File for Print03:10
4.Conclusion
4.1Conclusion02:02
2.2 Color Swatches and Styles
Hi there, and welcome back to this course. In this lesson, we will learn how to add color swatches and paragraph styles to add to each section of our menu card template. Let's take a look. On the file that we set up on the previous lesson, create a text box using the text tool from the Tools panel or you can press T on your keyboard. For my menu card template, I chose the name Bar Isabel. Head over to the Options panel and use the center align button to center align the text. Select the font Carters, set the size to 60 points, maybe, let's see, maybe a little bit bigger, that looks good. Open the Swatches panel, if you don't have it open, head over to Window > Color Swatches. Here I'll add a new color swatch. Let's delete the other colors that we have already here so we don't mix them up. So select the blue color, hold down Shift and then select the top of the first color that you want to delete, so you can delete everything as a group. Click OK here, double-click on Black copy. Here I just want to make sure that I have the color applied to the name of the restaurant or the bar. And then use the Selection tool so that way all the changes that we make on the Swatches panel we'll be able to see live. So get out of the text box and double-click on Black copy. And here you can see we can see the changes live. Make sure that you have the Preview box checked. So here I'm just looking for an orange color that goes just a little bit towards the yellow side, not too red. That's perfect, click OK. Open the Paragraph Styles panel by going to Window > Style > Paragraph Styles. Using the Text tool, select the text box, you can choose anywhere, but just select the text that you want to make a style. Head over to the Paragraph Styles panel and click on add a new style. Double-click on Paragraph Style 1, let's rename this to Restaurant Name. In here under Style Settings, we can see that everything that we have already set up for the name of the restaurant is already as a style setting. So we're starting with that. It's picking those settings up from the text box. So this is a very easy way to set up paragraph styles, rather than going in and setting everything up blindly. Click OK. The advantage of using this font is that it has the option to use shadow, black shadow, and drop shadow. So there are shadows behind the regular option that you can add or you can just use the regular by itself. But here I want to add some depth of field, so I will add one of the shadows. In order to do that, we need to create a new layer. So I'll add a new layer and rename it Content Shadow, place it under the Content, but above the Background. Select the text box, Copy or Command+C on your keyword, right_click, select Paste in Place. And make sure that you're pasting this on the Content Shadow layer. Here we can hide the content. Right now to set up the shadow, I want to lock the content layer. Double-click here, select Shadow, and I want the shadow to the black, so change that on the Swatches panel. And we have the shadow separately on a different text box, but behind the text. Now let's say you want to change the color, this orangey yellow color, lock the Content Shadow, head over to the Swatches panel, press J on your keyboard. And when you select a text box and then head over to change the color, it will change the color of the actual text box and not the text. So press J on your keyboard, that will activate the type color. You can see that here on the fill on the Swatches panel, there is a T there. So double-click on the color and simply move the slider to adjust to the color that you want. I'm happy with this yellow, so I will click Cancel. Using the Text tool, create another text box under the name of the restaurant. Here I will add Lounge & Bar- Dinner Menu, center align the text, select Carters. And here I just want to make sure that I'm selecting all caps. So that way, it is already saved on the paragraph styles. So if a client wants to change it, then it will already be set to all caps. I just want to set the size to 14 points, looks pretty good. Maybe it just needs to come a little bit lower. And head over to the Paragraph Styles Panel, make sure that you have the Text tool activated in the text box. Add a new paragraph style, rename this to Restaurant Tag and click OK. Now let's set up the sections of the menu. Using the Text tool, I'm adding starters, choosing all caps. I want this to be Carters regular and the size 18 points. Head to the Swatches panel, let's add some color here. And I'm leaning towards turquoise green here, maybe just a little bit darker, click OK. Activate the text with the Text tool, create a new style on the Paragraph Styles panel, rename this to Menu Subtitle. We can see the style settings. Just double-check, it's always good to double-check that you have the right style settings and there's nothing extra in there. If you want to change any of those settings, head over to the Basic Character Formats, and you can change the size, the leading, the font style, or the family, anything you like. Click OK. And here I want to do the same thing as the title of the restaurant. I want to have a shadow in the background, so right-click, Copy. Lock the content layer, head over to the Content Shadow, right-click, Paste in Place. Using the Text tool, select the text, change the style from regular to shadow. Head over to the Swatches panel, select black, and you're all set. Using the Text tool, create another text box. And now we're going to create the menu items. Select the all caps option, Carters regular, and create a new style in the Paragraph Styles panel. Rename the style name to Menu Item, click OK. Create a new style, this will be for the price. Head over to Indents Spacing, select the alignment to be right, all of the prices will be aligned to the right side of the table. Let's set the style name to Menu Price, click OK. There we have it, so we have a menu price and a menu item. I've set this in two separate text boxes, we'll set them up on the table later. We can also add an address at the bottom of the menu. So using the Text tool, create a small text box at the bottom of the menu. Let's set the address here, center align, set Carters as a font. Because it's the address, we'll set this to a smaller font size, a 10, and also activate the all caps option. Head over to the Paragraph Styles panel, add a new style. Rename the style to Restaurant Address, click OK. And now I think I want to break up the menu with a few fun either announcements, maybe we can have a menu of the day or gluten-free, dairy-free options, something like that. So using the Text tool, create a text frame the size of one of the one-third columns. Here I'll have gluten-free and vegetarian. Set the font to Carters, And I want this size to be bigger, maybe 24 points, I want it to use the whole width of the column. Set to all caps, no hyphenate. And I want the same thing, have a shadow behind it. So let's set our color here first, Here I'm leaning towards something red, to have some contrast against the yellow, orange, and the turquoise. So that looks good, click OK. Select the text box, right-click, Copy, lock the Content layer. Paste this in the Content Shadow layer, set the style to Shadow, set the shadow to black, and there we have in. Here I'm just going to unlock the Content Shadow layer so I can move some things around, for example, I want another menu section title. Select both text boxes, press Option, and drag down. Lock the Content layer, the lead, the Content Shadow, I'll change the content section title to drinks. Here I just want to add one more color, and cyan maybe will work better. That's a good complimentary color, so set that to cyan. Select a text box. Here I just want to make sure that the red has the same style name as the other colors, so double click here and check the Name with Color Value box, click OK. Let's put this paragraph styles in order. So we have first the restaurant name at the top, the tag later. The only thing that we'll have missing is the text on the side. So let's create a new style here. Select the text that is meant to be on the side, create a new style, and name it Menu Side Text. And let's put that at the bottom. Let's bring the Menu Subtitle up, just so everything is in order. So here we just need to add the shadow for the drinks. Select the text box, Command+C on your keyboard. Lock the Content layer, head over tho the Content Shadow, right-click, Paste in Place. And here we just need to change the style to Shadow and to black. And if I have both of this layers locked, of course, I can't move anything. So make sure that you have either your layers locked or unlocked depending on what you're doing. That's it for this lesson. We covered how to add color swatches and how to add different styles on your Paragraph Styles panel. These two things are very, very essential if you're planning on distributing your templates as assets to other people. You will make it very easy for them to edit and personalize them, change the colors, change the fonts, and add their own spin to the menu. In the next lesson, we will cover how to use tables in design so we can start adding sections and menu items, dishes, and descriptions. So I'll see you there.


