- Overview
- Transcript
1.3 How to Edit a Restaurant Menu Template
For this lesson, be sure to download the restaurant menu template.
Editing a template is very easy and helpful when you are in a hurry. In this lesson, you'll learn how easy it is to input your own information and images to customise a restaurant menu template. We’ll work quickly through some of the essentials and try changing the font to something that might be a better fit for your restaurant.
1.Introduction4 lessons, 20:32
1.1Welcome to "Restaurant Menu Design in Adobe InDesign"01:01
1.2Restaurant Menu Design Assets and Software02:04
1.3How to Edit a Restaurant Menu Template12:26
1.4Tips and Tricks05:01
2.How to Create a Menu Card5 lessons, 38:27
2.1Setting Up a Menu Card File03:39
2.2Color Swatches and Styles13:12
2.3Using Tables in InDesign05:50
2.4How to Design a Restaurant Menu Card11:44
2.5Preparing the File for Print04:02
3.How to Create a Trifold Menu4 lessons, 24:53
3.1Setting Up a Trifold Menu Design File05:42
3.2Color Swatches, Paragraph Styles, and Tables08:05
3.3Completing Your Trifold Menu Design07:56
3.4Preparing the Trifold Menu File for Print03:10
4.Conclusion1 lesson, 02:02
4.1Conclusion02:02
1.3 How to Edit a Restaurant Menu Template
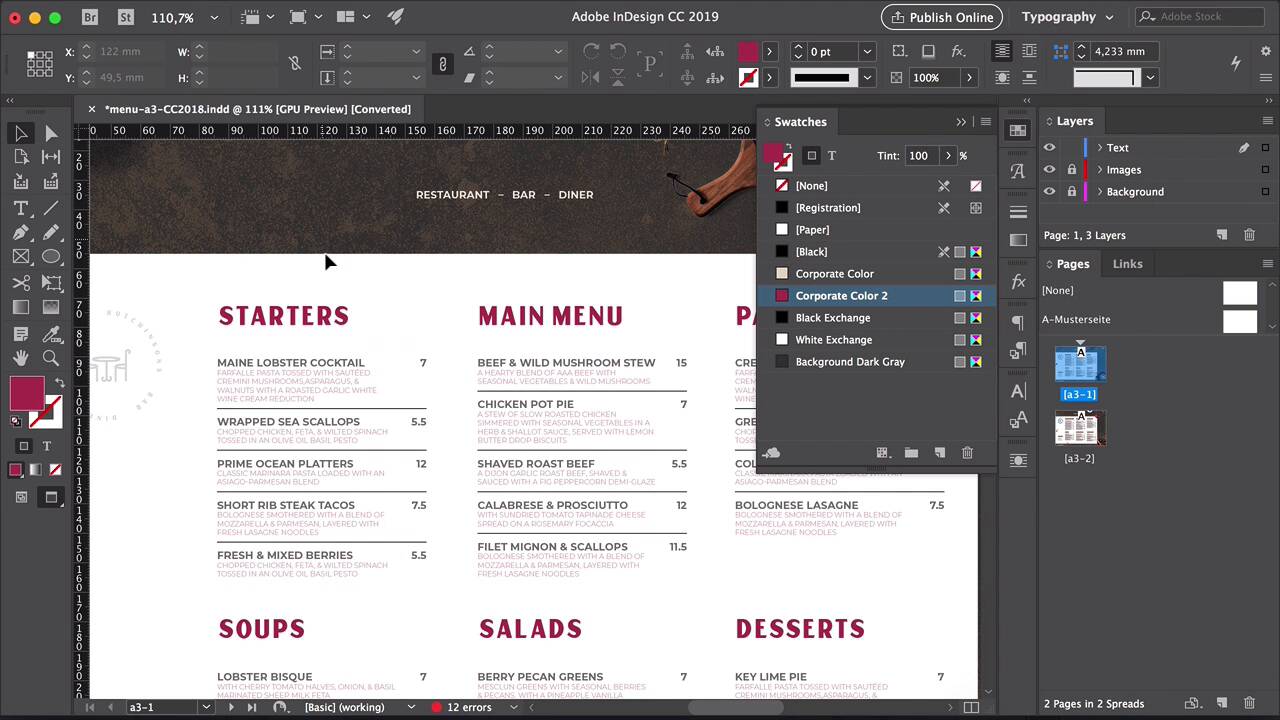
Hi there, and welcome back to this course. For this lesson, be sure to download the template that is linked in the description below. We will use this template to show you how easy and helpful it can be to use a template when you're in a hurry. So double-click into the folder that we downloaded and unzipped. Here, you will find a help PDF, and here, usually, the designer will include all details pertaining to the template. So any of the fonts, the sizes, and sometimes, even a how to guide to edit in their template. Let's head over to the InDesign folder, we have all the links here. Let's go back, so the DIN A3 size, and I am working with Adobe CC, so I will be opening the first file. You will get a warning about the links. So for now, just click OK, and then we'll link them to the file. The second warning we'll get is the font. So because we will be using different fonts, we will be changing the fonts, we don't have to worry about using the same fonts that are being used on this template. So for now, let's click on Close. Head over to Window, open Links, we will link all the images here, and you can see that all of the files that have question mark at the end are missing the link. So select either the first or the last file, press Shift, and select the last or first file. So that way, we can select all the files at the same time. Click on that relink button, let's navigate to where the template folder that we downloaded is. So for me, it will be Downloads. Here it is, indesign, click on Links, and the only thing that you need to make sure is to go down here and make sure that Search for Missing Links in This Folder is activated. So what this will do is it will link all of the other missing links to these images if the files are here, I'll so click on the first one and open. Click OK, and perfect, we've relinked all of the missing links. Let's move this to the side. So let's navigate here onto Pages. We have our layers, and we have our image background here. Unlock the images and background layer so we can work on the text. Open the Paragraph Styles. In here, we can see that we have all the different styles are being used on this template, and this is what will make it easy for us to edit. If you don't have the Paragraph Styles open head over to Window > Styles > Paragraph Styles. Select the text tool from the tool panel, or T on your keyboard, and click on any of the text boxes on the template, and you will notice that the Paragraphs Style panel will change as you select different styles of text on the file. If I click on Starters and then head over to the Options panel, you will see that the font being used is Befitting, which we don't have activated. And if you head to the Paragraph Styles panel, there is a plus sign next to Menu Area, which is the style that's applied to it. That means that there was an initial style given to the text box, which was later changed to something else. So if we want to overwrite everything and start from the beginning, press Option on your keyboard and click on the style, that will reset it. So I will do the same for the next two sections. Now that we have that changed, double-click on Menu.Area, and that will open the Paragraph Style Options. Here, we can change anything regarding typography. Click on the Basic Character Formats, and let's say we want to change the weight of the font. Here, I'll choose Thin Italic. Just make sure that you have the Preview box checked so you can see the changes. The style will change anywhere it was applied. Click OK here, and let's just adjust these other sections' text boxes. Select them, press Option, and click, and that will override any extra style that was applied to them. Let's go back into a Paragraph Style Options. Now, let's say we want a different font, we'll use Carters, and that instantly changes it, click OK. Let's head down here, there are more sections here, so just select all six of them. Press Shift to select multiple text boxes. Now, press Option and click on Menu Area, and now that's changed. Let's select here this text box. In here, the styles Description and Dish Menu are being used. Double-click on the Description style on the Paragraph Styles panel. You can make even more changes here. Let's say you want a different weight, different size, different lighting to adjust to whatever new size that you want, and that's not a problem. If you're happy with that, click OK. If you don't want the changes, just click Cancel. The colors work a similar way, open the Swatches panel. If you don't have it open, head over to Windows > Colors > Swatches. Now, let's select Corporate Color 2, double-click, make sure you have the Preview box checked, and as I move the slider, I'll see the colors change on the template. Let's say I want red, click OK, if I'm not feeling it, I can press Cmd+Z and go back a step. Let's say we want to change the name of the dishes. That one is using Background Dark Grey. Move the slider, and we can see the backgrounds also changing, that means that there's an overlay in the background that's using the same color. And again, if I'm not into that, click Cancel, if I like it, click OK. Now, let's look at how the dishes section is built. Press W on your keyboard and you will be able to get a preview of the template, and if you press again, you will be able to see, basically, the behind the scenes of how the template was constructed. So here, we can see that it's divided into two columns and five rows. So one column for the dishes, the other column for the price. That means that this is a table, so anywhere we move this text box, the whole table will move. To edit the contents, you can do as you would normally do, just select the text and write your own. If you happen to make a mistake and for some reason the name of the dish has the description style, select the name of the dish. Head over to the Paragraph Styles panel, and click on Dish Main, and that will bring it back to the original template. Let's look at here, a different text box. If we click here, we have Trifold-Name-Restaurant-Small. If we override that by pressing Option and click, we can see that the color is white. So here, we can change it to black, and I will also center it. If we wanted flush to the left, then press Cmd+Z and that will go back to the beginning again. One common problem is that you might not have as many items as they have on the menu, or maybe you have more than these. So you have the option to add more rows on the table or take them off. For that, let's open our Tables panel, head over to Window > Type & Tables > Table. And you can click here to add one more row, and that will automatically add it. Add your copy. Use the Paragraph Styles to style the contents. Dish.Main, Price.No. If you wanna experiment, you can also use any of the other styles, just to make sure that it is consistent throughout your menu. Let's say if you want to make any small changes, double-click, for example, in the Description. You can experiment here with the basic characters formats, the size, leading, tracking, or with the character color. The only thing that we're missing is the stroke that goes above and below the dish. Select the cell, head over to the Options bar, and you can see here a small diagram of a cell. It will let you know the stroke weight. Here for example, it is not, so we can select the cell and then copy and paste. That will be an easy way to do it. Or we can guesstimate the size of the strokes. So for me, for example here, the stroke could be 0.5 points. And you just have to make sure that on the diagram, you're only choosing the size that you want the stroke to be in. So for example, the last cell only needs to have a top stroke, set the stroke weight to 0.5 points, and you're set. Let's check here the restaurant name. Double-click on the side of the text box to make it fit to the content. This has Name.Restaurant.A3.Big style on it, that's good. And now, we can change the background. Head over to the Layers panel. Lock the Text and Images layer, and unlock the Background. In here, we can see we have this texture on the background. If you like a different texture, we can change this. I'll replace this with one of the textures that I'll be using in one of the future lessons. Let's head over to Menu Card > paper-textures > Textures, and I will select 116. Drag and drop into InDesign, press A on your keyboard for the Direct Selection tool, press R to rotate, and hold down Shift as you resize the image to resize it evenly. So now, we have a different texture here. Using the Direct Selection tool, select the image, Cmd+C. Select the frame, right-click, Paste Into, that will paste the image into that frame. And now, we can play around with the images that we linked at the beginning of this lesson. The images are part of a bigger group, so what you can do here is use the Selection tool, but double-click on each of the images that you want to move. And that's because there are compositions within compositions. Double-click and we can move this a little bit lower. And that's it, this is how you edit a restaurant menu template. If you ever need any kind of template, be it restaurant template or brochures, marketing bifolds, Envato Elements is a really great resource for that. They have a big library, many assets that you can choose from, and they're very easy to use. So now that we've shown you how to edit a template, we can start creating our own. I'll see you on the next lesson.


