
 Lessons: 21Length: 1.7 hours
- Overview
- Transcript
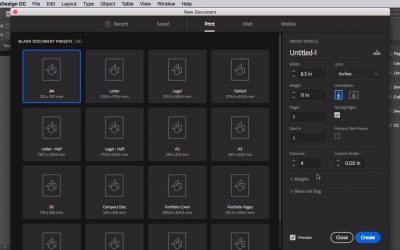
3.1 Setting Up Your Proposal: Part One
In this lesson, we’ll walk through the steps of creating a new proposal document in InDesign. Learn how to set up margins, columns, a bleed, and a sequence of pages for your proposal.
Resources for Chapter 3
- Bw Glenn Sans
- Bw Modelica
- Design Studio Architect Creative Occupation Meeting Blueprint Co
- Photography Ideas Creative Occupation Design Concept
- Fashion Designer
- Design Studio Architect Creative Occupation Meeting Blueprint Co
- Design Studio Architect Creative Occupation Blueprint Computer
- Long Haired White Female Clothes Designer
- Creative Brainstorming Meeting in Design Office
- Design Studio Architect Creative Occupation Blueprint Concept
1.Introduction
1.1Introduction01:53
1.2What Is a Project Proposal?04:03
1.3What You'll Need to Create Proposal Documents01:41
2.How to Adapt a Proposal Template
2.1How to Choose a Suitable Proposal Template04:03
2.2Getting to Know Your Template06:23
2.3How to Adapt Your Template (The Easy Way)03:21
2.4How to Redefine Styles in Your Template05:44
2.5How to Format Color in Your Template03:07
2.6How to Edit Master Pages in Your Template03:33
3.How to Create and Design Your Own Proposal Layouts
3.1Setting Up Your Proposal: Part One03:14
3.2Setting Up Your Proposal: Part Two05:41
3.3Styling Your Proposal: How to Find Inspiration08:07
3.4How to Create an Effective Cover for Your Proposal08:01
3.5Styling Your Proposal: How to Create Type Styles06:25
3.6How to Create a Contents Page for Your Proposal07:03
3.7How to 'Map Out' Your Proposal09:42
3.8Styling Your Proposal: Shapes and Stats02:31
3.9Styling Your Proposal: Images07:26
3.10Preparing Your Proposal for Print: Preflight04:00
3.11Preparing Your Proposal for Print: Exporting03:45
4.Conclusion
4.1Conclusion03:08
3.1 Setting Up Your Proposal: Part One
Hi there, welcome to this section of the course, how to create and design your own proposal layouts. So templates have their uses, but if you want to give your proposals a completely unique and creative look. You'll want to be able to create your own proposal documents from scratch. So in this section, we'll work towards creating a cover and full inside layouts for the proposal that's pictured here. And this is going to teach you how to set up the structured field proposal as well as how to source creative inspiration and apply your ideas in a professional, beautiful way to your layouts. In this lesson, we are going to start with creating a proposal document in InDesign. And cover some of the basics for getting your documents set up in the right way. So lets get started. With InDesign open, go to file, new, and document. Let's make sure print is selected at the top of the window. So we're going to set about proposal here, review as what's page size. If you're in Europe or elsewhere, the usual standard is A4 which is pretty similar but for our purposes here, let's stick review this later. So that's 8.5 inches to the width and 11 inches to the height. Make sure facing pages is checked to create spreads in your document. Now for the columns, so to create a grid in our pages which will give us a bit of flexibility where we can place text and image frames. Let's give our document four columns with a not 0.125 inch gutter. Okay, now for the margins, so one thing to remember is that if you're creating a print document with a large number of pages, you want to make sure that the inside margin which is the margin nearest the spine is slightly more generous than the outside. And this is going to allow for a bit of paper to disappear into the binding or fold in the center of the spreads. So let's set the inside to 1 inch, the outside a bit less to 0.875 inches. Let's make the top the same 0.875. And the bottom a bit more generates at 1.125 inches. If you're planning on having your proposal printed professionally is really important that you also include a bleed on your document. So this allows content go past the trim edge of the page. So if you're document is trimmed not completely with pin accurate, it's not going to be noticeable. So let's set that to 0.25 inches. Another thing to note is that you don't need a bleed on the inside edge of the page. So clock on the little chain icon and remove any bleed from the inside edge. The final thing to think about is the number of pages you might wanna have in your document. But don't worry about this too much at this early stage. You can easily add or delete pages as you work. So for now, let's just have 10 pages. Okay, cool. Now you're ready to click Create. So now we've got the basic proposal document set up with columns, good margins, a bleed, facing pages. So hop up to File and Save As And save this file as Proposal in progress. We'll be using this file throughout the next ten lessons, so make sure to save it to a folder you can easily find again. If you want to head straight over to the next lesson, you can keep this InDesign file open. Next up, we'll look at how to set up masters for your proposal.


