
 Lessons: 12Length: 2.5 hours
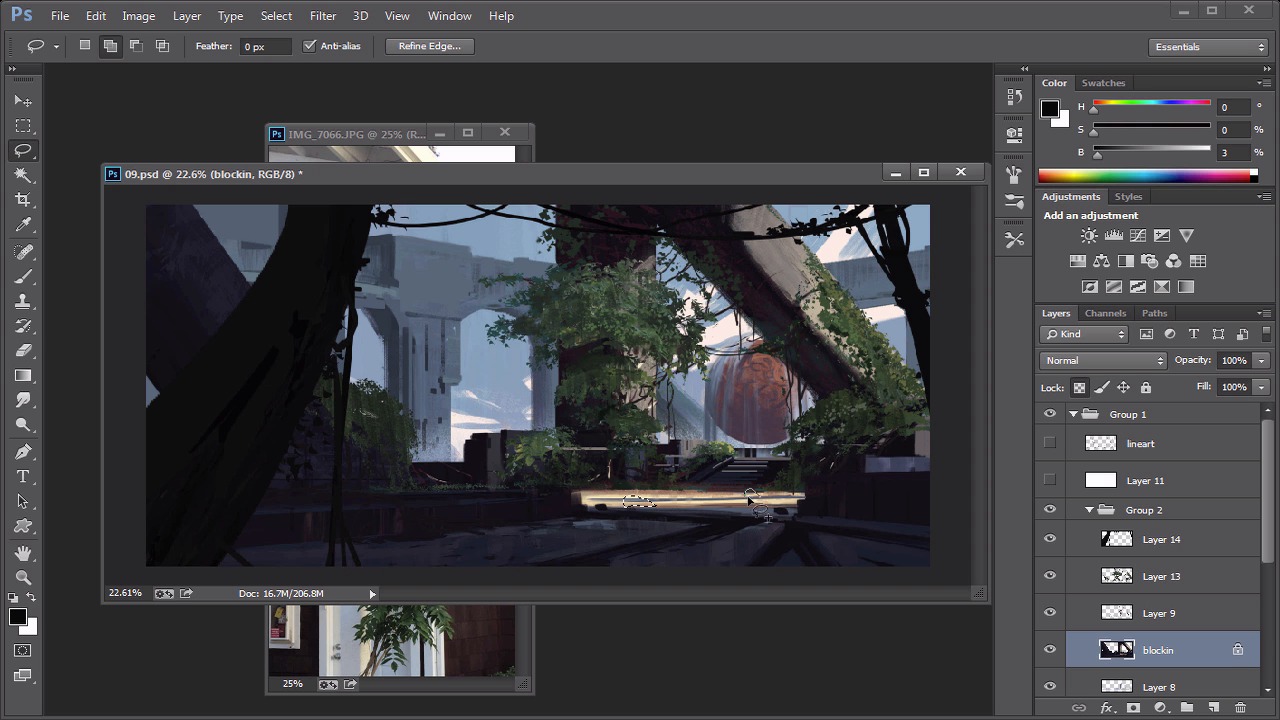
- Overview
- Transcript
4.1 Adding Finishing Touches
With the painting coming to a finish, we can now add any last-minute changes as we get ready for presentation.
1.Introduction
1.1Introduction00:57
2.Creating an Environment
2.1Line Art / Composition14:13
2.2Blocking In Colors14:46
2.3Adding Form and Lighting12:38
2.4Refining Edges15:16
2.5Refining Edges Continued15:00
2.6Refining Foliage14:52
3.Adding Texture and Foliage
3.1Adding Texture14:47
3.2Texturing Foliage14:57
4.Finishing Up
4.1Adding Finishing Touches14:55
4.2Adding Character13:43
5.Conclusion
5.1Overview03:34
4.1 Adding Finishing Touches
Okay, so let's start kind of figuring out some of the finishing touches, and you know kind of knock this guy out and finish him up. Compositionally I'm just going to move this guy over here a little bit. I think that'll kind of help out some things. I accidentally deleted the little piece that it was floating on so we could probably go back in there and put that back in. I think we can just grab you know something like that. That should work. This is going over it. Correct? Yes it is. Okay. So that's why it's getting that little, that little weird look to it, that's fine. We can do that. What else can we do here? You know, I think we just gotta maybe add some more pillars, something like that. This is kinda where we wanna just start kind of just looking at it as a whole, and just start kinda just thinking like you know, what are we missing, what do we need, and all that kinda fun stuff. So let's see what we can do here. For right now I'm just not kinda feeling this pillar here and I'm not sure why. And so maybe just gonna add a little more detail here or just a little bit more of a, I don't know a little more irregular forms. That kinda stuff. I think we just gotta put some more in there. That's what I'm gonna do. At any point in time, again, this thing's gonna change and we're gonna just do what we think is best here. And I think if we just add a little bit more irregularities, in terms of the shape, that kind of stuff, I think that's really gonna help us out here. So it's kinda what I'm looking for, it's a little more irregularities in the shapes. Some of the texture, all that kind of stuff so that's kinda what we're gonna do here. And then I'll probably have to go over it one more time with a little bit of kind of a texture brush. Just so we ca kind of get some more of that painterly feel that I'm trying to kinda go for here. So we're not gonna worry too much about it, but we just wanna start at least getting that figured out now. You know, just a little bit of something there. So I think kind of adding that extra piece kind of helps it out a lot actually. So we'll kind of keep that in there, and maybe we'll have this piece kind of go off the frame a little bit. Just because it will help kind of, help us deal with some of that negative space. So this thing could probably be like very, very high. You know? So, we're gonna add a little bit of that stuff in there. [COUGH] So let's see if we, I'm just trying to get that right angle and it can be very particular, as you can see mess with this area all the time. So if it all doesn't work out I could just kinda flatten it out. Now I'll just kind of live with my decision there. But I think that's looking a little bit nicer, and then we kind of put that to kind of get rid of the negative shape. Maybe we'll do the same here. And I think that will help it out. So, some last minute changes. Again, you just gotta go with your gut feeling here. There's nothing wrong with that. I think we should go back in here. Especially this kinda stuff right here. And let's just see if we can kind of put a little more loving in some of these, I guess you can call them these vines and stuff, so we kind of want that to have a little bit of a more realistic feel. Not realistic but just graphically have that read. So we can do some stuff like that and then I'm thinking, actually, if I can maybe take this guy and maybe grab a darker value, and maybe add in a big giant tree or something here, just to kind of help frame this guy. So that way it kinda comes like we're looking onto it, we're looking into this forest kind of thing, and we're seeing that for the first time. So let's see if we can get that to work. Let me sit here and kind of think about it real quick here. So yeah, I think that would work, actually. So let's just kind of grab it and that's gonna be probably pretty dark here even darker than, yeah. Yeah something like that almost in that pure black range here a little bit. I think this will kind of help push this guy. In that kind of realm here. And so, you know, we'll have this one not be as big but we definitely wanna have some of that, you know what I mean? We just wanna have some of that, just kind of that framing element that we really are coming into this place and, you know. Nature has claimed it and all those kind of fun things. So we're gonna roll with that a little bit, so we're gonna have some fun. You know what I mean? That's kind of the purpose of this guy is to have fun with it. If we're not having fun then what's the point? So we'll come in here and we'll throw a little bit of texture in there and that kind of stuff. Nothing too crazy. We don't wanna ruin the piece by distracting it from the main focal point, which is this are right here. So if anything I just want this to help lead the eye throughout the image. You know something as easy as that, I think actually, would be just fine. And so that idea just kind of came from the you know from the piece. It came from the vines, so that's where certain things can kind of really help out you know if you let it. So we'll just kind of, now I think we could, I don't wanna take too much from it though. So it's kind of a tricky game. You know what I mean? You gotta be a little bit smarter. You can't just put things everywhere because then it could really kind of mess up the composition. So I'm trying not to do that if at all possible. So again finishing touches, this is where that last like 20% is really really important. So you gotta make it count. So see what else we can do here in terms of that. So I think we could probably just add some more darker values like right here, just a little bit of that, cut lines and stuff like that, that could definitely work out here. Yeah, so now I feel like now we're just getting those layers and layers and layers of detail and that's kinda what I want, you know what I mean, at the end of the day. You want these little pieces here and there. So I might even paint a little bit of rocks and stuff on a different layer just to kind of add to it. So these rocks will help, will kind of help with the value. Just kind of help showing a little bit of scale. So we'll put these probably in the same realm as right here. So these little rocks will help us so let's keep using these you know if at all possible. I'm going to use some of these guys right here because I already have these on a layer. You know, it's just gonna help kind of keep that unison. So when you see this rock right here, and then all of a sudden you see it in the far back, it can kind of help gauge a little bit of that distance. And so that's kind of what I'm looking for here. And then once I kind of, you know, get that I can then take some of these values and kinda just let them be hit by it. So this one might not be as dark, but this one would be. So we can kinda have a little bit more of a, of perspective happening right here. And the system thing very, very simple. It doesn't have to be super rendered. It's just the basic idea. The mind, the viewer will kind of pick this up of what it is. It's gonna be like, it's a rock. They're not gonna question it too much. So little, small details, though, like these, they do kinda play a big part because you gotta be able to add these things as you go. So you see these little, these little pieces, that can really help out. And that's definitely the goal here. So you'll see me add some of those. And now I think now we're starting to really have some fun here, and that's exactly what I wanna do. So. Okay so I think we're pretty much getting to the end here. I think the last part we need to do is to kinda just add some I think maybe just add some lighting layers to this. And that would be just kind of as simple as just kind of getting some color dodge in there, and stuff of that nature. Just adding in a little bit of light, some kind of just pushing some of the light and dark values. And I think that's kinda where I wanna go with it for now. So let's just kinda keep rendering this guy out for the most part. These clouds will be kinda nice. I think I think for now too we can definitely play with some of these hard edges and soft edges. So you can see how these edges they are really really hard. And then I just like to blend it out and go really really soft. That helps create that painterly feel. It also helps create that mist and stuff that you see in clouds. I'm actually going to merge it down just so we have it. And then, you know I think I would have might do too with some of this water. I might make another layer of water and just kind of get like a, a bit more of a misty brush and hopefully that's gonna create that effect of the water that I'm looking for here. So we'll see if this works out. Yeah, it's exactly what I want here. So we just want some of that. That kind of misty stuff here a little bit, so that way, as it kinda comes up, we get some of that in there. So that's something that I definitely wanna have, and it kinda takes practice too to kinda figure out what brushes you want and then probably, we'll probably have some darker values to with the sky, going behind it. So that way you see that it's wider behind it so it's kinda creating all this form. And then I think on top of it, I'm not sure, maybe we can add just a little bit of some highlights, you know what I mean? Just some little highlights here and that will kind of help sell that idea that this thing was being, you know, rendered and then, or have some grooves in it at least. It's like a textured piece, and you can kind of see what's happening now, right? We're kind of just putting in some of these little, that reflective water and stuff like that. So that's always good too. So we kind of get that water to kinda come back up and stuff. And we kinda just, you know, kind of blend that out. And look at that. This is starting to look fun and this is where I mean, this where I mean, this is what I love, what I do. I could do stuff like this all day and hopefully you guys will see this and then you know. You'll have an idea that you wanted to take and then by watching, you know this course and the previous course, you'll know you have at least a game plan to attempt it, you know. And that's what I want you guys to get out of this is just a way to approach it. You know I want you guys to feel confident, you know in terms of approaching it. In terms of doing it, you know I want you guys just to have that kind of freedom here. So it's really, really important. Let's see here. I think we're just gonna take a layer. Just to kind of add some randomness to it, we're just gonna take a brush like this, probably throw it on like a screen overlay, maybe even a lighten. And we're just gonna go all over the place here, cuz right now, I'm not really feeling that and I feel like we just need a little bit of that random texture, and I feel like if we add that in there, it will help with the form. So we're just kinda adding that piece in there. And look at that. We're pretty much done. I mean, that's as good as it's gonna get in this amount of timeframe. So again if you look at the timeframe that we had from the previous course, that was about an hour. This is about maybe a couple hours in, so within three hours in a workplace you could probably have, you know, four or five sketches and one kind of fully rendered sketch within the end of a day which to me, is pretty good. That's a pretty good workday, that means you got a lot of work done, and you are efficient. So that's kinda why I'm showing you guys this process, cuz it just goes to show you how much you can get done within a good amount of time. So I'm just trying to kind of unify some of the values. I'm painting on a lighten mode right now and I'm hoping that the lighten mode will help me kind of grab some of that texture and kinda put it back in there. So it's kinda those little finishing details, kind of help keep the piece unified. So you kinda see all that stuff here. Definitely kinda put it on top of this guy here and this will definitely help kind of unify the piece a little bit as well. And then definitely. Probably throwing a little bit of like a little bit of a color dodge on some of the sky right here. So we'll do this real quickly as well. So looks like we are about to be finished so let's move on to the next part here. And I think that would just be a kind of a simple mixture of just adding in some more lighting queues to kinda push the lighting. And then I think we will kinda consider this done. We'll kind of do a little bit of overview. Talk about how we got to where we were and then we'll go from there. Okay? So cool. So thank you guys very much. We're almost at the end, you know? So let's keep it going. All right guys, I'll see you in a bit. Peace out.


