
 Lessons: 9Length: 39 minutes
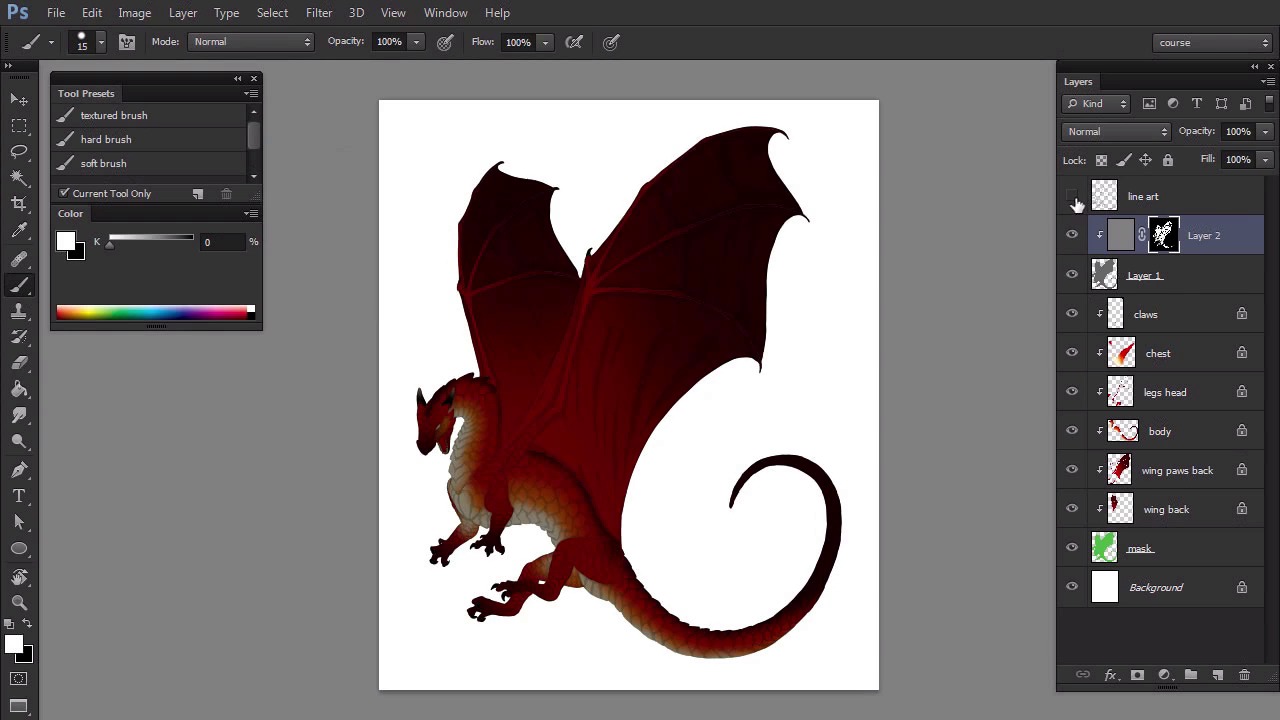
- Overview
- Transcript
3.2 Base Light
In this lesson we'll work on ambient occlusion and secondary light. This will give the dragon a basic form, which is the actual purpose of shading.
1.Introduction
1.1Introduction02:15
1.2Tools and Resources04:32
2.Theory of Shading
2.1Light, Shadow, and Color04:20
3.Coloring and Shading
3.1Simple Coloring05:48
3.2Base Light04:44
3.3Main Light03:26
3.4Additional Lights05:44
3.5Additional Tweaks06:18
4.Conclusion
4.1Conclusion01:47
3.2 Base Light
Hi. Welcome back to simple coloring and shading a liner in Adobe Photoshop. My name is Moniquas Egroberda and this part we're going to work on ambient light, circumferendary light and the shadows. Create a new layer under the line art. Hold control and click the sublet of the mask to create the selection. Then grab the paint bucket tool to fill the selection with 40% gray. Deselect when you're done. To make the shadow layer transparent, set its blend mode to multiply. Now we need to unclip the shadow layer to make a separate mask. Create a new layer and clip it to the layer below. Change the color to 50% gray and fill the layer with it. Add the layer mask to the layer then switch to black, and fill the mask with it. This will make the layer disappear. To reveal the parts we want visible, we just need to paint on it with white. Use a hard brush to remove the shadow from every scale leaving a bit of the darkness in the crevices. This is what we call ambient occlusion. No matter where the light source is, it will never reach certain places like small cracks or slates. We can use this attribute to visual justify lines of the line art. If you're more advanced, you can even use this phase to get rid of the line art completely. Keep in mind that you're painting on the layer mask, so if you make a mistake, just paint it black to make it disappear. If you don't feel comfortable doing it to the mouse, You can draw the light by selecting the part with the lasso tool or the pen tool. However, the shapes we're painting here won't be visible from a distance so they don't need to be overly clean. Feel free to do it quickly, loosely, but without crossing the lines. When you're done, you should be able to see a trace of the line art even after hiding its layer. This is what our dragon looks like in a neutral, ambient light. Let's create another kind of light, create a new layer and clip it. Set the color to 70% grey. This is much brighter than our previous 50% so it will make quite a strong light. We want to illuminate the center of every part of the body with it to give it a 3D feel. This is where the smaller clipping masks step in. We can make a selection of any of them to limit the area we paint on. This way we can paint quickly without thinking about the parts we shouldn't cross. Paint a big fat stroke in the middle of the body, far from the outline. It will make it look as if the main part was closer to us. Then illuminate only parts of the skies on the border between the light and shadow. Your goal is to make the transition more gradual and natural to hide that stroke you started with. To make the border even less aggressive, add the layer mask. Take a soft brush and paint on it with black. If you're not using tablet, make the stroke subtler by lowering the opacity. Be careful here. We don't want the border to disappear. Use this method to shade every part of the body. To wrap it up, make a selection for the part you want to shade, paint a big stroke with 70% gray. Paint this case on the borders, add the layer mask, and soften the borders with a soft brush. Try to do it uniformly, the same style for every part. Keep in mind, the dark colors don't get much brighter in light, so it's normal if some areas won't react to actions at all. Congratulations, the dragon is now shaded according to our neutral lighting. In the next part, we're going to create more dramatic effects by adding the primary light.


