- Overview
- Transcript
3.2 Image Tracing
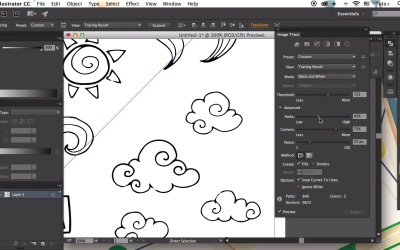
The first way to vector the doodle art is by using the Image Trace function of Adobe Illustrator, which automatically turns paper drawings into nice vectors. We will see what settings and presets are the best for black and white outlined doodles.
1.Introduction1 lesson, 02:29
1.1Introduction02:29
2.Creating Doodle Art 3 lessons, 11:28
2.1Tools02:32
2.2What to Doodle? 04:03
2.3How to Doodle?04:53
3.Vector Your Doodles3 lessons, 16:23
3.1Digitizing Doodles03:47
3.2Image Tracing05:05
3.3Outlining With Brushes07:31
4.Vector Art From Doodle Pieces2 lessons, 13:47
4.1Coloring Vector Doodles05:22
4.2Create a Custom Template08:25
5.Conclusion1 lesson, 02:06
5.1Conclusion02:06
3.2 Image Tracing
Hi everyone, this is Yulia Sokolova, and you are watching how to do the Vector Art Course at Tuts Plus. In this lesson, we will reveal the first way to vector our doodles using the image trace function of Adobe Illustrator, which automatically turns paper drawings into nice vectors. We will see what settings and process are the best for black and white outline doodles. Let's begin. First of all, let's make a new document of 600 by 800 pixel size and File > Place our image onto the art board Now in the Control Panel on top, we're gonna find the image trace function, which offers several presets depending on whether you have a detailed image, or some technical drawing, or whether you have a color picture or a black and white one, and so on. In our case, let's select the Sketched Art preset. Great, now our doodles are full of vectors. But as you can see, some lines turned out to be too thin, and now they look broken. To fix this, let's open the Image Trace panel, and from here we can adjust some tracing parameters manually. Let's increase the threshold value. As you can see the lines have begun thick and smooth. In the advanced section, you can find some other settings, which can make your image look better. There are no definite values. They need to be backed up, and you do it for every image. Just move the sliders left to right to see what is better for your doodle. Here we'll also have the Ignore White option checked. It will automatically deal with the white background, leaving only the outlines, which is very convenient in our case, because we have our black doodles on a white background, and we don't need all those wide gaps between the lines to be toned into a vector object. If you're happy with the result, click the expand bottom on top. Now, you can see how it looks. If you are not sure that this preset fits your image, you can undo the last action by pressing control add and try a different preset or different settings in the image trace panel. Maybe you want the lines to look thinner, but not so smooth. Now, as we're expanded the image, we have all the elements grouped together into one single group in the layers panel. And it looks quite messy right now. So, let's ungroup them and unite separate pieces of elements together. Take the lasso tool, select an object. Click right mouse button, and group it. Or just press control G. Continue grouping the objects. Now let's see what we can do with the broken lines. High threshold doesn't always help, and there might still be some gaps. Take the direct selection tool, the white arrow. Make the pieces of the line overlap. Open the box on the panel and unite the pieces merging them into one single line. We can also use the direct action tool to add the position of the anchor points and anchor handles to make the shapes look smooth an falling. Continue adjusting the lines and fixing the gaps with the direct selection tool, and the unite function of the pathfinder. We're editing the lines just a bit. Just minor fixes here and there. We actually don't need any perfect lines here. because those are vector doodles which should imitate the real hand drawing which is a bit shaky, a big drop. This gives a digitized image a certain look, which makes it more true to life. Here I delivered the unneeded elements, which were outside the scanning area who have the similar elements somewhere among our doodles, so we'll be using them for our final composition. Now have all of our objects grouped and slightly adjusted. Great job guys, now we've learned using the image tracing function and as you can see it is quite simple and very convenient for fast transition of paper drawings into vector art. And the settings are quite a versatile and flexible, which makes perfect for many kinds of images you need to trace and not all for Doodles. However, if you feel uncomfortable with this technique, or you don't like the result and want to do some more of a drawing type of work then check out our next lesson. We'll be discovering another way of turning our doodle art into vector piece using the drawing tools of Adobe Illustrator see you there.


