
 Lessons: 11Length: 1.2 hours
- Overview
- Transcript
2.1 Using Adjustment Layers
Filters, layer styles, and adjustment layers are all powerful tools for digital painting and Photoshop editing. In this lesson, we’ll try out a few design exercises using Photoshop’s powerful adjustment layer tools.
1.Introduction
1.1Welcome to the Course00:44
1.2How to Set Up Your Photoshop Workspace04:06
1.3Essential Photoshop Tools05:46
1.4Finding Inspiration03:01
1.5Choosing Your Format04:00
2.How to Create Mixed Media Art in Adobe Photoshop
2.1Using Adjustment Layers06:20
2.2Building the Composition07:46
2.3Photoshop Lighting Effects10:36
2.4Digital Painting Using Photoshop Brushes13:07
2.5Finalizing the Details14:26
3.Conclusion
3.1Conclusion01:15
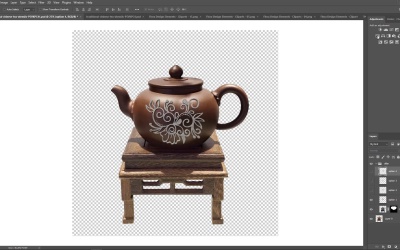
2.1 Using Adjustment Layers
Filters and layer styles in Photoshop are like creative decorations for whatever you put within the layers panel. They come in many styles on envato elements. So when I saw this pack of concrete layer style effects, I was like okay, this is gonna be so good for my teapot. I got a nice little decoration now. So originally I had this idea to imitate this traditional Chinese clay pot I saw on a completely different photo. I really like how the leaf design is like all 3D, but I wanted to put my own spin on it. So I'll need to create the design myself and my teapot and teacups set will be designed with graphics from this floral set from designer muse master. So with this ready to go, I'll duplicate the layer with Ctrl J, added to a new group. Then use the polygonal lasso tool to create a selection around the pot, then hit the layer mask button, so that we have the pots separated from the stand. So, if we're playing with a design that already looks like concrete from the concrete layer styles pack, then I also wanna try to add more texture to the teapot. So I'll go to Filter Gallery and start with these settings for the neon glow effect. Then add a second and third filter with these settings for accented edges and more neon glow. Initially this is gonna change the color of our pot. So I'll set the layer blend mode to Soft Light so that it helps to accentuate the pots texture even more. Now I can adjust this layer mask so that it's not overlapping the wooden stand too much. When you're ready to decorate the pot, open up the PSD for the concrete layer styles. We just want the effect by itself, so you can hide away all these extra layers. You won't need anything like the background or even shadows for instance, because we're gonna be replacing all of that and just focusing on the smart object with the original design. Double-click the smart object to get to the I love concrete text layer, hide that layer, then copy and paste any floral design you like right into the middle. Resize it to fit your preferences and remember to save this file in order to lock that update in, when we close out of it and go back. Now the text becomes our floral design because of this awesome concrete effect, and I think it's gonna be pretty perfect for the tea pot. Then right click to merge visible so you can copy and paste this concrete design over the pot. And once it's pasted in, all you have to do is resize it with the free transform tool using the move to an arrow keys to get the position just right. It's literally like you're designing furniture. So this step is really cool and it helps you kind of step into your environment with more authenticity. It's like this really exciting way to mix traditional and modern looks together. So I'm gonna stick with this look I think, but I did make a couple of extra layers to try out some other ones. Feel free to let me know which one you would have chosen from these different options. So I have settled on option one for this floral design, now I just need to color. Add a new adjustment layer of hue and saturation to the group with the following settings to make the entire teapot and it stand this rich, darker brown color. Again, you can see what the other floral options would look like but I'll be sticking with option one. Then use the lasso tool, making a selection around the pot and hit Hue and Saturation again, to add another adjustment layer, this time only affecting the pot. So lower the saturation, so that it's more contrasted against the Stand. Now add one more hue saturation layer above the floral design. Right click to set it as a clipping mask. Then set it to multiply. I mean, how cool is that, right? We go from this plain clay pot to being inspired and transforming it into this new design, a custom teapot for our friends. Now let's save this project and move on to our next step. A tea cup set to match this part. Hmm, can you smell that tea brewing yet? Maybe is a green tea, the echinacea, something calming and wonderfu,l so far, we have a beautiful clay pot finished. Now we can move on to a matching tea set just cuz I really thought it would be a really cute idea for this. So for the tea cups, we're gonna start off similarly to the clay pot by copying and pasting one of these floral designs onto a new layer above the smart object. This design is a little different but it still has the same style of flowers and swoops, so I will resize it to fit the tea cup as best as I can, before using the warp tool to map out that design along the surface of this cup. Add a layer mask to help remove the excess, then use a new adjustment layer of hue and saturation to desaturate the cup and give it this slightly bluish undertone. This time using the layer mask to erase the color on the actual tea, we'll be using a hard round brush to keep those edges nice and crisp, you are welcome to leave this cup as is. But if you do wanna push the realism a little farther, then we can start to tweak the lighting a bit by setting a new hue and saturation adjustment as a clipping mask to the floral design. Lighten it up a bit by raising the lightness. Then select its layer mask and begin diffusing the edges with a soft round brush. You can even play around with the layer blend mode if you like, I ended up on divide. Then you just go back in with a soft hand lightly taking away some of that white, just you know, picking at it, even studying the grooves of the cup a little bit. And then we'll have this really neat realistic design, and it's gonna look pretty fantastic.


