
 Lessons: 11Length: 1.2 hours
- Overview
- Transcript
1.3 Essential Photoshop Tools
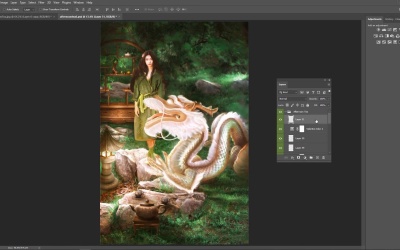
Photoshop comes with a wide range of essential tools you can use. From the standard toolbar to incredible adjustment layers, let’s go over my favorite Photoshop tools for executing quality design.
1.Introduction
1.1Welcome to the Course00:44
1.2How to Set Up Your Photoshop Workspace04:06
1.3Essential Photoshop Tools05:46
1.4Finding Inspiration03:01
1.5Choosing Your Format04:00
2.How to Create Mixed Media Art in Adobe Photoshop
2.1Using Adjustment Layers06:20
2.2Building the Composition07:46
2.3Photoshop Lighting Effects10:36
2.4Digital Painting Using Photoshop Brushes13:07
2.5Finalizing the Details14:26
3.Conclusion
3.1Conclusion01:15
1.3 Essential Photoshop Tools
[MUSIC] Now if you remember, I have already mentioned how Photoshop can be quite frustrating, whether you are a beginner or an advanced creator. What I've found over the years is that this frustration usually comes from not fully understanding how to integrate all of Photoshop tools, and settings into one thing, one great art piece. But, it is perfectly fine to learn Photoshop in stages too. You don't have to be a full expert in one area to begin, exploring digital painting, or photo retouching. You just begin at the stage that you're at. And when it comes to anything, especially with visual art, you can decode this process by finding your own recipe. So, what are your ingredients? My shelves are gonna be stocked with basic Photoshop tools like the layers, panel, adjustment layers, filters and various digital painting tools. And for every single one of these that we have listed here, we're gonna cover at least one aspect of using these tools and this piece today. So before we get to the art, let's go over these tools. Selection tools. I like to think of selection tools as kind of like digital scissors. So let's say you wanna eliminate something like a white background. Well, the various marquee and lasso tools available in Photoshop are definitely useful. These tools help you extract backgrounds from images, isolate certain areas, and they allow you to explore what it means to have more creative control over your work. Layers panel. The layers panel is what I like to call the briefcase. It's where the main bulk of everything that is important in your file goes. So it's basically where all the action is happening. And with each new layer your art begins to transform and evolves. My favorite aspects of the layers panel are layer groups for organization layer blend modes to play with new and exciting colors and layer masks for non destructive editing. So a part of your growth creatively is realizing that the layers panel is so versatile that you really shouldn't be too rigid when it comes to your use of it. For instance, you can have as little or as many layers as it takes to complete that piece. So don't feel like you have to hold anything back. And for really long pieces like this, we are talking about literally like 50 to 100 layers easily. Adjustment layers. Adjustment layers tend to get a bad rap, because the numbers and graphs make them seem so intimidating at first. But what I want you to understand is that these numbers stand for the numerical value of the effect that you are making, right? So, if you are adding a little blue or red to something, it will tell you how much you are adding numerically overall. And typically speaking for most adjustment layers, it's not really even about like knowing a specific number but rather playing with these adjustments sliders until you get to the result you like. In the end the panels is gonna tell you the data portion if that's what you like. And you can use this as a mental note for later or just to keep it as something that you can always readjust another time. Filters and the filter gallery. The filter gallery has been around in Photoshop for some time now even with all the newest additions and features you might forget how useful these original filters really are. For instance, if you like to mimic a traditional art texture or fabric style, you can always experiment with these different filter effects or even layer them for new ones. You're gonna see me use the filter gallery in this course to add more texture to this traditional clay pot design we have going on. This is gonna be for the design of the tea pot, but I have also used the filter gallery to emulate certain textures like jeans or a different painting effects and just really cool and different textural details. Now for the digital painting tools. When it comes to digital painting, many people only look at the normal brush tool as the official tool for digital painters. But any tool in Photoshop that allows you to use a brush becomes a painters tool as well. And I definitely include the Clone Stamp tools, dodge and burn and a few others into this list as well. But generally speaking, I keep my brush kit pretty simple, often only using Photoshop's legacy brushes. You can always download new Photoshop brushes, of course, or you can even create your own to mimic any style you need. For this tool, I definitely recommend getting a pen tablet using the pen pressure option and keeping your opacity level always in the mid to high values for cleaner lines. But digital painting is a lot more than just the tools, it's also about nurturing your patients. And for beginners, one go to technique you can use is to paint a little color, then use the eraser tool to diffuse the edges. Repeat these steps with more colors and your work is definitely going to transform into a realistic masterpiece. And remember, you can always come back to this course at any time to go over these lessons. In the next few steps I'll show you how to integrate these tools into your Photoshop routine.


