
 Lessons: 11Length: 1.2 hours
- Overview
- Transcript
2.5 Finalizing the Details
We're almost at the end of this Adobe Photoshop tutorial! Learn how to finalize the details of your digital art with refinement and style. These last tips show you how to complete the final steps of your work for remarkable results.
1.Introduction
1.1Welcome to the Course00:44
1.2How to Set Up Your Photoshop Workspace04:06
1.3Essential Photoshop Tools05:46
1.4Finding Inspiration03:01
1.5Choosing Your Format04:00
2.How to Create Mixed Media Art in Adobe Photoshop
2.1Using Adjustment Layers06:20
2.2Building the Composition07:46
2.3Photoshop Lighting Effects10:36
2.4Digital Painting Using Photoshop Brushes13:07
2.5Finalizing the Details14:26
3.Conclusion
3.1Conclusion01:15
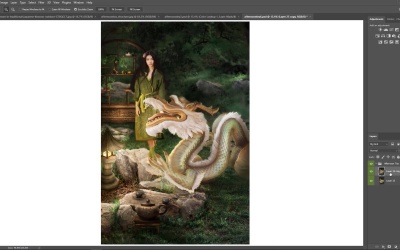
2.5 Finalizing the Details
[MUSIC] So far, we have done pretty well with a few basic digital painting techniques. But to really make this dragon come alive, we'll need to push the envelope of these colors even further for a truly magical effect. All I know right now from a quick assessment is that it's definitely too dark. Even though we've already applied so much light. And what I mean by too dark is that these little dark ridges that would normally show up in a metallic sculpture, what they do is they create this 2D effect that makes the hair look almost fake because in actuality it is. So I'm gonna need to make it look real by painting directly on top of this. Set a new layer at the top to normal and grab a hard round brush that's pressure based to paint golden hair all around the dragon. Trace right over the beard, mustache and brows, then connect the hair to the tail. I've decided to switch things up a bit, instead of going with these sharp pointy bits on the back, I think I'm gonna go with just straight hair. Then set a layer to Color Dodge, and with the same color, brighten up the dragon's entire body with a soft, round brush. [MUSIC] You can start to extend some of that light outwards too. [MUSIC] Then add a layer set to hue to add some new color. I'll be using the hue and saturation adjustment to help me find something I like. For the most part, these are the main colors for this dragon. Now I'm heading on to the blending stage. What I really need right now is to commit to a color scheme for this dragon so I can paint the base layers for the body and face. I'm going for a dragon with a realistic but almost like per lesson quality to it. So, I need to integrate some golden color into it. Doing this with a soft round brush will give it a really almost classical painting kind of vibe which I love. And sometimes with this step you have to paint over really important details even though it feels like you're gonna mess it up. Because I promise you won't. And since I'm already going for a painterly kind of style, I just have to keep the opacity low. So I can still work on the atmosphere, because every character needs to look like they're truly in their position. So these soft stages, these soft brushy stages, help us play with the mood and energy of the piece with some nice silky texture. Now the key with digital painting is to never get too stuck in one spot for too long. So let's go back over to this section with the model. So every now and then what I like to do is set my brush to a higher opacity to paint sharp dots all over the place. Again, this helps with the atmosphere almost like there are these little specks of dust that are catching some of the light coming through the leaves. These are the tiny details that add character to your work. Then we can start to incorporate that same light for the highlights in the hair. So I did go with a test run. I tried this out really quickly on another layer. So I'm just gonna show it real quick. I definitely want to take her hair out from being in an up do, and I want to get this general body going on so I can make her hair a lot longer. I'll use the eye dropper tool to pick up the color from her hair, then paint with that deep brown again, and a pressure sensitive hard round brush. Like always you can soften and diffuse the edges as you go, starting with the hair that hangs in the front and then picking out some pieces to experiment with, right in the front. Then, I'll pick up a slightly warmer brown from her crown and paint with this color to add more depth to her hair. I'm basically taking all of my color cues from the hair itself that is already there, because the entire palette that we need is already in view. Then you can begin making some style choices with her makeup as well. I'm picking up nearby colors to add more makeup contour and a slightly more stern kind of look in her face. And when the makeup gets too heavy, I just erase it a little because we are going for like a fierce, pretty kind of look. So I won't stray too far from the makeup that's already here. This flower in her hair could use a little attention too. I'll repair a few of the petals, maybe adding in a subtle idea of a leaf here or there. Then I'll just start painting some highlights to emphasize the petal shapes. From here on out, I am in complete repair mode when it comes to this painting. Meaning that if there are any of these areas where the sculpture is still showing through or anything that's making the dragon still look fake, I know that they have to go. So I'll have to blanket it in some color to really commit to this design. This step is going to help refine the design and bring the dragon out even more. Now of course every time you add something to the environment, everything else is affected. So now that she has longer hair, we also need to paint some darker shadows underneath the hair. And also start to bring out the rich greens of this robe. And as you'll see, once you start popping in all over the place, picking up color with the eyedropper tool, then blending that area out, the painting does start to feel cleaner and more polished because we're finally committing to these colors. And making paintings with a 3D quality means that I'll have to continue to pick a lighter color every now and then to bring more highlights to each section. Or I can even add more character development with some really shiny scales and some fiery dragon nails. Again, I'll use a soft round brush to bring light and atmospheric balance in by just diffusing certain areas. Like I love the idea of this tail just disappearing right off into the background but still kind of having all these interesting lighting details just because of how reflective the surface is. Painting more gold and white highlights will also help you define these areas even more. It's like you have to go in the opposite direction of always painting with a darker color for more detail. Because these highlights are what's really gonna make your work pop and come forward in the piece pretty instantly. Now remember my background as an artist is in digital painting. So eventually I do like to merge all the layers together. This is already saved on my fifth PSD files so it will be okay if I mess it up but we're not. I know I just need to take more control over this file. With everything merged, let's make a copy and go to filter Liquify to start adjusting the dragon. Using the forward warp tool I just wanna pull out its head a little, not too much in particular right at the snell area to make it longer because the anatomy is throwing me off a little. I mean we are turning a statue into a real dragon. So when you hit certain roadblocks or art blocks, just have a few really solid references nearby so you can make the anatomy better. Now let's brighten everything up with a new adjustment layer of levels. I wanna work on the clarity of this even more by experimenting with the contrast of these colors. Even just tweaking the settings in the RGB channel makes this look way clearer than before. I also wanna pull more of a daytime experience into this, everything's kind of really dark right now. And it's afternoon tea, not nighttime tea. So, I'll add a new adjustment layer of selective color and I'll go through all the different channels for a brighter and cleaner look that is not only more warm but also inviting. Continuing to paint in between adjustment layers, adding more highlights to the dragon's head and hair, then use a sharp hard round brush to bounce even more highlights onto the scales. From here on out, I'm trying to limit my adjustment layers as much as I can. I know this is getting a lot, but I will add color balance to bring out more of the blues in this piece. For this, I'm thinking about where the position of the sun is right now, according to this color scheme. So instead of this really burnt orangey sunsetting, look, I wanna go for something that's more mid-afternoon, white clouds and a blue sky kind of vibe. Looks pretty solid so far. So, once there's more color in the dragon's mane, you can layer other ones like this grayish green color on the snout, and naturally, all the colors in the dragon get reflected into the models robe of course. So we start to really crisp up all these different sections with even more exciting details. [LAUGH] It's literally just detail, upon detail, upon detail, upon detail. That is what is digital painting is. And this is when your understanding of light and shadow gets to really shine because it's trying to maintain the balance of the two, as well as all of these soft and crisp textures that is essential for making this fantasy come to life. Now don't forget to add some highlights on the other objects too, like some bright edges around the lamps and stones, because as we start to finish the dragon we'll also need to finish the model. Color pick some of the highlights from her hair and start painting with them to flow along each strand of hair. One of the reasons why the candle is here, is because I want it to illuminate the model from behind, almost like a room lighting effect. So after I've painted in some color from the flower, I'll pick up some color from this candle flame, and paint golden highlights across the hair and flower. Less is definitely more in this step or else she will start to look really glossy, like the dragon. And when it comes to painting most of your problems can probably be solved by asking yourself a lot of questions, especially if you need a hard edged brush or a soft edged brush for this step. Because as you start to get to these final stages of your work, you're gonna need brushes that make really sharp, clean and clear lines that will make the scene look really clear. Now after a couple of hours with this dragon, I did decide to add a couple of more teeth to its mouth to fill it up. This is just personal style choice. I don't want the dragon to look entirely menacing because I do want it to seem pretty friendly. That's why I'm also taking kind of really special precaution with the hair and the mane and the mustache to make everything glistening, very much feeling like a shampoo commercial, but it's gonna make this piece look great. When you are ready for more highlights, set a new layer to overlay and use a soft brush to paint more of these bright moments all around the garden. Maybe some of the light spills onto the stones near the shelf or you can even go really crazy in the background, or the beard starts to get really glossy as though this dragon has like the best night time self care routine. What is it's secret? Now, even though the dragon already has this long whisker detail, I'm gonna paint some additional ones. And you'll see and kind of like the beginning I wasn't really sure about this step initially, where to put them, how they should hang. But you can just keep readjusting this piece as you're painting to find what's gonna work in the end. The rest of this piece is pretty much dedicated to the light. And the vast majority of your time is spent highlighting all of the different edges and different things in the direction of the lamp. So the tea pot will definitely need some more highlights. [MUSIC] As well as the tea cups, and even the model's hands, robe and hair. As I start to wrap this piece up, I'll add two more adjustment layers to clean up these colors real quick. First, a second levels adjustment layer where I add in even more reddish tones. Then a simple curves adjustment layer where I play with the RGB, green and blue channels for a little more clarity. In the final stretch, I am still painting and picking up colors. So, saving a really sharp rush for the last highlights and details will help make all these characters pop. I'll also make another new layer set to overlay, to beef up these pockets of sun that are coming into the background. This lights everything up in a way that's more compatible with the afternoon theme. And these little specks of lighting here and there have a really great way of creating this visually satisfying feeling for the viewer. Once you are finished, your work is no longer a mere photo manipulation. But an entire mixed media piece full of story and wonder. So that's it. Here is the final look. I really hope you've all enjoyed this class. If you would like to stay around for a couple more minutes, we're just gonna go over a quick recap of everything we've learned.


