
 Lessons: 14Length: 1.7 hours
- Overview
- Transcript
2.1 Set Up the Main Shapes
Learn how to set up and manipulate a mesh shape.
1.Introduction
1.1Introduction01:12
2.Create the Cake Parts
2.1Set Up the Main Shapes11:13
2.2Add Mesh Points and Color09:32
2.3Finalize the Cake Shapes11:07
3.Create the Cake Glaze
3.1Set Up the Shape for the Glaze06:34
3.2Add Color to Your Glaze Shape06:04
3.3Create Drips of Glaze08:07
3.4Finalize the Glaze Drips08:29
4.Create the Fruits for the Cake
4.1Create a Raspberry09:48
4.2Create a Blueberry05:38
4.3Create Green Leaves07:28
5.Create a Background and Reflections
5.1Add a Mesh Background08:05
5.2Add Reflections05:43
6.Conclusion
6.1Conclusion02:16
2.1 Set Up the Main Shapes
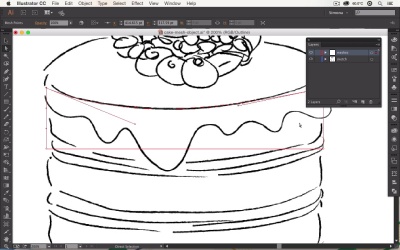
Hello everybody. My name is Simona and welcome to the course Advanced Gradient Techniques in Adobe illustrator here on tuts+. We're about to start the lesson Set Up Main Shapes. In this lesson, we're going to create our shapes that we need for our cake icon. And since we solely want to work with gradient meshes, this is the base where we're going to start to turn our regular shapes into gradient mesh objects. Now let's get right to it and let's open up Adobe Illustrator. Here in Adobe Illustrator I have a sketch of a cake icon that I have created. All I did is take a notebook and a pencil and I've outlined the basic shapes that I need for this cake icon. As you can see, we have here the fruits, the glaze, the cake layers, and the cream in between. But before we go any further, I quickly wanna tell you that I'm working with Illustrator CC from the Adobe Cloud, and my Document Color mode which we can find under File. Document color mode is set up for RGB. I'm not using CMYK. I want this icon to be used for the web, since most icons are used for the web. Of course, we want to work in RBG mode. If you want to have it printed later on, just make sure you convert it CMYK.. Now the first thing we want to do here, you want to select the image I've placed. And you can find this image in your source file folder. So you can work along with me. And we want to lock it, so we go to Object > Lock selection, or, of course, the shortcut for this is CMD2, or CTRL2 on the PC. Then we need to have a look at the layers here. Since we are working with objects that we're going to turn into a gradient meshes, we want to make sure that we have at least two layers. One layer, usually our reference photo, or in this case, our sketch. And the second layer, where we're going to place the objects or shapes. So let's create a new layer, and let's call it meshes, of course, you can call it anything you like. This is really up to you. After that, we want to analyze the sketch quickly. In this lesson, we want to create the cake shapes. So let's have a look here. You can see, we need three shapes for the cakes, and we need some shapes in between for our glazes. So the first thing we want to do, we want to use the rectangle too over here in the tool bar. So let me select it, or use the shortcut M, and then, we're going to create a rectangle. And I want to use the width of the sketch, and we want to make sure that we're setting the stroke to black, and the fill to none. So let me switch this here for you, and now we can see that this is what we need in width, and we zoom in, the height is approximately the same. But as you can see, of course, we need a curved shape. But first, we want to create a regular rectangle, we are setting the stroke to black, so we can see our sketch in the back. And after that, we are going to Object > Create Gradient Mesh. Here in the pop up window it is automatically getting converted to a white fill. And we want to pay attention here for the gradient mesh, that we only set 1 for the row and 1 for the column. And that we have the appearance set to flat, and again, you can toggle off and on the preview. And then we click OK. Now in order to manipulate a gradient mesh object, we need to use a little trick. Right now, we have white as a fill, and we do not see our sketch underneath anymore. Of course, we could play with the opacity and everything. We really want to pay attention that we see the sketch in the back, so we can manipulate and change the shape of our gradient mesh object here. So this is really easy to do, and let me show you. All we have to do is press Cmd and hold the Cmd key or the Ctrl key, on the PC, and then we'll click on the icon here next to the layer, the I icon. And as you can see, I get the message Toggle mode. Now if I click this, see would happens, we've created an outline. The I disappeared now and we just see the outline. And now we can see our sketch below again, and if I deselect the object, you can see that we have the anchor points in each corner. We see the outline, in red in my case, and now we can use this outline mode to manipulate the shape to follow along like we need the cake to be. So we select the direct selection tool. Then we select the anchor point. And now we can see the handle. Now let me zoom in a little bit more. And now I can grab the handle, and as you can see, now I can manipulate the lines. And this is really helpful for creating gradient mesh objects. If I move this out of the side here, you can see that we might need to be a little bit higher, and we can grab the anchor point here and pull it up. Or we can grab the other anchor point, and we're grabbing the handle again and we're changing the cake into the shape that we need. Now you might ask, why don't we do this afterwards, or why don't we create just a curved shape right away. When we start with a rectangle and then turn it into a gradient mesh object and then change the shape of it, we have a better control over the gradient measure points. If we later on add extra mesh points they will really fall in line and we won't have any overlapping mesh lines. We will go into further detail later on why this will help us, but for now, all we need to remember is recreating a regular rectangle shape. Then we're going to object and returning it into a gradient mesh, after that we toggle off and on the visibility of the layer simply by pressing the Cmd and holding the Cmd key, or the Ctrl key on the PC. And clicking on the I icon of the layer. If I press again, I'll make it visible again, as you can see. And if I hold Cmd again, press on the I, it disappears again. Now of course, this we want to do with each of the shapes. So as you can see, I think this looks pretty good. So this would be the first cake shape. Then we need to create the shape for the cream in between. So I'm choosing a rectangle again, I'm drawing in approximately the size. After that I might want to select the first shape I've created and lock it, so it doesn't interfere. And we're still working in the outline mode. I'm going back to Object > Create Gradient Mesh. Make sure I have Row set to 1, and Column set to 1, appearance flat, and I click OK. After that, again, with the direct selection tool, I can select the handles, and I can manipulate the shape into place, just like this. Right now, this is not really very complicated, because we're working, still, with a simple shape. And we can also select both of the anchor points, and with the arrow keys on the keyboard, we can move it tighter. Sometimes we just need to move it around a little bit, and you'll see, if the shape fits in between your cake shapes or not. There's not really a direct science to it. All we have to make sure that we turn it into a gradient mesh object, and then we can manipulate it by using the handles. Next, we're going to grab the anchor points again moving it a little bit closer. And after that we can just grab it and make a copy of it, because I know I need two shapes. One for the cream and one for the filling, of course, for the other shapes you can just do the same. Now we've created the basic shape for our cake and for our cream filling. Now let me unlock all. Just make sure that we lock our sketch layer again. And now let me zoom in here into the corner. We need to select the anchor point here, and we need to manipulate it a little bit more. Since our cake is not really that straight, we want to create a tiny bit of a curve. So all I have to do is, I select this anchor point that you see that I'm moving right now and I'm moving it up so we're creating a little bit of a curve here and the bulge on the outside. The same thing I'm doing with the bottom here. I'm just pulling it out a little bit, and I'm letting it bulge out onto the side. Now if i go over to the sides, I want to do the same thing, of course, here. Make sure that you do not grab this handle over here, because this handle creates our curved line up here. We want to choose the handle here on this side vertically. So I'll pull it up just a tad, and do the same thing with the bottom one. It's really easy to manipulate at this point. The same thing we want to do with our cream layer. We want to manipulate it a little bit so it's not that straight looking. So I'll select the edge here and grab the handle and pull it out a little bit, same thing for the other one. They're really easy to grab and, as you can see here, I'm just making sure that it bulges out a little bit. Afterwards we will manipulate it much more when we add the colors to it, but for now, this will really help us. So our shape for the cream, and the filling, and the cake parts doesn't look super straight. It's not complicated either, and you can easily play around with it. And of course, curve it as much as you like. So let me zoom out again, here. And if I hide our cake sketch, you can see now that we have these layers here. If I toggle them on again, of course, we don't see anything because they're all white. But we're going to give it the proper color in the next lesson. Now let's go over to the next lesson right away. Where we're going to add more mesh points. And where we're going to add color to our cake shapes.


