
 Lessons: 14Length: 1.7 hours
- Overview
- Transcript
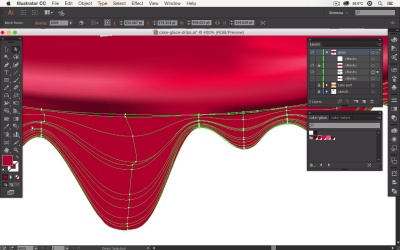
3.4 Finalize the Glaze Drips
Add colors and shadows and highlights to the glaze.
1.Introduction
1.1Introduction01:12
2.Create the Cake Parts
2.1Set Up the Main Shapes11:13
2.2Add Mesh Points and Color09:32
2.3Finalize the Cake Shapes11:07
3.Create the Cake Glaze
3.1Set Up the Shape for the Glaze06:34
3.2Add Color to Your Glaze Shape06:04
3.3Create Drips of Glaze08:07
3.4Finalize the Glaze Drips08:29
4.Create the Fruits for the Cake
4.1Create a Raspberry09:48
4.2Create a Blueberry05:38
4.3Create Green Leaves07:28
5.Create a Background and Reflections
5.1Add a Mesh Background08:05
5.2Add Reflections05:43
6.Conclusion
6.1Conclusion02:16
3.4 Finalize the Glaze Drips
Hello everybody. I am Simona and welcome back to the course, Advanced Gradient Mesh in Adobe Illustrator here on tuts+. We're about to start the lesson Finalize the Cake Glaze Drips. In the last few lessons, we've worked on our glaze part for our cake icon. We've created the base shapes and we added colors to it. And then we created also a rectangle that been transformed into glaze strips. Now, let's finalize everything. Let's add some mesh points and our colors. So let's open up Adobe Illustrator right away. Here you can see at one point we are now with our cake icon design The created the top part. We created the glaze trips. You know we already have to kick parts. And let me turn off the sketch here so we can see what we're going to finish. This is the part that was created in the last lesson. Remember we just started with a rectangle. And we added extra columns when we turned it into a gradient mesh object and then we simply transformed it. Now it's time to add some more mesh points. All together I think we might have to add quite a few lines, since adding color to a mesh object really depends on how many mesh points you have. And since we need to create highlights running along the bottom here, we need to control it really well. So, let's zoom in, and let me show you how many of those mesh points we need to add. First, we're going to select the mesh tool. And then as you can see, we'll start clicking on the site here. And this will add a vertical line. But we don't need a vertical point now. We need actually everything running along horizontally. So, let me undo this here and we need to zoom in a little bit better. The best part to actually add in is go with the biggest drip down here. And all we need to do because we already have some vertical lines that we need. We will simply click once here and as you can see it added following our curved line here, another mesh line. Now, sometimes it gets a little bit tricky with the handle stick, can get into the way. But all you have to do is just zoom in a little bit more and then click and add another one. Now we can even click down here and add another one. As you can see, we're needing to create our mesh lines for our drips. It'll make sense in a few more minutes when we're adding the color. But just trust me for now when I say that we need quite a few lines down here. Afterwards we also want to add more mesh points in the middle here. Just like this. And then we continue moving upwards. And we'll add a mesh line here because we need to create a transition from our colors from darker to lighter and we need to make sure it matches our top part. And then maybe one more in the middle here. And then let's say a few down here. So let me zoom out now, and as you can see it's getting quite complicated. But don't worry all we have to do then is select match points. And before we continue, make sure that you selected the shape. And let's make sure that we set our base color. The best way to choose a base color. Actually I haven't mentioned this before. Is not to use the lightest or the darkest. You want to choose the medium color. In our case, it would be this red here, so all I'm going to do is with the object selected, I'm adding the color to it. Now if I toggle on the visibility. You can see now that our base shape has the same color as our top part. Sometimes we need to move it a little bit closer, so the gaps are closing and as you can see, it follows along our top shape here. And then when we add the colors, we'll just make sure when we're adding shadows that we select these points, and picking the same color from the top here. So I think, right now, this is what we're going to start with. So with our shape selected. And again, the top shape is still locked. We can zoom in, and we take the direct selection tool. Select these anchor points here. And then we're going to use the eyedropper. The Eyedropper Tool will help us sample the exact same color that we need so both our shapes will match. So all I click here close to it. And as you can see if I deselect, it's starting to match it. We might even need to use this point here and sample it as well. Now we have to move back and forth a lot actually, with our direct selection tool and the sample tool. And remember you can easily do this by first you select a point, then you select the eye dropper and then you sample the color. And then you can switch between the direct selection tool and the eye dropper by simply pressing Cmd on the keyboard or Ctrl for PC. This is a way to switch between the last two tools you've used. So again, I am pressing. I'm picking the other’s point here and then I’m eye dropping. And I can continue this back and forth until everything matches with the colors. Again, I'm using the eye dropper. I’m matching, selecting the next point. And so forth. Sometimes you might need to zoom in a little bit so you can see what's happening. Or you need to grab the point and move it a tad closer to our shape. Sample the color. Again, I am checking to point, sampling the color. Select the other point, sampling the color. Sometimes you have to click very close to the other shape, and make sure that you're selecting the same color. And this is how you're going to match the second shape to the first shape. So let me zoom out here and let me show you. If i deselect, you can see that our shape is starting to match. Of course we need to do this with quite a few points. But I think you know now what I'm talking about. Now let's add some highlights. So again, so I would like to add a highlight to this drip here. So I'll select this shape and I select. This particular anchor point here. And then I'm going to give it the lightest color. And as you can see we've created a highlight now. Of course you might want to grab the other anchor point below as well, and extend our highlight a little bit. And as you can see it's getting a little bit more. But it became flat again. So on do we really want to make sure that we control the drips. And you can do that by grabbing the other line below by simply grabbing the anchor point and moving it up and down. If I move it down it spreads. If I move it up it becomes tighter. And all I have to use is the direct election tool, grab the anchor point and then move it around. And this is really all there is to it. It is quite. So you really need to take some time to add all the color to it. But just play around with it. And since I've already finished it for us, let me show it to you. So here I will hide the one that we've just worked with. And this is the finished glaze for the bottom part for the drips. As you can see it's the same shape that we've created together, and all I have done is added color. So for example in the middle here if I select the point you can see that I've used the darkest color here for the highlight underneath and grabbed some points and added shadows to it. And I continue this all the way along. I made sure that I match the bottom part to the top part by sampling with the eyedrop of the colors right where the mesh points meet. And now if I turn on the cake part, you can see that our cake icon is really coming together. Sometimes you even want to play, maybe, with the size. So if I select both, and I'm increasing them a little bit. It looks like the cake glaze is much bigger. And it's coming over our cake parts. And this is it for this lesson. Now, right away, let's move on to the next lesson where we're going to create some really fun mesh objects. We're going to create some fruits.


