
 Lessons: 14Length: 1.7 hours
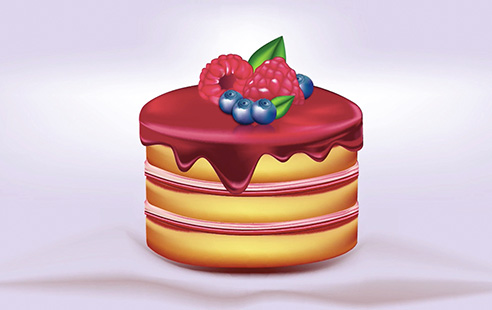

- Overview
- Transcript
1.1 Introduction
Welcome to Advanced Gradient Mesh in Adobe Illustrator. In this course, you will learn how Gradient Mesh can take your digital designs to the next level. The techniques you will learn throughout this course, will be a great asset to your design & illustration toolbox. So I really hope you enjoy watching the course as much as I did recording it.
1.Introduction
1.1Introduction01:12
2.Create the Cake Parts
2.1Set Up the Main Shapes11:13
2.2Add Mesh Points and Color09:32
2.3Finalize the Cake Shapes11:07
3.Create the Cake Glaze
3.1Set Up the Shape for the Glaze06:34
3.2Add Color to Your Glaze Shape06:04
3.3Create Drips of Glaze08:07
3.4Finalize the Glaze Drips08:29
4.Create the Fruits for the Cake
4.1Create a Raspberry09:48
4.2Create a Blueberry05:38
4.3Create Green Leaves07:28
5.Create a Background and Reflections
5.1Add a Mesh Background08:05
5.2Add Reflections05:43
6.Conclusion
6.1Conclusion02:16
1.1 Introduction
Adobe Illustrator is one of my favorite softwares to use. And although I like Photoshop almost as much, I still tend to open up Illustrator first. This is why I chose a vector program for creating an icon. Of course Photoshop has some neat features, but didn't you always want to know how to achieve a similar look and style, in Illustrator especially when it comes to gradients and such? I certainly have, and that's why this course, Advanced Gradient Mesh in Adobe Illustrator, here in tuts+ is all about the power of gradient meshes and how well they work to achieve a smooth and solid look. My name is Simona and I picked a delicious cake icon as our project and we will create it together step by step from sketch to final vector icon, solely by gradient meshes even down to the background. So without any further delay, let's get started. Let's create some scrumptious cake, some filling, a delicious glaze, and some awesome fruits.


