
 Lessons: 12Length: 36 minutes
- Overview
- Transcript
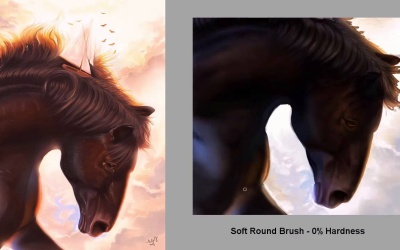
3.1 Hard vs. Soft Brushes
Achieving quality digital art requires a balance of soft and hard brushes. In this lesson, I'll show you how to develop your compositions with a balance of soft and crisp textures. Learn how to create cleaner paintings and master Hardness and Opacity with these simple tips.
1.Introduction
1.1Introduction01:04
2.Master Brush Basics
2.1Start With Basic Brushes03:16
2.2Brush Efficiency and the Layers Panel03:28
2.3Get to Know Pen Pressure03:46
2.4Learn How to Blend With Brushes03:02
3.Brush Application
3.1Hard vs. Soft Brushes03:00
3.2How to Use Texture Brushes03:04
3.3Using Other Brush Types03:44
4.Photoshop Brush Resources
4.1Installing and Using Custom Brushes03:03
4.2How to Create and Organize Custom Brushes02:51
4.3Take Advantage of Photoshop Brush Presets02:44
5.Conclusion
5.1Conclusion02:45
3.1 Hard vs. Soft Brushes
Now that we know a little more about brush settings, it's time to tackle our workflow. So in this lesson, we'll learn the difference between hard and soft edge brushes, as well as recognizing the moment when they're needed in our work. Let's begin. Know when they apply, hard vs soft brushes. We already learned earlier that a brush's hardness varies on the percentage level you apply in Photoshop. So naturally, the lower the percentage, the softer the brush. But how do you know when to use either a soft or hard brush? The top two problems I always see beginners face deal with this confusion. Either you're painting with a brush that's too hard or a brush that's too soft. So I'll give you a super simple solution to this problem. Digital paintings are created in various stages. According to which stage you're working on, that stage will decide the type of brush you're using. The first two stages are for the sketching and the flat base colors. Soft brushes tend to look too blurry, so you wouldn't want to draw your sketch with this type. So as a rule of thumb, keep your hardness level at 100% for these first two stages. Once you've passed this initial phase,you can decide which path you wanna take next. Do you want to shape with soft colors or block in shapes with a harder brush for a more sculpted look? Here's the process I took for my recent painting, empathy. Realistic paintings often require a lot of blending. So, if you start with a soft brush, you can lay down a subtle changes in light and color before setting the details in stone. Notice how as the painting progresses, my brush hardness increases for a cleaner, more detailed look. Soft brushes are also used for atmosphere. They can help to feed parts of your composition for a seamless transition in light and shadow. Here I used a soft brush with low harness and opacity to bring in more light from the sun to whisk through the horses hair. As long as the light is painted on a new layer, I can easily dial back the intensity with the eraser tool. Getting to the finish line usually means you want to clean up your work. So that's when you jump back to a much harder brush. Create striking realistic hair with clean solid strokes and use this same intensity for bright highlights around the clouds. All in all whenever you feel stuck, just remember this simple rule, just change it up. Whether it's the hardness or the opacity, you've probably been painting on the same setting for too long. So a simple change is most likely all you need to achieve various results. I hope this lesson has helped you understand a little more about how to apply soft and hard brushes. Let's move on to expanding our brush knowledge by tackling texture brushes in the next lesson.


