
 Lessons: 12Length: 36 minutes
- Overview
- Transcript
2.3 Get to Know Pen Pressure
In Photoshop, pen pressure is a special brush setting available only to pen tablet users. Let’s learn the benefits of graphics tablets and how to use pen pressure sensitivity for incredible results.
Related Links
1.Introduction
1.1Introduction01:04
2.Master Brush Basics
2.1Start With Basic Brushes03:16
2.2Brush Efficiency and the Layers Panel03:28
2.3Get to Know Pen Pressure03:46
2.4Learn How to Blend With Brushes03:02
3.Brush Application
3.1Hard vs. Soft Brushes03:00
3.2How to Use Texture Brushes03:04
3.3Using Other Brush Types03:44
4.Photoshop Brush Resources
4.1Installing and Using Custom Brushes03:03
4.2How to Create and Organize Custom Brushes02:51
4.3Take Advantage of Photoshop Brush Presets02:44
5.Conclusion
5.1Conclusion02:45
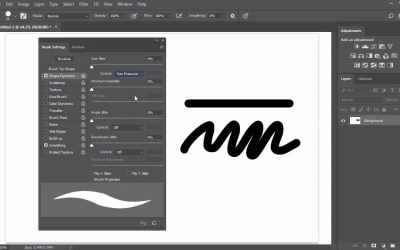
2.3 Get to Know Pen Pressure
Hello, and welcome back to this course. We're making great progress so far on learning more about Photoshop brushes. For our third tip, we'll dive into the pen pressure options and how to add even more customizations when working with graphics tablets. Get to Know Pen Pressure, there's been a lot of debate over the years on whether or not you really need a pen tablet. For those who only have an optical mouse, there are actually many tutorials available for you. You can learn how to create everything from graphic designs to photo manipulations and even digital paintings with a regular mouse. But even with all these tutorials, using an optical mouse will not grant you access to pen pressure sensitivity in Adobe Photoshop. So the only way to get true, beautiful, tapered ends, and to improve your overall painting experience is to use a pen tablet. Let's take a look at our options, realize first and foremost that you don't need the most expensive tablet on the market. I, for one, have gone through at least five different models from all different price ranges. The main two types of pen tablets you'll see these days either have a pad you can draw directly onto or an actual screen. Depending on your preferences, there is a tiny learning curve as you'll need to get used to the feeling of drawing while looking up at the screen. But there's no other way to overcome this than with a little practice. So once your tablet is set up select the brush tool and hit F5 on your keyboard to get started. The brush panel is your best option for getting to know more about pen pressure. Here it keeps every setting that's related to brushes with a few bonus controls, let's try them out. Select a hard or round brush from the selection. Draw a simple line or scribble to test it out on your canvas. See how wide and blunt the result becomes? If you want to create a nice tapered end instead, then go to Shape Dynamics. Under size, jitter control, change the option to pen pressure. You'll see a preview of the brush at the bottom before you test it out with a new stroke. See the difference? Now it looks like you're writing with a pen or pencil. Now enable this button, pen pressure for opacity to simulate a stroke even closer to traditional mediums. This setting automatically enables the transfer resetting within the the brush panel. Which creates a more opaque result dependent on how hard you pass in to the tablet. I like to use this brush for sketches. Typically without the taper, while others may want a more solid result. So just go with what works best for you. Develop better line drawings by practicing simple exercises like drawing vertical, horizontal, and slanted lines repeatedly. Or by practicing hatching and cross-hatching, a simple shading method. It's especially effective if you zoom in to deliberately draw cleaner lines. Hitting Ctrl+Z whenever necessary, to try again. I'd also recommend to keep the opacity in flow at 100%, at this time. Anything less will force you to press harder into the tablet and may cause you to strain your hand overtime. If you're not confident with the brush tool just yet, feel free to use the pen tool to utilize pen pressure. A great option for illustrators or designers who want a more graphical result, simply select the pen tool and create a design with a few anchored points. Then right click and select stroke path, making sure that the brush tool and pen pressure options are both enabled. Depending on the settings of your current brush, this tool will create a beautiful stroke that can easily be applied to portraits or designs for more appeal. Dedicate some time to trying out this settings. The more familiar you good with these changes, the better you'll become as an artist. Let's move on to our fourth brush tip. Where we'll learn everything we need to know about blending.


