
 Lessons: 17Length: 2.6 hours
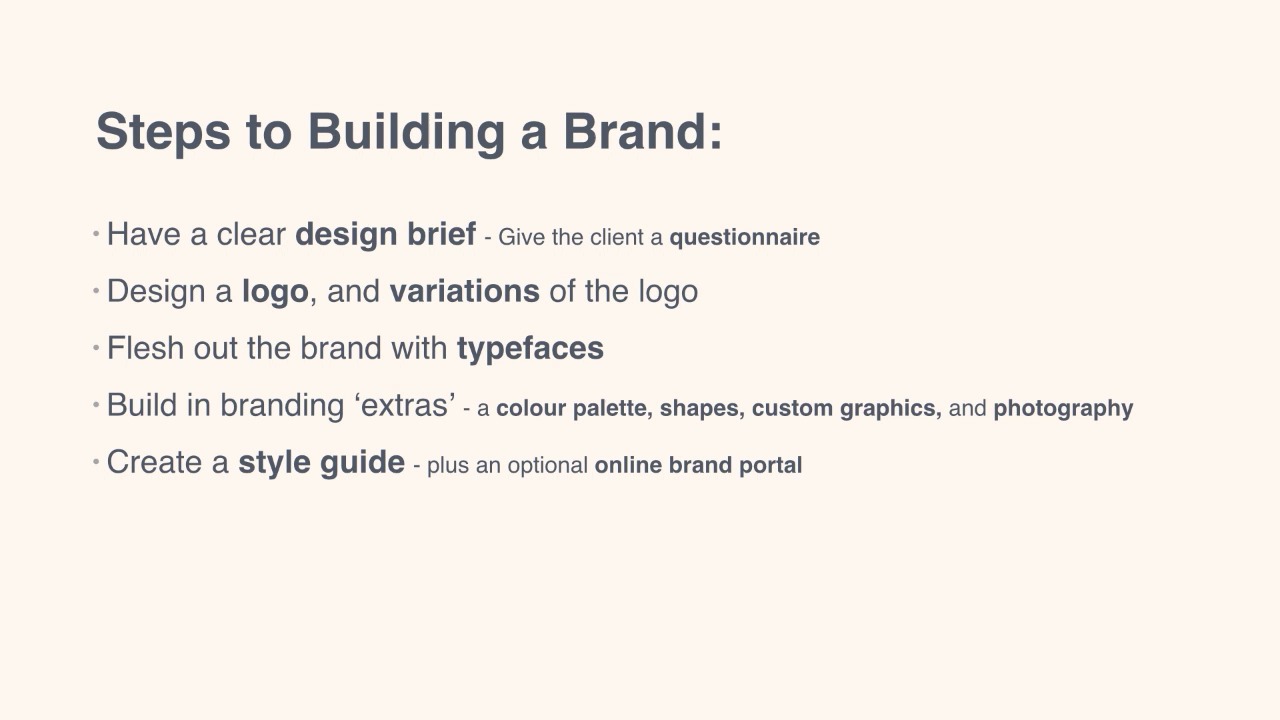
- Overview
- Transcript
6.1 Evolving Your Brand (and Knowing When to Rebrand!)
Congratulations! You are now fully equipped in designing and building visual brand identities. In this lesson, we look at how you can evolve your role beyond the files handover, and become a ‘brand enforcer’. We also discuss how you can approach the often inevitable situation of needing to rebrand with professionalism and positivity. I hope you’ll go away with new-found confidence in tackling brand projects head-on, and go on to really enjoy making your brand designs come to life.
1.Introduction
1.1Introduction01:32
1.2What Is a Brand?07:45
1.3Your Essential Checklist04:55
1.4What You’ll Need to Take This Course02:34
2.Logos and Icons
2.1What Are Logos and Icons?10:48
2.2PROJECT: Design a Logo and Icon19:51
2.3PROJECT: Finishing Up the Logo and Icon08:07
3.Brand Typefaces
3.1What Do Fonts Say About Your Brand?11:40
3.2Choosing Your B-Font06:30
3.3PROJECT: Choose and Format Brand Type18:08
4.Branding ‘Extras’: Color, Shape, and Graphics
4.1Building Visual Extras Into Your Brand Identity09:17
4.2PROJECT: Create Your Brand ‘Extras’08:23
4.3PROJECT: Create Your Brand ‘Extras’, Continued11:54
5.Brand Guidelines (Style Guides)
5.1PROJECT: Create a Brand Guidelines Template11:16
5.2PROJECT: Finishing Up Our Brand Guidelines Template08:38
5.3PROJECT: Going Digital: Creating a Brand Toolbox11:02
6.Conclusion
6.1Evolving Your Brand (and Knowing When to Rebrand!)02:20
6.1 Evolving Your Brand (and Knowing When to Rebrand!)
Congratulations guys you've completed this involved Tuts+ course designing and building a brand. You can now officially call yourself a brand expert and use your newfound branding skills to tackle new and exciting projects. Let's quickly review our brand checklist that we introduced in the first section of the course and just remind ourselves of how much we've actually covered over the lessons. So first up we had the brief then the logo. We looked at how to brainstorm logo ideas and refine a vectorized version in Illustrator. Next is all about tracking down the right typefaces to suit your brand identity. Then we looked at how to build and brand extras, including a color palette and branded shapes. Then we wanted to pull all those brand elements together and I showed you how you can set a brand guidelines or style guide templates in InDesign. I also showed you some options for lifting your branding into a digital format by creating an online brand portal or tool box. Once the brand is created and handed over to the client, there may well still be a role for you as a brand enforcer. Many designers do check in with their clients after completing brand projects, simply to advise on how the brand can be maintained and how it can be applied across the new projects to the client. So it's well worth keeping in touch with your client after handover of files for this reason. Now back to our checklist. And hold on, there's just one more item to add. This may sound a bit demoralizing after you've spent so much time creating a brand identity but often it is necessary to strongly consider rebranding. What you have to remember is that branding has to evolve over time. I have to say a really big thank you for taking part in this Envato Tuts+ course, Designing and Building a Brand. And, of course, a huge congratulations for all your hard work over the lessons. We've covered so, so much guys so really, a big well done. And I hope to see you here again over at Tuts+ very very soon.


