
 Lessons: 11Length: 1.4 hours
- Overview
- Transcript
2.1 Creating an InDesign File, Creating Grids, and Organizing Layers
In this lesson, you will learn how to set up an InDesign file for a magazine. We will look at how to create grids and how to decide the number of columns and rows you need. Last, we will take a look at layer organization to keep our files tidy.
1.Introduction
1.1Introduction to Creative Magazine Layout Design01:24
1.2Design Assets and Software01:21
2.Setting Up an InDesign File for Magazines
2.1Creating an InDesign File, Creating Grids, and Organizing Layers03:56
2.2Typographic Hierarchy: Designing a Preliminary Article and Paragraph Styles12:00
2.3Creating and Grabbing Color Swatches05:13
2.4Creating Master Pages and Consistent Folios05:05
3.Designing a Magazine Cover
3.1Designing a Magazine Cover: Tips and Tricks09:03
4.Creating Layouts
4.1Designing a Contents Page08:39
4.2Designing an Article10:58
4.3Breaking the Rules23:48
5.Conclusion
5.1Conclusion01:55
2.1 Creating an InDesign File, Creating Grids, and Organizing Layers
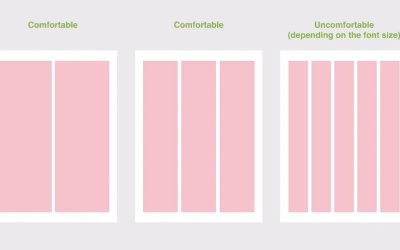
Hi there, and welcome back to this course. In this lesson, we will learn how to set up an InDesign file for a magazine, how to create grids, and how to keep an organized file. So let's get started. In InDesign, create a new document for print. And for this course, we will use an A4 page. Set the name to Creative Magazine Layout Design. Change the Units to Centimeters. Check Facing Pages and create a 13 page document. We will leave the margins as they are for now. Set a Bleed of 2.3 centimeters and click Create. Let's reset the workspace to Typography so that way we can all start with the same layout. That way, it'll be easier for you to find all the options. We have our Layers panel, we have our Pages panel, Master pages. Double-click on a Master and we can start setting up our layout. We have our margins here, so let's go to Layout margins and we can set up the margins that we want. For this course, I want to set a bigger margin on the outside of the page and a smaller margin on the inside and bottom. So set the Top to 2.5 centimeters, Bottom to 1.5 centimeter. Let's do Inside 1.5 and Outside 2.5. Let's move this to the side so you can see. Check the Preview option that you have here, so that way you can see what you're doing. Here we can see, we have a bigger margin outside and smaller inside. Click OK. Now I want to set up our guide. So head over to Layout > Create Guides. Check the Preview box. For this, you have to take into account how big the page is. Because you want to make sure that you're having columns that are readable, that are comfortable to read even though you're creating something a little bit more experimental. For this specific magazine, we can start with two columns and then we can experiment a little bit more from there. Set the Row Number to 6, Gutter 2.5 centimeters. And then head over down here to Fit Guides to Margins. That will measure the guides based on the margin and not on the page. Head over to Columns Number, set it to 2, Gutter 0.5 centimeters, the same as the rows, and click OK. In editorial design, we tend to keep template files that we can start with every time we publish a new magazine. So for this course, we're going to start with the Layers panel. If you don't have the Layers panel open, head over to Window > Layers. On the Layer panel, double-click on Layer 1 so we can rename it. Name this Background, click OK. This is where all of our backgrounds are gonna go. Create a new layer, rename this to Images, click OK. And create one more for Copy. You can lock the layers if you need, depending on what you're working on. You can also transfer elements from layer to layer. So here we'll create a quick square. And we can transfer this element from one layer to another on the Layers panel. And we can lock it and we can unlock it. Great, so in this lesson, we learned how to set up an InDesign file for a magazine and how to create margins and grids as a base for the design of this layout. We also created a couple of layers and these will help us create a very organized and tidy file. On the next lesson, I will show you how to decide on the type specifics for your layout and we'll talk some more about file organization. So I'll see you there.


