


Having thoroughly explored the human body, it's time to start looking more closely at its details, starting with face anatomy. The very first thing the eye looks for, in any setting, is the human face, and this applies also to art: a viewer will first look at the face of your character.
Mastering the anatomy of the face and being able to create a lively and expressive face drawing is therefore well worth the effort. As much as trending illustration styles change with time, the fundamentals of human anatomy illustration are evergreen.
In this tutorial, we're learning the basics of the human face anatomy: proportions, features, and foreshortening. We'll go into the details of variations in face anatomy drawing in our next session.
Jump to content in this section:
1. Proportions in Face Anatomy
Seen Face-On
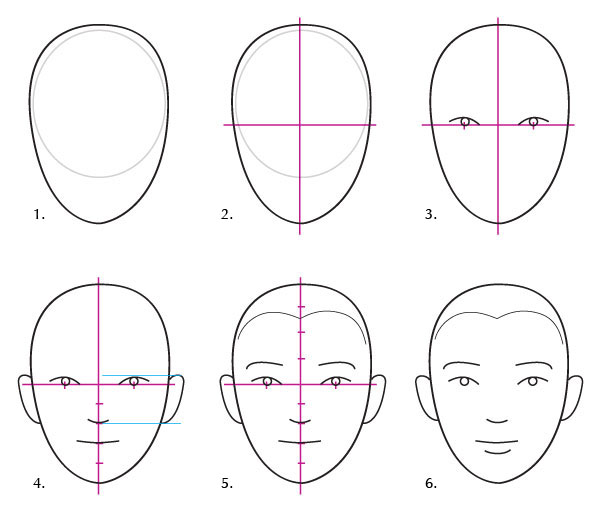
The skull is a slightly flattened sphere to which the jaw is appended so that, seen face-on, it has the shape of an egg, pointy side down. Two perpendicular midlines cut the egg into four quarters. To create our face anatomy reference and place the features:
- Mark the middle points of the left and right halves: The eyes sit on the midline, on these middle points.
- Divide the lower half in five: The bottom of the nose is two points down from the midline. The slit of the mouth is three points down from the midline, just one point down from the nose.
- Divide the upper half in four: The hairline (when not receding) is two to three points up from the midline. The ear is positioned between the upper eyelid and the tip of the nose, but this is only when the face is level. Looking up or down changes the apparent position of the ear (see Foreshortening).
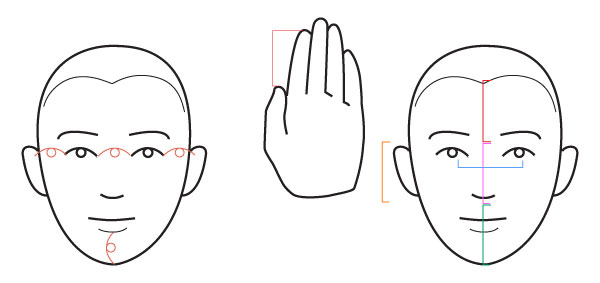
It's helpful to know in face anatomy drawing that the width of a face is generally five eyes or a little less. The distance between the eyes is equal to one eye. It's not uncommon for people to have eyes further apart or closer together, but we notice it when they do (wide-set eyes give a child-like, innocent impression, while close-set eyes inspire distrust for some reason). The distance between lower lip and chin is also the length of one eye.
Another measurement in facial anatomy drawing is the length of the index finger beyond the thumb. In the diagram below, all of the distances marked are equal to this length: height of the ear, hairline to brow, brow to nose, nose to chin, and pupil to pupil.
Seen in Profile
From the side, a head anatomy drawing is still shaped like an egg, but pointing towards the corner. The midlines now divide the head into front (face) and back (skull).
On the skull:
- The ear is just behind the central line. In size and vertical positioning, it still fits between the upper eyelid and the bottom of the nose.
- The depth of the skull varies between the two dotted lines shown in step 4.
On the face:
- The features are placed the same way as above.
- The hollow at the root of the nose either coincides with the midline or is slightly above it.
- The most prominent point in the brow is 1 point up from the midline.

2. Anatomy of a Face: Features
The Eyes and Eyebrows
The eye is simply two arcs forming an almond shape. There's no particular rule here because the eye shape can vary a great deal, but we can note the following tendencies:
- The outer corner of the eye can be higher than the inner, but not the reverse.
- If the eye is compared to an almond, the rounder part would be towards the inner corner, with the tapering part in the outer corner.

Details of the Eye
- At rest, the iris is partially hidden behind the upper lid. It only intersects the lower lid if looking down, or if the eye is narrowed so that the lower lid rises.
- The eyelashes sweep outward and are shorter on the lower lid (in fact, it's unnecessary to draw them most of the time).
- Whether to show the small oval of the tear duct in the inner corner and the thickness of the lower lid is a personal decision that depends on one's style. Too much detail doesn't necessarily look good; detail should certainly decrease with the scale of the drawing.
- The same goes for the fold of the eyelid, which also contributes to the facial expression and can make the eye look less alert. I find that when a drawing is too stylized, or so small that the fold can't be included without changing the expression, it's best to omit it.
In profile, the eye takes on the shape of an arrowhead (with the sides variously concave or convex), with a little hint of the upper eyelid and possibly of the lower as well. In real life, you wouldn't see the iris from the side; you'd only see a white eye. When I did that in my work, I received so many "this really looks weird" comments from readers that I had to start including at least a hint of the iris.
As for the eyebrow, the simplest way to draw it at rest is to make it follow the curve of the upper eyelid. Most of the eyebrow body is towards the inside, with the outer tail slightly or much shorter.
In profile, it changes shape completely and becomes comma-like. The comma appears to be the continuation of the eyelashes before curling back on itself to and over the eye—indeed, sometimes it looks connected to the eyelashes, so that you can draw in a single curve the upper line of the eye curling back to become the eyebrow.
The Nose
In head anatomy drawing, the nose is roughly wedge-shaped, a shape that's easier to visualize and draw in 3D before detailing it.
The bridge and sides of the nose are flat surfaces that may be only implied in the final face drawing, though it's important to put them down in the buildup sketch so that the detailed part of the nose is placed and sized correctly. This is the bottom flat side in our wedge, a truncated triangle connecting the wings and the tip of the nose.
The wings curl inwards into the septum, forming the nostrils. Note in the bottom view below how the lines that form the sides of the septum are at the fore and start from the face, not the other way around. The septum juts out lower than the wings when seen from the front, which also means that in three-quarter face view, the further nostril is hidden by it to a varying degree.

When you draw face anatomy, one of the trickiest parts about the nose may be deciding what lines to draw or to omit for a good-looking result! You don't always want the wings drawn fully, as they are in the side nose above.
Similarly, the front nose here shows all four lines for the bridge of the nose and where it connects with the face, but most of the time it looks much better if you only draw the bottom part, the wings/nostrils/septum (hide the lines with your fingers to see). If the nose is in three-quarter face view, however, it becomes almost essential to draw the further line of the bridge.
It takes a lot of observation and trial and error to arrive at your own "signature nose", and with this as with any tricky feature, I find it very useful to look at comic artists' work, observing their noses very closely, to see what decisions they have made for themselves. We'll look at this again next session when we cover the diversity of features in face anatomy drawing.

The Lips
Notes on the mouth and lips in face anatomy:
- The slit of the mouth should be drawn first as it's the longest and darkest of the three somewhat parallel lines forming the mouth. It is not a simple curve but a series of subtle curves. In the figure below, you can see an exaggerated example making the movements of the mouth line clear; note how they reflect the line of the upper lip. They can be softened in a number of ways: the central dip can be very narrow for a pointed look, or so broad its presence is attenuated—but it can even be reversed when the lower lip is fleshy, and that creates a slight, natural pout. If achieving symmetry in this line is challenging, try starting from the center and drawing it out one way, and then return and do the other side.
- The upper lip's two peaks are much more obvious, but they can similarly be softened into broad curves, even so softened that they blend into a "peakless" lip.
- The lower lip, on the other hand, is always a smooth curve, but it can range from nearly flat to generously rounded. It's always good to mark the lower lip, even with a mere dash.
- The upper lip is nearly always thinner than the lower, and it sticks out from the face less than the lower. If it's outlined, it should always be done more finely than the lower, because the lower lip's outline is emphasized by its shadow (as thin as it is!).
- From the side, the lips take on an arrowhead shape, and the jutting of the upper lip becomes clearly visible. So does the contrast between the profile shape of the two lips: flatter and diagonal for the upper; rounder for the lower.
- The slit of the mouth, from the side, slants down from the lips. Even if the person is smiling, it slants (or curves) down before rising again into the corners. Never slant the mouth straight up in profile.

The Ears
The most important part of the ear, for it to look right, is the tall "C" shape of its outer outline and the inverted "U" inside it that marks the rim of the upper ear. There's often a smaller "U" just above the lobe (feel it with your finger), connected to a smaller "C". The general effect is concentric around the ear hole (not as a rule visible) and varies a lot individually. This can be stylized—for instance, my generic ears (below) look somewhat like stretched @ symbols.
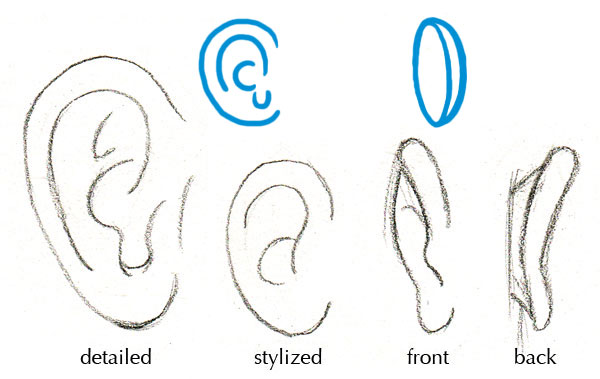
When the human face is seen from the front, the ear is in profile:
- The rim earlier outlined by the inverted "U" now stands out as a separate unit, as happens when you look at a dish from the side and suddenly see its bottom side as being in front of the inside.
- The lobe can also look almost drop-like, more distinct from the ear as a whole.
- How thin the ear is from this angle depends on how close it is set to the head, and that varies individually. However, it's always tilted slightly forward, as that's the direction we have evolved to listen from.
From the back, the ear looks detached from the head: a rim attached to the head by a funnel. Don't be shy about the size of the funnel; it needs to tilt the ears forward! It is more important than the rim from this angle.
Foreshortening
Being basically a ball where the features are mapped out on contour lines, the head anatomy drawing is easier to foreshorten than may be expected. However, it's more important than ever to observe it from various angles in real life to become familiar with the way the features jut out and sink in, overlapping each other in sometimes unexpected ways. The nose protrudes, of course, but so do the brow, the cheekbones, the central part of the mouth, and the chin, while the eye sockets and sides of the mouth are depressions on the surface of our ball.
When we drew the face straight on and in profile above, we were simplifying it into a flat, 2D surface where our face anatomy reference lines were straight. For any other angle, we need to shift our thinking to 3D and become aware that this egg shape is in fact really like an egg, and the lines we used earlier to locate the features curve all around it like the equator and latitudes on the globe: their circular nature is revealed when the egg is tilted.
Placing the features when you draw face anatomy, then, is simply a matter of drawing the crossing midlines under the desired angle—all three of them at once now. We can then divide the top and bottom half as before, creating slices in the egg, bearing in mind that the slices closest to us will look thicker. The process is the same whether you want to draw the anatomy of a face looking down or up.
Facial Anatomy Drawing: Looking Down
- In human face anatomy, all the features curve up and the ear moves up.
- Because the nose juts out, it oversteps its line (see figure) and the tip looks much closer to the mouth—if the face turns down enough, the nose will squarely overlap the mouth. Seen from this angle, the nose displays no details at all, just the wedge with a hint of wings.
- The curve of the eyebrows is flattened, though it takes extreme perspective to make them curve the other way.
- In the eyes, the upper lid becomes much more prominent and quickly changes its usual curve to cover the orb of the eye.
- The upper lip almost disappears, and the lower one appears larger.
- Note that because the mouth follows the general curve, it appears to be smiling, so a tweaking of reality may be needed to adjust the expression (if desired).

Facial Anatomy Drawing: Looking Up
- All the features curve down, and the ear moves down accordingly.
- The upper lip displays its full surface, which normally doesn't face the observer. The mouth now seems to be pouting!
- The eyebrow gains more curve, but the lower eyelid curves down, producing the effect of narrowed eyes.
- The bottom of the nose is displayed clearly, with both nostrils unhindered.

Face Anatomy: Turning Sideways
- When someone is seen in a three-quarter face view from the back, all that is visible are the jutting points of the brow and cheekbone. The line of the neck overlaps that of the chin as it points to the ear. The eyelash is next to come into view as the face turns.
- Then part of the eyebrow appears, and the protrusion of the lower eyelid as the tip of the nose emerges from behind the curve of the cheek.
- In near-profile, the eyeball and lips appear (but the slit of the mouth is still very small), and the line of the neck merges with the line of the chin into one curve. You can still see part of the curve of the cheek hiding the nostril.

Practice Time
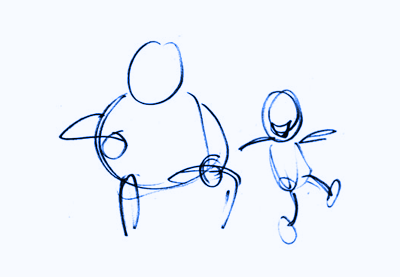
Apply the same method of quick sketching practiced for the body (see Learning to See and Draw Energy) to the anatomy of the face, roughly capturing your impression of faces you observe around you in a coffee shop or on the street.
Don't worry about detailing the features or getting things right—just do a lot of these from a lot of angles so they enter your system. The important thing is to first nail the basics of drawing faces. It's practice that makes perfect when learning how to draw people.

If you find visualizing and drawing the 3D "egg" challenging, take an actual egg (you may want to hard boil it first, just in case!). Put the basics of drawing faces to the test and draw the three midlines running all around it, and add the other divisions so that they also go all around. Observe and sketch the egg from various angles with its contour lines; this is an excellent way to get a feel for how the lines and distances behave in perspective. You can then place the features on their respective marks and observe how they move around as the egg is rotated.
Learn More About Human Face Drawing and Other Anatomy
Already a human face anatomy expert? Mastered the basics of drawing faces and want to get to the next level?
Look for graphic assets on Envato Elements to get a head start for your next drawing project. You can also learn more about drawing with these tutorials.


 By
By


